User’s Manual Model: M8a For Technical Assistance, please call (800) 638-3600, or visit www.magnadyne.
Congratulations on your purchase of a quality Marksman automotive security and remote start system. Marksman security products have been designed to provide the consumer with a technologically superior product with years of trouble free operation. The information enclosed will provide a ready reference of the operation and maintenance of your new Marksman security and remote start system.
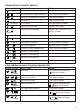
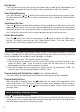
Standard Remote Transmitter Operation Transmitter Button System Function Remark Lock Doors & Arm System Arm and Delete the 2 Stage Shock Sensor (3 Second) Press Twice within 3 Seconds Arm System and Hidden Alarm Function Press within 3 Seconds Car Locator When System is Armed Panic Function Press and Hold for 3 seconds + Silent Arming / Disarming Ignition in "Off" Position + Active Anti-Car Jacking Mode Ignition in "On" Position Press and Hold for 2 seconds (2 Second) Unlock Doors & Disarm
Note: The factory default setting at “Power Save Mode”, before operation the 2-way LED remote control transmitter, press the button first, within 3 seconds press and hold the button for 3 seconds, with two beeping sound to indicate exit the “Power Save Mode” and all remote transmitter is on function. Power Save Mode The power save mode allows you to temporarily bypass all remote transmitter functions.
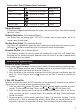
Chirp Indicators Parking Lights Chirp Function Chirp Function 1 Chirp System is Armed 1 Flash System is Armed 2 Chirps System is Disarmed 2 Flashes System is Disarmed 3 Chirps Door Ajar Warning 3 Flashes Disarmed/Triggered 4 Chirps Disarm/Triggered 12 Flashes Car Locator 6 Chirps Car Locator Constant On Under Remote Start Alarm Operating Condition Siren/Horn Parking Light LED Doors Starter 1. Arming 1 or 3 Chirps 1 Flash Slow Flash Locking Disabled 2.
Ajar Warning: If the siren sounds 3 chirps, then you have left a door, trunk, or hood lid ajar (Depending on how your system is programmed, you will hear the chirps immediately or within 30 seconds). Silent Arming/Disarming: Press the transmitter and button at the same time to arm or disarm your security system. No chirp sound will be heard, arm / disarm confirmation will be through the vehicles parking lights only.
Actions of the 2-Way LED Remote Control Transceiver LED Melody Sound Disarm LED turns on for 2 seconds 2 Chirps Hood / Trunk Trigger LED flash for 15 seconds 4 Chirps Door Trigger LED flash for 15 seconds 4 Chirps Shock Sensor Trigger LED flash for 15 seconds 4 Chirps Ignition Trigger LED flash for 15 seconds 4 Chirps Tamper Disarming: If the alarm is triggered upon disarming the system, the siren will chirp 4 times and the parking light flash 3 times.
Disarming without a Transmitter The override function may be used if the remote transmitter is lost or inoperative. 1. Enter the vehicle and turn the ignition switch to the “ON” position (alarm will sound). 2. Within 10 seconds push and release the valet switch. The alarm will stop sounding and enter the disarm mode. You can now start and operate the vehicle normally.
Panic Function (Also See Installation Manual) The transmitter can be used as a remote panic switch to manually trigger the alarm in case of emergency: 1. Press and hold the button for 3 seconds. The alarm will immediately sound. 2. During panic mode, the normal function of this transmitter button will be suspended. The transmitter and buttons can be used to lock and unlock the door (if the option is installed).
Anti-Car Jacking Warning: If you don't require the anti-car jacking function in this alarm system, be sure that it is set to “OFF”. The default setting for anti-car jacking is “OFF” (See Installation Guide). Active Anti-Car Jacking: 1. Press and hold the transmitter and button at the same time for 2 seconds while the vehicle’s ignition is ON. The parking lights will turns on for 1.5 seconds to indicate the system has entered the anti-car jacking mode. 2.
System Status Check (For 2-Way Transceiver Operation Only) Press the button twice to check the system’s present status through the 2-way transceiver, then within 3 seconds press the (C) button. One melody sound and all the system’s present status will immediately displayed on the LED.
Dome Light Convenience Delay and Supervision The alarm has a unique feature which will turn on your vehicle dome light as follows: 1. Upon disarming, the interior light will remain on for 30 seconds. 2. If the vehicle is intruded, the interior light will flash for the same duration as the siren. Note: To turn off the dome light, turn on the ignition switch or arm the alarm.
REMOTE START OPERATION To Remote Start the Vehicle 1. Press the button twice on the transmitter. 2. The parking lights will be activated, indicating the remote start received the signal. 3. The engine will start approximately 5 seconds. 4. Once the engine is running, after a couple seconds the parking light will turn on again and climate controls will activate and adjust the vehicles interior temperature to your preset setting. 5. The vehicle will run for a 5 to 30 minute cycle and automatically shut down.
Turbo Timer Mode (Also See Installation Manual) Turbo Timer Mode keeps the engine running after arriving at you destination for a programmable time period of 1, 3 or 5 minutes. This allows the system’s time to conveniently cool down the turbo after you have left the vehicle. To Activate: 1. While the engine is running, set the emergency brake and place the transmission to "Park". 2. Before turning off the engine, press and release and buttons at the same time.
To Turn Off the Remote Start To stop the engine that is running by remote start: 1. Press the button twice on the remote transmitter in the Remote Start Mode. 2. Move the optional remote start enable toggle switch to the “OFF” position (if installed). 3. Press the brake pedal. The vehicle will shut down and turn off the parking lights indicating the engine has stopped.
Transmitter Battery Replacement Regular Remote Transmitter: If the range of your transmitter deteriorates, it is possible that the battery needs to be replaced. 1. Remove upper transmitter case. 2. Remove old battery. 3. Install two new CR2016 battery (3 volt), noting the (+) and (-) marks. 4. Replace upper transmitter case with care, trying not to damage the inside components.
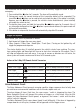
REPLACEMENT PARTS AND ACCESSORIES TRANSMITTERS BATTERIES DESCRIPTION MODEL NO. PRICE 2-Way LED Remote Transceiver M8ARF-LED $89.95 ea. Remote Transmitter M5ARF $46.96 ea.
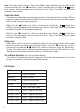
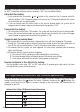
PARTS AND ACCESSORIES ORDER FORM Credit Card or Money Order Only (Sorry No Cash, C.O.D. or personal checks accepted) Call: (310) 884-7777 Fax: (310) 637-9542 Mail to: Magnadyne Corporation ATTN: Consumer Parts Sales P.O. Box 5365 Carson, CA 90749-5365 SHIP TO: (No P.O. Boxes) LAST NAME FIRST NAME INITIAL STREET ADDRESS ADDITIONAL ADDRESS ADDITIONAL ADDRESS CITY STATE ZIP CODE DAY TIME PHONE NUMBER CREDIT CARD INFORMATION VISA MC CREDIT CARD N0.
LIMITED LIFETIME WARRANTY Magnadyne Corporation or its authorized agents will, for the life of the vehicle and to the original purchaser, repair, replace or refund the retail sales price of said product or any part thereof, at the option of the Magnadyne Corporation or its authorized agents, if said product or part is found defective in materials or workmanship, when properly connected and operating on the correct power requirements designated for the specific product.
© Copyright 2004 Magnadyne Corporation M8A-UM 12-18-03 Rev.