MV-DVD-PL2-UM.qxp 2/10/06 15:13 Page 1 Compact Mobile DVD Player Owner's Manual Model: MV-DVD-PL2 For operational or technical assistance, after reading this manual, please call us toll free at (800) 638-3600 or visit www.magnadyne.com.
MV-DVD-PL2-UM.qxp 2/10/06 15:13 Page 2 Contents Safety Information . . . . . . . . . . . . . . . . 2-3 Remote Control . . . . . . . . . . . . . . . . . . . . 9 Features . . . . . . . . . . . . . . . . . . . . . . . . . . 3 Remote Control Functions . . . . . . . . . . . 10 Disc Handling Notes . . . . . . . . . . . . . . . . 4 Basic Operations. . . . . . . . . . . . . . . . 11-14 Installation . . . . . . . . . . . . . . . . . . . . . . . . 5 System Setup . . . . . . . . . . . . . . . . . .
MV-DVD-PL2-UM.qxp 2/10/06 15:13 Page 3 Using this Product Safely Operation Before installation and use of this DVD player, please read this manual completely. Proper Power Supply This product is designed to operate with a 12 Volt DC, negative ground battery system. Driving Be aware of road and traffic conditions, keep the volume at a low level. Protecting the Disc Mechanism Avoid inserting any foreign objects into the slot of this player.
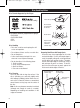
MV-DVD-PL2-UM.qxp 2/10/06 15:13 Page 4 Disc Handling Notes Disc Formats Supported by this Player: Label side up V I D E O (Single-sided disc only) Do not touch the underside of the disc Discs which cannot be played with this player: • DVD-ROM • DVD-R/DVD-RAM • CDV • CD-G Disc Handling • Dirt, dust, scratches and warping disc will cause non operation. • Do not place stickers on disc or scratch disc. • Do not warp discs. • A disc should always be kept in its case when not in use to prevent damage.
MV-DVD-PL2-UM.qxp 2/10/06 15:13 Page 5 Installation Notes: • With the screws provided, attach the brackets on both sides of unit as shown in the illustration below. • Install the unit as a floor mount or underdash mount with the screws provided.
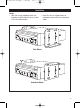
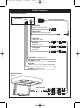
MV-DVD-PL2-UM.qxp 2/10/06 15:13 Page 6 Electric Connection Connecting to a Monitor MV-DVD-PL2 External Infrared Sensor POWER Orange RCA Digital Coaxial Audio Out Black 3.
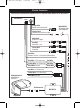
MV-DVD-PL2-UM.qxp 2/10/06 15:13 Page 7 Electric Connection Connecting to a MovieVision System that uses a Separate Power Module as the Only Source MV-DVD-PL2 POWER Orange RCA Digital Coaxial Audio Out Black 3.
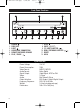
MV-DVD-PL2-UM.qxp 2/10/06 15:13 Page 8 Front Panel Functions 1 12 1. 2. 3. 4. 5. 6. 2 11 10 9 POWER DISC SLOT EJECT HEADPHONE CONNECTION REMOTE INFRARED SENSOR PLAY / PAUSE 3 8 7 7. 8. 9. 10. 11. 12.
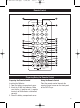
MV-DVD-PL2-UM.qxp 2/10/06 15:13 Page 9 Remote Control 12 1 POWER MENU/PBC TITLE 13 2 3 1 2 3 4 5 6 7 8 10/0 10+ 9 4 14 CLEAR 6 15 16 5 DISPLAY SUBTITLE SLOW PROGRAM MUTE REPEAT 7 17 18 AUDIO ANGLE 8 19 20 CH+ ZOOM SETUP 9 21 ENTER 22 CH 10 23 24 DVD/TV/GAME 11 V O L 25 RC-PL4 Preparing/Using the Remote Control Preparing the Remote Control Inserting the Batteries: 1. Open the battery compartment cover. 2. Insert the 2 AAA size batteries.
MV-DVD-PL2-UM.qxp 2/10/06 15:13 Page 10 Remote Control Functions 1. MENU/PBC: Selects scenes available on the disc. 2. POWER: Turns the unit "On" or "Off". 3. NUMBER: Numeric buttons used to enter number of desired track. 4. SUBTITLE: Changes the subtitle language on multi-subtitle language discs. 5. DISPLAY: Displays statistical disc information during playback. 6. AUDIO: Changes the language on multi-language discs. 7. ANGLE: Changes the view angle on multi-angle discs. 8.
MV-DVD-PL2-UM.qxp 2/10/06 15:13 Page 11 Basic Operations Loading a Disc 1. Turn the car ignition "On" to the accessory position. 2. Press the POWER button. 3. Insert the disc with printed side facing up into the disc slot. 4. The disc will then load, and disc playback will start automatically. Ejecting a Disc Press the EJECT button to eject the disc from the DVD player (remove the disc or it will reload automatically). Push EJECT again to reload the disc.
MV-DVD-PL2-UM.qxp 2/10/06 15:13 Page 12 Basic Operations Stopping Play While the disc is playing, push the STOP button to stop play temporarily. Press PLAY/PAUSE to resume play at the point play was interrupted, or press the STOP button again to completely stop disk playback. Press PLAY/PAUSE to start playback from the beginning of disc. Scene Selection With the DVD in playback mode, follow these steps: 1. Push MENU/PBC. The different scenes available on the disc will be displayed.
MV-DVD-PL2-UM.qxp 2/10/06 15:13 Page 13 Basic Operations Repeat Play While a disc is playing, continue pushing REPEAT to select from three repeat modes. For DVD discs: Push REPEAT to repeat Chapter. Push REPEAT again to repeat Title. Push REPEAT again to repeat All. Push REPEAT once more to Exit. For CD discs: Push REPEAT to repeat Track. Push REPEAT again to repeat All. Push REPEAT once more to Exit. Zoom While playing a disc, press the ZOOM button to increase or decrease the screen image.
MV-DVD-PL2-UM.qxp 2/10/06 15:13 Page 14 Basic Operations Display Disc Playing Time Continuously pressing the DISPLAY button during playback will sequentially display: Title Elapsed, Title Remain, Chapter Elapsed, Chapter Remain, and Display Off. Note: The information displayed is subject to the type of the disc playing.
MV-DVD-PL2-UM.qxp 2/10/06 15:13 Page 15 System Setup Press the SETUP button to display the System Setup Menu. SELECTION buttons to navUse the igate through the menu: General Setup Page, Audio Setup Page, Video Setup Page, and Password Setup Page. Confirm your selection by pressing the ENTER button. SELECIn the submenus, use the TION buttons to make your selection. Confirm your selection by pressing the ENTER button. To navigate up and down use the SELECTION buttons.
MV-DVD-PL2-UM.qxp 2/10/06 15:13 Page 16 System Setup Set Last Memory Function The DVD player can identify the last format of the disc being used to store the last frame shown in its memory prior to unit being powered off. This function memorizes the point at which the disc was stopped. The disc can be removed from the unit. Then if the same disc is loaded again, play will resume from the point at which it was stopped, providing that no other disc of the same format was loaded in the interim.
MV-DVD-PL2-UM.qxp 2/10/06 15:13 Page 17 System Setup Video Quality Settings Press the SETUP button to enter the General Setup Page. Navigate to the Video Setup Page using the SELECTION buttons and press the ENTER button to select Color Setting. Press then use the SELECTION buttons to select between: Sharpness, Brightness, Contrast, Gamma, Hue, Saturation, and Luma Delay. Press to select the submenu. Then use the SELECTION buttons to adjust setting. Press ENTER to confirm setting.
MV-DVD-PL2-UM.qxp 2/10/06 15:13 Page 18 Troubleshooting Only qualified service personnel should remove the cover or service this player. Otherwise the warranty will become invalid. No Sound: • Check audio connections. • If using a Hi-Fi amplifier, try another sound source. If it appears that your DVD unit is faulty, first consult the list below. Disc Does Not Play: • Ensure the disc label is facing upwards. • Clean the disc. • Check to see if the disc is defective by trying another disc.
MV-DVD-PL2-UM.qxp 2/10/06 15:13 Page 19 Replacement Parts Order Form Send Orders To: Magnadyne Corporation ATTN: Consumer Parts Sales P. O. Box 5365 Carson, CA 90749-5365 We Accept Checks, Money Orders, Visa and Master Card Make Checks Payable to: Magnadyne Corporation SHIP TO: (No P.O.
MV-DVD-PL2-UM.qxp 2/10/06 15:13 Page 20 MovieVision Replacement Parts POWER MENU/PBC TITLE 1 2 3 4 5 6 7 8 DESCRIPTION MODEL # PRICE DVD Remote Control RC-PL4 $39.