GB F D I NL E P DK S N SF GR Router Electronic Router Instruction Manual Défonceuse Défonceuse électronique Manuel d’instructions Oberfräse Elektronische Oberfräse Betriebsanleitung Fresa Fresa elettronica Istruzioni per l’uso Bovenfrees Elektronische bovenfrees Gebruiksaanwijzing Máquina para fresar Máquina para fresar electrónica Manual de instrucciones Fresadora Fresadora electrónica Manual de instruções Overfræser Elektronisk overfræser Brugsanvisning Handöverfräs Elektronisk handöverf
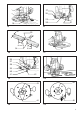
1 4 6 7 8 2 5 3 10 9 11 1 2 12 13 17 14 15 16 3 4 20 18 19 5 6 22 23 21 23 22 24 25 7 2
27 28 29 30 26 8 31 9 32 33 55 mm 34 35 55 mm 10 11 36 37 38 39 40 41 42 12 14 13 43 45 44 46 15 3
7 51 48 49 50 52 16 17 52 52 53 18 19 54 55 20 21 57 58 56 22 4 23
Symbols The following show the symbols used for the machine. Be sure that you understand their meaning before use. Symboles Nous donnons ci-dessous les symboles utilisés pour l’outil. Assurez-vous que vous en avez bien compris la signification avant d’utiliser l’outil. Symbole Die folgenden Symbole werden für die Maschine verwendet. Machen Sie sich vor der Benutzung unbedingt mit ihrer Bedeutung vertraut. Symboli Per questo utensile vengono usati i simboli seguenti.
ENGLISH 1 2 3 4 5 6 7 8 9 10 11 12 13 14 15 16 17 18 19 20 Wrench Router bit Shaft lock Tighten Loosen Nylon nut Stopper pole Fast-feed button Lock lever Adjusting hex bolt Stopper Stopper pole Chip deflector Adjusting hex bolt Hex nut Stopper Switch lever Lock-off button Switch trigger Speed change knob Explanation of general view 21 22 23 24 25 26 27 28 29 30 31 32 33 34 35 36 37 38 39 Workpiece Bit revolving direction Feed direction View from the top of the tool Correct bit feed direction Straight gui
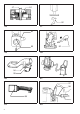
15. Do not smear the tool base carelessly with thinner, gasoline, oil or the like. They may cause cracks in the tool base. 16. Draw attention to the need to use cutters of the correct shank diameter and which are suitable for the speed of the tool. SAVE THESE INSTRUCTIONS. OPERATING INSTRUCTIONS Installing or removing the router bit (Fig. 1) Important: Always be sure that the tool is switched off and unplugged from the supply outlet before installing or removing the router bit.
Straight guide Dust extraction When using the straight guide, be sure to install it on the right side in the feed direction. (Fig. 8) Install the straight guide on the guide holder with the wing bolt (B). Insert the guide holder into the holes in the tool base and tighten the wing bolt (A). To adjust the distance between the bit and the straight guide, loosen the wing bolt (B) and turn the fine adjusting screw (1.5 mm per turn). (Fig.
NEDERLANDS 1 2 3 4 5 6 7 8 9 10 11 12 13 14 15 16 17 18 19 20 Sleutel Freesbit Asvergrendeling Vastzetten Loszetten Nylonmoer Aanslagnok Sneltoevoerknop Grendel Zeskantstelbout Aanslag Aanslagnok Spaandeflector Zeskantstelbout Zeskantmoer Aanslag Schakelhendel Ontgrendelingsknop Trekkerschakelaar Toerentalregelaar Verklaring van algemene gegevens 21 22 23 24 25 26 27 28 29 30 31 32 33 34 35 36 37 38 39 Werkstuk Bitdraairichting Toevoerrichting Gezien vanaf de bovenkant van het gereedschap Juiste bittoevo
. Let op de draairichting van de frees en de freesrichting, of deze met elkaar overeenkomen. 11. Schakel altijd het gereedschap uit wanneer u tijdens het frezen weg moet. Schakel het gereedschap alleen in wanneer u het vast houdt. 12. Schakel altijd uit en wacht tot de frees helemaal tot stilstand is gekomen, alvorens het gereedschap van het werkstuk te verwijderen. 13. Raak de frees onmiddellijk na het gebruik niet aan. De frees is dan nog ontzettend heet en kan dus brandwonden veroorzaken. 14.
Werking (Fig. 7) Stofafzuiging Plaats het gereedschap op het werkstuk en schakel het in. Zet de grendel in de vrije stand en laat het gereedschap langzaam op het werkstuk zakken tot de vooringestelde freesdiepte is bereikt. Duw het gereedshap met beide handen vooruit. Bij het snijden van randen moet het werkstukoppervlak links van de bit zitten in de toevoerrichting zoals afgebeeld in Fig. 7. Voor gereedschap zonder borgplaat Gebruik de zuigkop voor stofafzuiging.