Cordless Impact Wrench Equipped with Electric Brake 12.7 mm (1/2”) MODEL 6911HD 12.7 mm (1/2”) MODEL 6 9 1 l H D W W i t h Fast Charger 12.7 mm (112”) MODEL 691lHDWG W i t h Fast Charger INSTRUCTION MANUAL Capacltles Square drive I Standard bolt M 8 - M 1 4 (5116’’ - 9/16’,) Impact per minute High tensile bolt M6 - M 1 2 1114” - 0 12.7 mm ( 1 1 2 ” ) 112”) - 2.500 IRPMI M a x . fastening torque lSee note 1 below) Dimens 10n s IL x W x HI Net weight 0 - 1,800 1 , 2 0 0 k g .
IMPORTANT SAFETY INSTRUCTIONS (For All Tools) WARNING: WHEN USING ELECTRIC TOOLS, BASIC SAFETY PRECAUTIONS SHOULD ALWAYS BE FOLLOWED TO REDUCE THE RISK OF FIRE, ELECTRIC SHOCK, AND PERSONAL INJURY, INCLUDING THE FOLLOWING: READ ALL INSTRUCTIONS. 1. KEEP WORK AREA CLEAN. Cluttered areas and benches invite injuries. 2. CONSIDER WORK AREA ENVIRONMENT. Don't use power tools in damp or wet locations. Keep work area well lit. Don't expose power tools t o rain.
14. REMOVE ADJUSTING KEYS AND WRENCHES. Form habit of checking t o see that keys and adjusting wrenches are removed from tool before turning it on. 15. AVOID UNINTENTIONAL STARTING. Don't carry tool with finger on switch. Be sure switch is OFF when plugging in. 16. EXTENSION CORDS. Make sure your extension cord is in good condition. When using an extension cord, be sure to use one heavy enough to carry the current your product will draw.
VOLTAGE WARNING: Before connecting the tool to a power source (receptacle. outlet, etc.) be sure the voltage supplied is the same as that specified on the nameplate of the tool. A power source with voltage greater than that specified for the tool can result in SERIOUS INJURY to the user - as well as damage to the tool. If in doubt, DO NOT PLUG IN THE TOOL. Using a power source with voltage less than the nameplate rating is harmful to the motor.
IMPORTANT SAFETY INSTRUCTIONS FOR CHARGER & BATTERY CARTRIDGE SAVE THESE INSTRUCTIONS - This manual contains important safety and operating instructions for battery charger. 2.Before using battery charger, read all instructions and cautionary markings on (1) battery charger, (21battery, and (3)product using battery. 3.CAUTION - To reduce risk of injury, charge only MAKITA Battery Cartridge 1200 & 1201.Other types of batteries may burst causing personal injury and damage. 4.
ADDITIONAL SAFETY RULES FOR CHARGER & BATTERY CARTRIDGE 1. Do not charge Battery Cartridge when temperature is BELOW 10°C (50OF) or ABOVE 4OoC (104OF). 2. Do not attempt to use a step-up transformer, an engine generator or DC power receptacle. 3. Do not allow anything t o cover or clog the charger vents. 4. Always cover the battery terminals with the battery cover when the battery cartridge is not used. 5. A battery short can cause a large current flow, overheating, possible burns and even a breakdown.
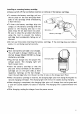
* T o remove the battery cartridge, pull out the set plate on the tool and grasp both sides of the cartridge while withdrawing it from the tool. *To insert the battery cartridge, align the tongue on the battery cartridge with the groove in the housing and slip it into place. Snap the set plate back into place. Be sure to close the set plate fully before using the tool to prevent the battery cartridge from accidentally falling out of the tool.
CAUTION : *The fast charger Model DC1201 is for charging Makita battery cartridge. Never use it for other purposes or for other manufacturer’s batteries. *When you charge a new battery cartridge or a battery cartridge which has not been used for a long period of time, it may not accept a full charge. This is a normal condition and does not indicate a problem. You can recharge the battery cartridge fully after discharging it completely and recharging a couple of times.
Switch action Tool speed is increased by increasing pressure on the trigger. To start the tool, simply pull the trigger Release the trigger t o stop. S w i t i h trigger I ', '\ CAUTION : Before inserting the battery cartridge into the tool, always check to see that the switch trigger actuates properly and returns t o the "OFF" position when released. Reversing switch action This tool has a reversing switch t o change the direction of rotation.
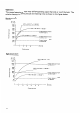
Operation The proper fastening torque may differ depending upon the kind or size of the bolt. The relation between fastening torque and fastening time is shown in the figures below. Standard bolt ko . cm Ifi.
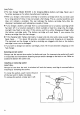
Hold the tool firmly and place the socket over the bot or nut. Turn the tool on and fasten for the proper fastening time. NOTE : 0 Hold the tool pointed straight a t the bolt or nut without applying excessive pressure on the tool. *Excessive fastening torque may damage the bolt or nut. Before starting your job, always perform a t e s t operation to verify the adequate fastening speed and time for your bolt or nut. The fastening torque is affected by a wide variety of factors including the following.
ACCESSORIES CAUTION: These accessories or attachments are recommended for use with your Makita tool specified in this manual. The use of any other accessories or attachments might present a risk of injury to persons. The accessories or attachments should be used only in the proper and intended manner. Socket 133216-3 22-42 133217-1 133218-9 133219-7 22 - 52 23 - 43 2 3 - 52 22 M14 M12 - 23 - - 9/16' Extension bar Universal joint Part No. 785201-8 Part No.
Bits Fast charger Size Part No. Model DC1201 Part No. 1 131 26-0 Phillips Battery cartridge 1 2 0 0 Part No. 192271-4 High capacity battery 1 2 0 1 Battery cover Part No. 192296-8 Part No. 414938-7 *Power display battery (High cap.) 1201A Bit adapter Part No. 192407-5 Part No. 785069-2 For driving machine screws Plastic carrying case Oval socket Part No. 785401-0 0 ring (Part No.
Apr-O5-'93 EN CORDLESS IMPACT WRENCH Model 6911HD Note: The switch and other part configurations may differ from country to country.
Apr-O5-'93 MODEL 6911HD $tD $cD DESCRIPTION M :i' EN DESCRIPTION ~ ~ 1 2 3 4 1 6 1 1 5 1 6 1 I 8 9 10 11 12 13 14 1 1 1 4 1 1 1 1 Name Plate Tapping Screw 0 1 4 x 2 0 Pan Head Screw M4x20 [With Washer1 Housing Set lWith llem 241 set Plate Switch Lever Switch Lever Hammer Care Tapping Screw MT4x2O 0 Ring 50 Flaf Washer 18 Anvil 15 16 17 18 19 20 21 22 23 24 26 21 28 29 1 1 2 1 1 1 1 1 1 1 1 1 Steel Ball 3 5 Flaf Washer 28 Compression Spring 30 Steel Ball 5 6 Spindle DC Motor 12 V Plane
Recycling the Battery The only way to dispose of a Makita battery is to recycle it. The law prohibits any other method of disposal. 1 Ni-Cd I To recycle the battery: 1. Remove the battery from the tool. 2. a). Take the battery to your nearest Makita Factory Service Center or b). Take the battery to your nearest Makita Authorized Service Center or Distributor that has been designated as a Makita battery recycling location.