
Instructions


10 ENGLISH
CAUTION: Pressing excessively on the tool
will not speed up the drilling. In fact, this excessive
pressure will only serve to damage the tip of your drill
bit,decreasethetoolperformanceandshortenthe
service life of the tool.
CAUTION: Hold the tool rmly and exert care
when the drill bit begins to break through the
workpiece.Thereisatremendousforceexertedon
thetool/drillbitatthetimeofholebreakthrough.
CAUTION: A stuck drill bit can be removed
simply by setting the reversing switch to reverse
rotation in order to back out. However, the tool
may back out abruptly if you do not hold it rmly.
CAUTION: Always secure small workpieces
in a vise or similar hold-down device.
CAUTION: If the tool is operated continuously
until the battery cartridge has discharged, allow
the tool to rest for 15 minutes before proceeding
with a fresh battery.
MAINTENANCE
CAUTION: Always be sure that the tool is
switched off and the battery cartridge is removed
before attempting to perform inspection or
maintenance.
NOTICE: Never use gasoline, benzine, thinner,
alcohol or the like. Discoloration, deformation or
cracks may result.
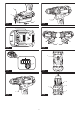
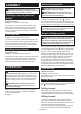
Replacing carbon brushes
►Fig.15: 1. Limit mark
Checkthecarbonbrushesregularly.
Replace them when they wear down to the limit mark.
Keepthecarbonbrushescleanandfreetoslipinthe
holders.Bothcarbonbrushesshouldbereplacedatthe
sametime.Useonlyidenticalcarbonbrushes.
1. Use a screwdriver to remove two screws then
remove the rear cover.
►Fig.16: 1. Rear cover 2. Screw
2. Raise the arm part of the spring and then place
itintherecessedpartofthehousingwithaslottedbit
screwdriver of slender shaft or the like.
►Fig.17: 1. Recessed part 2. Spring 3.Arm
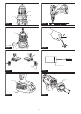
3. Useplierstoremovethecarbonbrushcapsof
thecarbonbrushes.Takeouttheworncarbonbrushes,
insertthenewonesandreplacethecarbonbrushcaps
in reverse.
►Fig.18: 1.Carbonbrushcap
4. Make sure to place the lead wire in opposite side
of the arm.
►Fig.19: 1. Lead wire 2.Carbonbrushcap
5. Makesurethatthecarbonbrushcapshavetinto
theholesinbrushholderssecurely.
►Fig.20: 1. Hole 2.Carbonbrushcap
6. Reinstall the rear cover and tighten two screws
securely.
7. Insertthebatterycartridgeintothetoolandbreak
inbrushesbyrunningtoolwithnoloadforabout1
minute.
8. Checkthetoolwhilerunningandelectricbrake
operation when releasing the switch trigger. If electric
brakeisnotworkingwell,askMakitaAuthorizedor
Factory Service Centers for repair.
TomaintainproductSAFETYandRELIABILITY,
repairs,anyothermaintenanceoradjustmentshould
beperformedbyMakitaAuthorizedorFactoryService
Centers, always using Makita replacement parts.
OPTIONAL
ACCESSORIES
CAUTION: These accessories or attachments
are recommended for use with your Makita tool
specied in this manual.Theuseofanyother
accessories or attachments might present a risk of
injurytopersons.Onlyuseaccessoryorattachment
for its stated purpose.
If you need any assistance for more details regard-
ing these accessories, ask your local Makita Service
Center.
• Drillbits
• Driverbits
• Tungsten-carbidetippeddrillbit
• Blow-outbulb
• Driverbitholder
• Hook
• Makitagenuinebatteryandcharger
NOTE:Someitemsinthelistmaybeincludedinthe
toolpackageasstandardaccessories.Theymay
differ from country to country.