
Instructions


8 ENGLISH
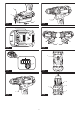
Reversing switch action
►Fig.6: 1. Reversing switch lever
CAUTION: Always check the direction of
rotation before operation.
CAUTION: Use the reversing switch only after
the tool comes to a complete stop. Changing the
directionofrotationbeforethetoolstopsmaydam-
age the tool.
CAUTION: When not operating the tool,
always set the reversing switch lever to the neu-
tral position.
Thistoolhasareversingswitchtochangethedirection
of rotation. Depress the reversing switch lever from the
AsideforclockwiserotationorfromtheBsideforcoun-
terclockwise rotation.
When the reversing switch lever is in the neutral posi-
tion,theswitchtriggercannotbepulled.
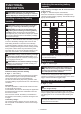
Speed change
►Fig.7: 1. Speed change lever
CAUTION: Always set the speed change lever
fully to the correct position. If you operate the
tool with the speed change lever positioned halfway
betweenthe"1"sideand"2"side,thetoolmaybe
damaged.
CAUTION: Do not use the speed change lever
while the tool is running.Thetoolmaybedamaged.
Position of
speed
change lever
Speed Torque Applicable
operation
1 Low High Heavy load-
ing operation
2 High Low Light loading
operation
Tochangethespeed,switchoffthetoolrst.Select
the"2"sideforhighspeedor"1"forlowspeedbuthigh
torque. Be sure that the speed change lever is set to the
correctpositionbeforeoperation.
If the tool speed is coming down extremely during the
operationwith"2",slidethelevertothe"1"andrestart
the operation.
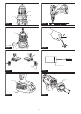
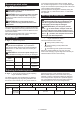
Selecting the action mode
CAUTION: Always set the ring correctly to
your desired mode mark. If you operate the tool
with the ring positioned halfway between the
mode marks, the tool may be damaged.
CAUTION: When you change the position
from " " to other modes, it may be a little dif-
culty to slide the action mode changing ring. In
this case, switch on and run the tool for a second
at the " " position, then stop the tool and slide
the ring to your desired position.
►Fig.8: 1.Actionmodechangingring2.Adjusting
ring 3. Graduation 4.Arrow
Thistoolhasthreeactionmodes.
•
Drilling mode (rotation only)
•
Hammer drilling mode (rotation with
hammering)
•
Screwdriving mode (rotation with clutch)
Selectonemodesuitableforyourwork.Turnthe
action mode changing ring and align the mark that you
selectedwiththearrowonthetoolbody.
Adjusting the fastening torque
►Fig.9: 1.Actionmodechangingring2.Adjusting
ring 3. Graduation 4.Arrow
Thefasteningtorquecanbeadjustedin21stepsby
turningtheadjustingring.Alignthegraduationswith
thearrowonthetoolbody.Youcangettheminimum
fastening torque at 1 and maximum torque at 21.
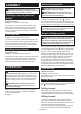
Before actual operation, drive a trial screw into your
material or a piece of duplicate material to determine
which torque level is required for a particular applica-
tion.Thefollowingshowstheroughguideoftherela-
tionshipbetweenthescrewsizeandgraduation.
Graduation 1 2 3 4 5 6 7 8 9 10 11 12 13 14 15 16 17 18 19 20 21
Machine screw M4 M5 M6
Wood
screw
Soft wood
(e.g. pine)
– ɸ3.5 x 22 ɸ4.1x 38 –
Hard wood
(e.g. lauan)
– ɸ3.5 x 22 ɸ4.1x 38 –