
Use and Care Manual


10 ENGLISH
Operation
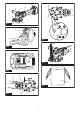
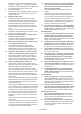
► Fig.5: 1. Guide 2. Rebar
► Fig.6: 1. Rebar 2. Guide
1. Screw the Handle into threaded hole at the vertical
or parallel position for easier operation.
2. Ensure that the Switch is at “O” position.
CAUTION: As a safety function of this tool,
the Motor cannot be energised when the battery is
inserted with the Switch at “l” position. For fur-
ther safety, please note that the battery should be
inserted with the Switch at “O” position.
3. Insert the battery into the tool.
4. Slide the Switch to “l” position. The motor is on.
Then push down on the forward end of the Switch to
lock it for operating continuously.
WARNING: Do not touch the rotating parts as
they can cause serious injury.
5. Position the Guide in the opening against the
rebar.
Then push the tool forward slowly to start to cut
the rebar.
CAUTION: When cutting, both at the begin-
ning and near the end, slow down the tool’s for-
ward (cutting) movement. A fast cutting action, at
these times, will damage the Tipped Saw blades
andcancauseinjuryfromyingdebris.
CAUTION: Holdthetoolrmlysothatitdoes
not shake when cutting. Cutting with the tool
shaking will shorten the life of the Tipped Saw and
damage the blades.
CAUTION: Position the tool so it is at 90
degrees to rebar to be cut. If the tool is not at 90
degrees to the rebar, it can cause shaking and
overload the tool.
CAUTION: Do not start cutting immediately
after the motor is switched on. Allow the Tipped
Saw to reach full speed before beginning to cut.
CAUTION: Do not remove the battery when
the motor is switched on. Doing so can cause
damage to the motor’s electronics.
6. After nishing the cut, push down on the rear end
of the Switch which will cause the Switch to move to the
“O” position and turn off the motor.
CAUTION: This tool is designed to cut rebar.
Please contact the manufacturer or your local
dealer if you want to cut other materials. Cutting
other materials will damage the Tipped Saw
blades.
Caution when cutting
1. Ensure that the Tipped Saw blade is well away
from the material to be cut before switching on.
2. Slow down the forward (cutting) movement of the
tool when approaching the end of the cut. This is espe-
cially important when the piece to be cut is less than 50
mm in length. The piece cut off can strike the Tipped
Saw blades, damaging them and cause serious injury.
3. When the Tipped Saw blades become blunt or
chipped. replace the blade. Continuing to use it in this
condition will overload the tool.
4. If the material moves or shakes, when being cut,
stop the operation and properly secure the material.
5. Do not hold by hand the material to be cut. Doing
so may result in personal injury.
6. Do not cut rebar that in size or hardness exceeds
the cutting capacity of the tool.
Replace the Tipped Saw when any
of the below occurs
1. Warning Lamp (red) blinks frequently even though
the battery is fully charged.
2. The Tipped Saw blades are chipped or worn.
3. The cutting speed is very slow.
4. The surface of the cut piece is discolored by heat.
NOTE: Tipped Saw blades cannot be resharpened.
HowtottheDustBag
► Fig.7: 1. Dust Bag
1. Place the open end of the Dust Bag over the Dust
Bag Holder and secure in place with the draw strings.
2. Give the bag a sharp tug to ensure it is properly
secured.
CAUTION: The Dust Bag is made from non-
ammablematerialbutveryhotdebris,suchas
that produced when cutting with a worn Tipped
Saw blade, can melt the material. Be aware of this
possibility when using the Dust Bag.
Battery Indicator function
► Fig.8: 1. Battery Indicator
When you turn the tool on, the battery indicator shows
the remaining battery capacity. (see table 1)