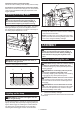
INSTRUCTION MANUAL MANUAL DE INSTRUCCIONES Cordless Finish Nailer Clavadora de Acabado Inalámbrica XNB02 IMPORTANT: Read Before Using. IMPORTANTE: Lea antes de usar.
ENGLISH (Original instructions) SPECIFICATIONS Model: XNB02 Nail size 16Ga x 25 / 30 / 32 / 35 / 38 / 40 / 45 / 50 / 57 / 60 / 64 mm (16Ga x 1″ / 1-3/16″ / 1-1/4″ / 1-3/8″ / 1-1/2″ / 1-9/16″ / 1-3/4″ / 2″ / 2-1/4″ / 2-3/8″ / 2-1/2″) Magazine capacity 100 pcs. Dimensions without hook (L x W x H) (when using BL1840B battery) 296 x 108 x 318 mm (11-5/8 x 4-1/4 x 12-1/2″) Rated voltage D.C. 18 V Net weight • • • 3.4 - 3.8 kg (7.5- 8.
2. 3. 4. 5. 6. 7. 8. 9. Use personal protective equipment. Always wear eye protection. Protective equipment such as dust mask, non-skid safety shoes, hard hat, or hearing protection used for appropriate conditions will reduce personal injuries. Prevent unintentional starting. Ensure the switch is in the off-position before connecting to power source and/or BATTERY pack, picking up or carrying the tool.
3. Follow instruction for lubricating and changing accessories. 17. 18. Cordless nailer safety warnings 1. 2. 3. 4. 5. 6. 7. 8. 9. 10. 11. 12. 13. 14. 15. 16. Always assume that the tool contains fasteners. Careless handling of the nailer can result in unexpected firing of fasteners and personal injury. Do not point the tool towards yourself or anyone nearby. Unexpected triggering will discharge the fastener causing an injury.
. 6. 7. 8. 9. 10. 11. 12. Do not short the battery cartridge: (1) Do not touch the terminals with any conductive material. (2) Avoid storing battery cartridge in a container with other metal objects such as nails, coins, etc. (3) Do not expose battery cartridge to water or rain. A battery short can cause a large current flow, overheating, possible burns and even a breakdown. Do not store the tool and battery cartridge in locations where the temperature may reach or exceed 50 °C (122 °F).
Overload protection Indicator lamps When the tool/battery is operated in a manner that causes it to draw an abnormally high current, the tool automatically stops without any indication. In this situation, turn the tool off and stop the application that caused the tool to become overloaded. Then turn the tool on to restart. Lighted Remaining capacity Off Blinking Charge the battery. The battery may have malfunctioned.
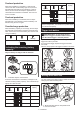
Intermittent nailing (sequential mode) This mode suits for driving a nail carefully and accurately. 1 Continuous/ intermittent nailing (continuous mode) When the tool is set to this mode, you can choose either continuous or intermittent nailing by sequences of the trigger operation. Adjusting the nailing depth WARNING: Always make sure that your fingers are not placed on the switch trigger or the contact element and the battery cartridge is removed before adjusting the depth of nailing.
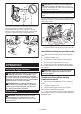
Nose adapter CAUTION: Always make sure that your fingers are not placed on the switch trigger or the contact element and the battery cartridge is removed before installing the nose adapter. When firing nails on the material with easily-marred surfaces, use the nose adapter. Put the nose adapter on the front end of the contact element. Make sure that the nose adapter completely covers the front end of the contact element as illustrated. 1 ► 1 . Pusher lever 3.
CAUTION: Do not drive nails on hard materials such as metal or the like. If the nail cannot penetrate the material, the nailer may be kicked back toward you and cause injury. NOTE: If you drive nails continuously for a long time, the exhaust air will get hot due to the heat from the motor. The tool employs two nailing actions: intermittent nailing (sequential mode) and continuous/intermittent nailing (continuous mode). 1 3 4 The hook is convenient for temporarily hanging the tool.
NOTE: This tool stops automatically under the following conditions: • When you release the switch trigger or contact element from workpiece before the tool finishes the operation completely. In this case, pull the trigger again until the tool turns into standby. • When keeping either pulling the switch trigger or placing the contact element about 5 seconds without another action. In this case, release the switch trigger or the contact element from workpiece to restart the operation.
NOTICE: Never use gasoline, benzine, thinner, alcohol or the like. Discoloration, deformation or cracks may result. To maintain product SAFETY and RELIABILITY, repairs, any other maintenance or adjustment should be performed by Makita Authorized or Factory Service Centers, always using Makita replacement parts. OPTIONAL ACCESSORIES CAUTION: These accessories or attachments are recommended for use with your Makita tool specified in this manual.
ESPAÑOL (Instrucciones originales) ESPECIFICACIONES Modelo: XNB02 Tamaño del clavo 16Ga x 25 / 30 / 32 / 35 / 38 / 40 / 45 / 50 / 57 / 60 / 64 mm (16Ga x 1″ / 1-3/16″ / 1-1/4″ / 1-3/8″ / 1-1/2″ / 1-9/16″ / 1-3/4″ / 2″ / 2-1/4″ / 2-3/8″ / 2-1/2″) Capacidad del cartucho 100 pzas. Dimensiones sin gancho (La x An x Al) (cuando se use la batería BL1840B) 296 mm x 108 mm x 318 mm (11-5/8″ x 4-1/4″ x 12-1/2″) Tensión nominal 18 V c.c.
5. 6. 7. piezas móviles. Los cables dañados o enredados aumentan el riesgo de sufrir una descarga eléctrica. Cuando utilice una herramienta eléctrica en exteriores, utilice un cable de extensión apropiado para uso en exteriores. La utilización de un cable apropiado para uso en exteriores reducirá el riesgo de que se produzca una descarga eléctrica.
9. Cuando vaya a utilizar esta herramienta, evite usar guantes de trabajo de tela ya que éstos podrían atorarse. Si los guantes de trabajo de tela llegaran a atorarse en las piezas móviles, esto podría ocasionar lesiones personales. 2. 3. Uso y cuidado de la herramienta a batería 1. Recargue sólo con el cargador especificado por el fabricante. Un cargador que es adecuado para un solo tipo de batería puede generar riesgo de incendio al ser utilizado con otra batería. 2.
16. 17. 18. 19. 20. 21. 22. No intente manipular indebidamente la herramienta ni procure usarla para otro fin que no sea clavar clavos. No opere la herramienta sin clavos. Esto acortará la vida útil de la herramienta. Detenga las operaciones de clavado de inmediato si nota algo malo o fuera de lo común con la herramienta. Nunca clave en materiales que puedan ser perforados por el clavo y donde pueda salir volando como un proyectil.
2 PRECAUCIÓN: Utilice únicamente baterías originales de Makita. El uso de baterías no originales de Makita, o de baterías alteradas, puede ocasionar que las baterías exploten causando un incendio, lesiones personales y daños. Asimismo, esto invalidará la garantía de Makita para la herramienta y el cargador Makita. 1 Consejos para alargar al máximo la vida útil de la batería 1. 2. 3. 4. Cargue el cartucho de batería antes de que se descargue completamente.
Protección en caso de sobredescarga Botón de bloqueo del gatillo interruptor Cuando la capacidad de la batería no sea suficiente, la herramienta se detendrá automáticamente y el indicador de batería mostrará el siguiente estado. En este caso, retire la batería de la herramienta y cárguela. Encendido Apagado PRECAUCIÓN: Cuando no esté operando la herramienta, presione el botón de bloqueo del gatillo interruptor desde el lado B para bloquear el gatillo interruptor en la posición de apagado.
Ajuste de la profundidad del clavado 1 ADVERTENCIA: Asegúrese siempre de que sus dedos no estén colocados sobre el gatillo interruptor o el elemento de contacto y que el cartucho de batería haya sido extraído antes de ajustar la profundidad del clavado. Gire el ajustador para ajustar la profundidad del clavado. La profundidad del clavado se hace más honda a medida que se gira el ajustador en la dirección de A, y menos honda si se gira en la dirección de B, tal como se ilustra en la figura.
Para extraer los clavos, siga el procedimiento de instalación en orden inverso. Adaptador de boquilla PRECAUCIÓN: Asegúrese siempre de que sus dedos no estén colocados sobre el gatillo interruptor o el elemento de contacto y que el cartucho de batería haya sido extraído antes de instalar el adaptador de boquilla. 1 Cuando dispare clavos sobre material con superficies delicadas, utilice el adaptador de boquilla. Coloque el adaptador de boquilla en la parte delantera del elemento de contacto.
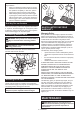
Inserción de clavos ADVERTENCIA: Mantenga el elemento de contacto colocado firmemente sobre el material hasta que el clavo se haya clavado por completo. Un disparo no intencional podría causar lesiones personales. PRECAUCIÓN: No clave clavos en materiales duros como metales o similares. Si el clavo no puede penetrar en el material, la clavadora podría experimentar un fuerte retroceso y causarle lesiones.
3. Jale el gatillo interruptor primero y luego coloque el elemento de contacto contra la pieza de trabajo. AVISO: Evite almacenar los clavos en lugares muy húmedos o calientes o expuestos a la luz directa del sol. 4. Para clavar el siguiente clavo, mantenga el dedo jalando del gatillo interruptor y coloque de nuevo el elemento de contacto contra la pieza de trabajo.
MANTENIMIENTO PRECAUCIÓN: Asegúrese siempre de que la herramienta esté apagada y el cartucho de batería extraído antes de intentar realizar una inspección o mantenimiento. AVISO: Nunca use gasolina, bencina, diluyente (tíner), alcohol o sustancias similares. Puede que esto ocasione grietas o descoloramiento.
< USA only > WARNING Some dust created by power sanding, sawing, grinding, drilling, and other construction activities contains chemicals known to the State of California to cause cancer, birth defects or other reproductive harm. Some examples of these chemicals are: • lead from lead-based paints, • crystalline silica from bricks and cement and other masonry products, and • arsenic and chromium from chemically-treated lumber.