
Use and Care Manual


6 ENGLISH
Push drive mode
1
2
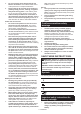
Fig.4
► 1. Button 2. Mode indicator
This tool has push drive mode. In this mode, the tool
cuts off power to the motor to save the battery power
at idle.
To select push drive mode, pull the trigger slightly, then
release it and quickly press the button. The mode indi-
cator will then light up.
Once push drive is activated, pull the switch trigger and
then push the lock button. Apply pressure to the driver
bit and the motor will start rotating. Further pressure
engages the clutch and the driver bit will start rotating.
In push drive mode, the motor and the driver bit will only
rotate by applying pressure.
NOTE: If the tool does not run for about 8 hours in
push drive mode with the trigger locked on, tool is
shutdown. In such a case, release and pull the trigger
again for restarting.
Electric brake
This tool is equipped with an electric brake. If the tool
consistently fails to quickly stop after the switch trigger
is released, have the tool serviced at a Makita service
center.
Lighting up the front lamp
CAUTION: Do not look in the light or see the
source of light directly.
1
2
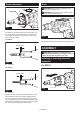
Fig.5
► 1. Lamp 2. Button
To turn on the lamp, slightly pull the switch trigger, and
then release it. The lamp goes out approximately 10
seconds after releasing the switch trigger.
To keep turning off the light, slightly pull the switch
trigger, then release it, and then press the button for
a few seconds. To turn on the light, perform the same
operation again.
In push drive mode with the switch trigger locked, the
lamp goes out approximately one minute after the motor
stops.
NOTE: While pulling the switch trigger, the lamp
status cannot be changed.
NOTE: For approximately 10 seconds after releasing
the switch trigger, the lamp status can be changed.
NOTE: Use a dry cloth to wipe the dirt off the lens of
the lamp. Be careful not to scratch the lens of lamp, or
it may lower the illumination.
Reversing switch action
1
A
B
Fig.6
► 1. Reversing switch lever
CAUTION: Always check the direction of
rotation before operation.
CAUTION: Use the reversing switch only after
the tool comes to a complete stop. Changing the
direction of rotation before the tool stops may dam-
age the tool.
CAUTION: When not operating the tool,
always set the reversing switch lever to the neu-
tral position.
This tool has a reversing switch to change the direc-
tion of rotation. Move the reversing switch lever to the
position (A side) for clockwise rotation or to the posi-
tion (B side) for counterclockwise rotation.
When the reversing switch lever is in the neutral posi-
tion, the switch trigger cannot be pulled.