
User guide

PRO 25 UNIVERSAL
WIRE SET INSTALLATION
INSTRUCTIONS
READ CAREFULLY BEFORE
STARTING INSTALLATION
1. Remove only one wire at a time. Replace it with
a new wire before removing a second wire.
2. Begin with the longest wire. Then replace the
next longest wire, and so forth, ending with the
shortest wire.
3. Select new wire from universal set, using the
longest wire in the package first.
4. Snap spark plug boot onto spark plug and route
new wire back through brackets to distributor cap.
5. Cut off excess spark plug wire length at
distributor cap. (See illustration5.)
6. Slide distributor boot onto spark plug wire
(See illustration 6.)
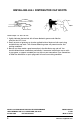
7. Strip 7/8” of insulation away from spark plug
wire conductor core. Be very careful not to cut
or nick the conductor core when stripping
away the insulation. (See illustration 7.)
8. Fold conductor core back along wire.
(See illustration 8.)
9. Put distributor terminal over conductor and
crimp into place. (See illustration9.) We
recommend the use of ACCEL crimping
jaws part no. 170042 on 7mm and 8mm wire
sets or ACCEL part no. 170036 or 170037
ignition wire crimping tool. The ACCEL
crimping jaws are much less expensive
than the crimping tool, but requires the use
of a vise to hold in place.
10. Push distributor terminal firmly into distributor
cap and slide distributor boot onto distributor cap.
11. Return to step 2 (above) and repeat process
for each wire, ending with the coil wire.
(SEE REVERSE SIDE FOR
H.E.I. INSTRUCTIONS)
ACCEL www.accel-ignition.com
1
CUT
BOOT
FOLD
TERMINATE
SUPPRESSION OR SPIRAL CORE
COPPER CORE
DO NOT SLIT CORE
WRONG
WRONG
RIGHT
WRONG
WRONG
RIGHT
DO NOT SHRED OR STRIP AWAY CORE
DO NOT CUT OFF SINGLE STRANDS
DO NOT LEAVE STRANDS SEPARATED AFTER STRIPPING
9
8
7
6
5