
Instruction Manual


ADVANCE BUSHINGS
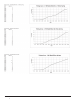
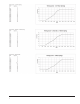
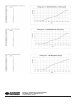
There are 3 different advance bushings included in
the hardware package. The distributor comes with a 21º
bushing already installed. If a different degree of advance is
desired, follow the procedures to change the bushings.
HOW TO SET UP THE ADVANCE BUSHINGS
• Take off the locknut and washer at the bottom of the
advance assembly at the bottom of the bushing pin.
• The bushing will slide off.
• Select the new bushing and install.
• Install the washer and locknut.
HOW TO SET UP THE MECHANICAL ADVANCE
LOCK OUT
1. Remove the springs, weights and the advance stop
bushing from the advance assembly.
2. Remove the roll-pin and gear at the bottom of the
distributor. Remove the roll-pin and stop collar at
bottom of distributor housing.
3. Lift the shaft at least two inches out of the housing, but do
not remove the shaft.
4. Turn the shaft 180º so the bushing pin slides into the
small hole on the advance plate.
5. Put the locknut and washer back onto the advance
bushing pin, which locks the advance in place.
6. Install stop collar and roll-pin. Install the drive gear and
roll-pin.
NOTE: WHEN INSTALLING A HIGH PERFORMANCE IGNITION
SYSTEM WITH THIS DISTRIBUTOR, PLEASE REFER TO THE
INSTRUCTIONS THAT COME WITH THE IGNITION CONTROL
BOX. THIS DISTRIBUTOR HAS THE CORRECT COLOR CODE.
HOW TO SET UP THE VACUUM ADVANCE LOCK
OUT ON THE #8350M, #8352M AND #8354M
DISTRIBUTORS
If you do not want to use the vacuum advance canister
of the has supplied a lockout mechanism.
1. Remove the two Allen head screws that hold the
advance canister.
2. Remove the snap ring that holds the magnetic pickup
assembly in place.
3. Gently lift up on the magnetic pickup plate and slide the
vacuum canister out.
4. Install the Lockout Plate in place of the canister. Install
the two retaining screws.
5. Install the supplied screw and washer through the Lockout
and tighten.
6. It is important to make sure the pickup plate is parallel
with the housing of the distributor. If it is cocked or
slanted, the paddles of the reluctor may contact the
pickup. Check the clearance by rotating the distributor
shaft. If necessary, use the supplied shims under the
lockout hold-down to correctly position the pickup plate.
NOTE: IF NO SHIMS WERE REQUIRED, USE ONE BENEATH THE
WASHER OF THE LOCK-OUT HOLD DOWN SCREW.
NOTE: DO NOT FORGET TO PLUG THE ORIGINAL VACUUM ADVANCE
HOSE.
HOW TO WIRE THE READY-TO-RUN #8350M,
#8352M AND #8354M DISTRIBUTOR
Red lead to coil (+) positive
Orange lead to coil (-) negative
Black lead with the larger ring terminal to engine ground.
NOTE: The #8352M and #8579M distributors for the 221-302
engines are supplied with an iron drive gear for use with
a flat tappet camshaft only. If you are using either of these
distributors in a late model 5.0L engine equipped with a
hydraulic roller camshaft or an earlier engine retrofitted
with a hydraulic roller camshaft you will need to change to
a steel alloy drive gear #29418PD. If you are using either
of these distributors in an engine equipped with a billet
mechanical roller camshaft you will need to change to a
bronze alloy drive gear #29429PD.
BUSHING SIZE
18
O
21
O
25
O
28
O
2