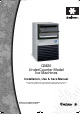
0Front.fm Page 1 Wednesday, June 18, 2008 9:04 AM QM20 UnderCounter Model Ice Machines Installation, Use & Care Manual This manual is updated as new information and models are released. Visit our website for the latest manual. www.manitowocfsg.
0Front.fm Page 2 Wednesday, June 18, 2008 9:04 AM Safety Notices Read These Before Proceeding: As you work on Manitowoc equipment, be sure to pay close attention to the safety notices in this manual. Disregarding the notices may lead to serious injury and/ or damage to the equipment. Throughout this manual, you will see the following types of safety notices: ! Warning Text in a Warning box alerts you to a potential personal injury situation.
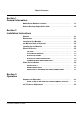
Table of Contents Section 1 General Information Model/Serial Number Location................................................................... 1-1 Owner Warranty Registration Card .......................................................... 1-2 Section 2 Installation Instructions General ................................................................................................................. 2-1 Dimensions ........................................................................................
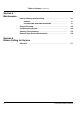
Table of Contents (continued) Section 4 Maintenance Interior Cleaning and Sanitizing................................................................ 4-1 GENERAL ……………………………………………………………………… 4-1 CLEANING AND SANITIZING PROCEDURE ……………………………… 4-1 Exterior Cleaning ............................................................................. 4-3 Ice Machine Inspection ................................................................... 4-3 Cleaning The Condenser .......................................
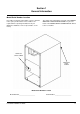
Section 1 General Information Model/Serial Number Location Record the model and serial number of your ice machine in the space provided below. These numbers are required when requesting information from your Manitowoc distributor, service representative, or the factory. The model and serial number are listed on the OWNER WARRANTY REGISTRATION CARD. They are also listed on the MODEL/SERIAL NUMBER DECAL affixed to the ice machine.
General Information Section 1 Owner Warranty Registration Card Exclusions GENERAL The following items are not included in the ice machine’s warranty coverage: The packet containing this manual also includes warranty information. Warranty coverage begins the day your new ice machine is installed. Important Complete and mail the OWNER WARRANTY REGISTRATION CARD as soon as possible to validate the installation date.
Section 1 General Information RESIDENTIAL WARRANTY COVERAGE WHAT IS NOT COVERED? WHAT DOES THIS LIMITED WARRANTY COVER? This limited warranty does not cover, and you are solely responsible for the costs of: (1) periodic or routine maintenance, (2) repair or replacement of the Product or parts due to normal wear and tear, (3) defects or damage to the Product or parts resulting from misuse, abuse, neglect, or accidents, (4) defects or damage to the Product or parts resulting from improper or unauthorized
General Information Section 1 THIS PAGE INTENTIONALLY LEFT BLANK 1-4 Part Number 000001770 06/08
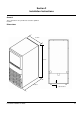
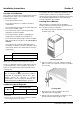
Section 2 Installation Instructions General These instructions are provided to assist the qualified installer. Dimensions 38.10cm 78.00cm 55.93cm 1.90cm±0.
Installation Instructions Section 2 Location of Ice Machine The location selected for the ice machine must meet the following criteria. If any of these criteria are not met, select another location. • The location must be indoors. • The location must be free of airborne and other contaminants. • The air temperature must be at least 10C (50F), but must not exceed 40C (110F). • The location must not be near heat-generating equipment or in direct sunlight.
Section 2 Installation Instructions Electrical Service ! Warning ! Warning All wiring must conform to local, state and national codes. Never use an extension cord. If an outlet is not within reach of the ice machine’s power cord, have a proper amperage outlet wired closer to the ice machine. Voltage Phase Electrical Rating 230/50/1 0.3kW FUSE/CIRCUIT BREAKER 115/60/1 0.4kW A separate fuse/circuit breaker must be provided for each ice machine.
Installation Instructions ELECTRICAL CORD STRAIN RELIEF To prevent strain at the electrical connection inside the ice machine, an electrical cord strain relief device must be installed on the rear panel of the ice machine. 1. Disassemble the strain relief device into its three components. 2. Install the cord holder through the opening in the lower right corner of the rear panel of the ice machine.
Section 2 Installation Instructions Water Service/Drains WATER SUPPLY Local water conditions may require treatment of the water to inhibit scale formation, filter sediment, remove chlorine, and improve taste and clarity. • Install a water shut-off valve for both the ice making and condenser water lines (if applicable). • Insulate water lines to prevent condensation.
Installation Instructions Section 2 OVERFLOW TUBE DRAIN HOLE ICE MAKING/BIN WATER DRAIN TUBING 1.59 cm (5/8”) MINIMUM INSIDE DIAMETER ICE MAKING WATER INLET TUBING 0.
Section 3 Operation Sequence of Operation Control Board Relays Ice Making Sequence of Operation 1 Compressor 2 Hot Gas Valve Water Fill Valve 3 Water Pump Fan Motor Length of “ON” Time off on on 2.9 Minutes (175 Seconds) on on off 5 Seconds on off on Automatically determined on on off Automatically determined off off off Until bin thermostat re-closes Start-Up* 1.Water Purge 2.Refrigeration System Start-Up 3.Freeze Cycle 4.Harvest Cycle 5.
Operation Section 3 Ice Thickness Adjustment QM-20 dice ice cube formation is slightly different from our previous models. Manitowoc ice machines have a unique cube shape. It is normal to have a dimple in the ice cube (a concave indentation in the cube). Ice cubes from the QM-20 may appear to have a slightly larger dimple than other Manitowoc dice cube machines. Therefore, cube size for the QM-20 is determined by measuring the slab weight (the combined weight of all cubes from one harvest cycle).
Section 4 Maintenance Interior Cleaning and Sanitizing GENERAL Clean and sanitize the ice machine every six months for efficient operation. If the ice machine requires more frequent cleaning and sanitizing, consult a qualified service company to test the water quality and recommend appropriate water treatment. The ice machine must be taken apart for cleaning and sanitizing.
Maintenance • Section 4 Disconnect the water pump discharge hose from the distribution tube and water pump. C. Remove the Water Pump • Evaporator plastic parts – including top, bottom and sides • Bin bottom, sides and top • Disconnect the water pump power cord. Rinse all areas thoroughly with clean water. • Loosen the screws that hold the water pump in place. step 10 Mix a solution of sanitizer and warm water. • Lift the water pump and bracket assembly up and off the screws.
Section 4 Maintenance step 18 Mix a solution of sanitizer and warm water. Solution Type Water Mixed With Sanitizer 23L. (6 gal ) 120 ml (4 oz) sanitizer step 19 Use 1/2 of the sanitizer/water solution to sanitize all removed components. Use a cloth or sponge to liberally apply the solution to all surfaces of the removed parts or soak the removed parts in the sanitizer/water solution. Do not rinse parts after sanitizing.
Maintenance Section 4 Cleaning The Condenser ! Warning Disconnect electric power to the ice machine at the electric service switch before cleaning the condenser. A dirty condenser restricts airflow, resulting in excessively high operating temperatures. This reduces ice production and shortens component life. Clean the condenser at least every six months. Follow the steps below. ! Warning The condenser fins are sharp. Use care when cleaning them. 1.
Section 5 Before Calling for Service Checklist If a problem arises during operation of your ice machine, follow the checklist below before calling for service.
Before Calling for Service Problem Ice machine produces shallow or incomplete cubes, or the ice fill pattern on the evaporator is incomplete Possible Cause Water level is low Water inlet valve filter screen is dirty Water filtration is poor Hot incoming water Ice thickness adjustment dial is not set properly Incorrect incoming water pressure Low ice capacity Ice machine is not level Water inlet valve filter screen is dirty Incoming water supply is shut off The air filter is dirty The condenser is dirty I
© 2007 Manitowoc Continuing product improvements may necessitate change of specifications without notice. Part Number 000001770 06/08 Manitowoc Foodservice Group 2110 South 26th Street, P.O. Box 1720 Manitowoc, WI 54221-1720, USA Ph: 920-682-0161 Fax: 920-683-7589 Visit us online at: www.manitowocfsg.