
User guide
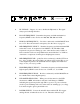

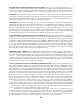

IN
BYPASS
1
2
3
4
5 6
7
8
9
10
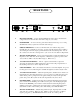
1
2
3
4
5 6
7
8
9
10
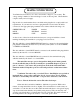
1
2
3
4
5 6
7
8
9
10
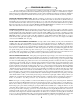
200 300 500 700 1000
PEAK .7 1 1.5 2 3
.4 4
.3 .2 kHz 7 5
1.5 2 3 4 5
PEAKDIP
HIGH FREQUENCY kHz Hz LOW FREQUENCY
HANDCRAFTED IN CHINO, CALIFORNIA
MID - FREQUENCY EQUALIZER
A IN / BYPASS - Bypass, of course, disables the EQ function. The signal
always passes through the tubes.
B Hz LOW FREQUENCY - Determines frequency at which maximum low
frequency PEAK occurs. Choices are 200, 300, 500, 800 and 1 kHz.
C PEAK (LOW FREQUENCY) - Provides continuously variable BOOST from
0 to 11-12 dB to the selected low frequency. See the curves on page 11.
D MID FREQUENCY SELECT - Dermines frequency at which maximum DIP
in the mids occurs. 11 frequencies from 200 Hz to 7K. The 200 to 800
frequencies are great for clearing up some of the mud in sounds, 1 kHz to 4
khz to tame the nasal tones and painful hard sounds while the 5 or 7 kHz are
often used to compensate for microphone diaphragm resonances.
E MID FREQUENCY DIP - (peak) Provides continuously variable CUT from
0 to -10 or -12 dB to the selected mids. As with most LC passive EQs, as one
selects higher frequencies, the bandwidth narrows slightly and a little more
range of cut (or boost) is possible.
F HIGH FREQUENCY SELECT - Determines frequency at which maximum
high frequency PEAK occurs. Choices are: 1.5 kHz, 2, 3, 4, & 5 kHz.
G HIGH FREQUENCY PEAK - Provides continuously variable BOOST from
0 to 10 dB of the selected high frequency.
H LED POWER INDICATOR - When power is first turned on, the LED
should turn on RED. About 20 seconds later it will change to GREEN
indicating the signal can pass through. This is a power-on, power-off mute
circuit to prevent thumps and noises as the tubes are warming up (or cooling).
It is smart enough to ignore quick black-outs.
I POWER SWITCH - Powers the unit ON when switched UP. We suggest
turning the unit off when the session is over. The tubes will last longer.