
Owners Manual


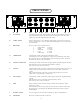
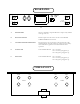

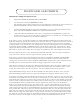

FRONT PANEL ADJUSTMENTS
Initial basic settings for line level use:
1 -Begin with POWER ON, BYPASS, SEP and COMPRESS
2 -Set all controls at 12:00 ( or THRESHOLD at min)
(for calibration feed in a 1Khz oscillator at 0 VU and confirm the return from the unit is actually 0 VU.
Switch from BYPASS to IN and adjust the individual OUTPUTs to also return 0 VU.)
3 -Switch from BYPASS to IN and adjust the DUAL INPUT to get 3 to 6 dB of gain reduction on the
meter with either COMPRESS or LIMIT. Fine adjust with the Thresholds.
4 -Adjust the individual OUTPUTS to either have a comparable level with BYPASS or provide the
desired level to tape. Use the recorder's meters. Digital recorders use Peak Meters and Analog usually
uses VU meters. Machines may use different calibrations.
If the source is "stereo" then the best method is to switch from SEP to LINK. This insures that both left and
right sides will change gain the same amount at the same time. That way a sound located in center will stay in
center and not move around. This unit uses both the channels to control the gain. That means that similar
settings should be set up on both sides. You should not just depend on adjusting one side. The usual mistake
is forgetting about the LIMIT / COMPRESS switch, so check that they match first. Use both meters. Some
compressors mix left and right then use that mono signal to control compression with the left side controls.
This makes it easy for some to adjust but its not right. We combine the "DC" control signals not the audio.
Because Compress has lower "ratios" than Limit the Threshold will seem to have less range. Actually the
range is the same - only the result is less gain reduction. Turn up the Input.
If the source is too percussive or has loud drums in the mix: try adjusting the ATTACK and RECOVERY
controls. Sometimes fast Attack and medium Recovery helps tame drums. Conversely if the drums are
"sitting pretty" then slow the attack. Fast ATTACK & RECOVERY settings tend to reduce transients. Slower
ATTACK preserves the mix and drums should not trigger compression - overall level will.
Only the fastest settings are the only way to make this unit pump like a cheap old solid state limiter. Even
then you have to do some drastic Limiting. We designed the Variable-MU to be difficult to dial in a "bad"
setting. The control range is wide but not extreme - not zero to infinity. Music before spec sheets.
Slower RECOVERY settings tend to be the most inaudible. The more bouncy the meter seems - the more
likely that limiting is audible and may be regrettable. Pumping is no longer in "fashion" now, we hear.
If you want a fast analog "brick-wall" limiter that doesn't mess up the music - dream on - they don't exist. The
Variable-MU will probably do what you actually need. The trick is to use slow Recovery and less than 5 dB of
Limit which often translates to "lower the input". In this unit the "knee" softens as more limiting is used. This
tends to act like a compressor followed by a limiter. This is good but not perfect. Up to about 10 dB of gain
reductionshould be mostly inaudible. This is why the original name of the unit was the 10 dB Limiter.
However, watch out for quiet passages - they will get loud - a giveaway that somebody is seriously "over-
compressing". Rather than heavily limiting the mix - Gently compress individual tracks during recording,
gently compress the mix and save the final limiting to the mastering engineer who is probably also going to
use a Variable-MU - followed by their state-of-the-art digital limiter. That way, only the radio stations and
MTV will "over-compress". Did you know that the louder the CD, the more it is likely to push the station's
limiters into the cringe zone. For broadcast, average loudness is often a better goal that the loudest possible
CD. It all comes out the same in the end. Controlling dynamic range is important for pop. Watch out for big
peaks in the extreme lows and highs - broadcasters use and abuse multi-band limiters. Your call...
9