
Installation Instructions
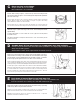


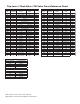


To begin, place the tank-to-bowl rubber gasket onto the locknut on the
flush valve shank against the bottom of the tank. (Be sure the locknut is
tight).
Para comenzar, coloque el empaque esponjoso al tanque sobre la tuerca de
seguridad en el vástago de la válvula de descarga. (Asegúrese que la rosca de
cerrado esté ajustada).
Pour commencer, placez le joint en caoutchouc du réservoir à la cuvette dans
l’écrou autofreiné sur la tige du robinet de chasse contre le dessous du réservoir.
(Assurez-vous que l’écrou autofreiné soit serré).
Next, start the rubber headed bolts into the proper tank holes by
pushing them with your hand.
Después, coloque los pernos de caucho a los agujeros del tanque , empujando con
su mano.
Ensuite, passez les verrous à tête en caoutchouc dans les trous du réservoir en les
poussant avec votre main.
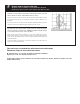
THREE BOLT CONNECTIONS: Place the tank in position on the bowl by
aligning the tank mounting holes with the bowl mounting holes and tilting
the tank slightly forward. Place bolts through the tank mounting holes
so they are protruding through the bowl mounting holes. Progressively
tighten all three bolts, with the final tightening on the third rear bolt to
help bring the tank to a level position. Initial torque being 2 to 3 turns
past hand tight. Fill tank with water and check for leaks around bolts, if
necessary tighten all nuts in ¼ turn increments until water tight. Use a six
point socket on nylon nuts. DO NOT OVERTIGHTEN or you may round off
hex on the nut or fracture the toilet.
TWO BOLT CONNECTIONS WITH SANITARY BAR: Place the tank in
position on the bowl by aligning the tank mounting holes with the bowl
mounting holes. Place bolts through the tank mounting holes so they are
protruding through the bowl mounting holes. Progressively tighten the
two bolts until tank touches sanitary bar. Fill tank with water and check for
leaks around bolts, if necessary tighten all nuts in ¼ turn increments until
water tight. Use a six point socket on nylon nuts. DO NOT OVERTIGHTEN
or you may round off hex on the nut or fracture the toilet.
Coloque el tanque en posición sobre la taza. Alinear los pernos en el fondo del
tanque con los oricios en la taza. Montar las roscas en los pernos que sobresalen
de la parte inferior del borde del sanitario. Ajustar todas las roscas con una
herramienta de 6 puntos a 2-3 giros más que apriete de mano. NO APRETAR
DEMASIADO o puede redondear el hexagonal de la tuerca o fracturar el sanitario.
Alinear el tanque con la pared o con el piso, ajustando o aojando los pernos.
Puede inclinar el tanque hacia adelante o hacia atrás mediante el ajuste de los
pernos. Después de alinear el tanque, asegúrese que las tres roscas estén
apretadas.
Placez le réservoir sur la cuvette. Alignez les boulons au-dessous du réservoir
avec les trous dans la cuvette. Assemblez les écrous dans les boulons saillant vers
l’extérieur des rebords de la toilette. Serrez tous les écrous avec un outil hexagonal,
serrez 2 à 3 tours à la main. NE SERREZ PAS TROP, car vous pourriez arrondir
l’écrou hexagonal ou briser la toilette. Alignez le réservoir avec le plancher ou le
mur en serrant ou desserrant un ou des écrous du devant. Vous pouvez pencher le
réservoir vers l’avant ou l’arrière en ajustant les boulons arrière. Après avoir aligné le
réservoir, vériez pour vous assurer que les trois écrous sont serrés.
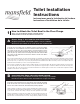
How to Attach Vitreous China Toilet Tank to the Toilet Bowl
Cómo conectar el tanque a la taza del sanitario
Comment fixer le réservoir de toilette en porcelaine vitrifiée à la cuvette
2
A
B
C
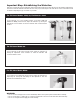
Step A
Step B
Step C