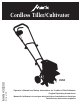
Cordless Tiller/Cultivator Rev.
Welcome to the World of Mantis Gardening IMPORTANT MESSAGE Thank you for purchasing this Mantis tiller/cultivator. You have purchased a world class product, one of the best designed and built anywhere. PRODUCT REGISTRATION This Operator’s Manual contains Safety instructions. The useful life and good service you receive from this machine depends to a large extent on how well you read and understand this manual.
Safety Rules & Warnings You will notice throughout this Operator’s Manual Safety Rules and Important Notes. Make sure you understand and obey these warnings and all instructions for your own protection. I.
III. SAFETY MANUAL(S) – Read, understand, off. Wait until touching all machine components ha protection, and earbefore protection stopped the product. and follow all instructions in the is to be used and remove (i.e. safety goggles,before dust masks, and Inspect the area where the product stopped touching the product. Inspect the area where before the product user manual(s) attemptingis to be used and remove defenders). all objects which can be thrown by the product.
IV. WARNINGS (CONTINUED) 8. Avoid accidental starting – Do not carry the garden tiller/cultivator with your finger on the switch. Make sure the switch is off before inserting or removing the battery. 9. Remove the battery from the tiller when it is not in use. oving parts – Keep hands and feet 10. M away from moving parts. Keep guards in place and in proper working order. 11.
V. BATTERY & CHARGER SAFETY INSTRUCTIONS (CONTINUED) • Charge in a well-ventilated area – Do not block the charger vents. Keep them clear to allow for proper ventilation. Do not allow smoking or open flames near a charging battery pack since it may explode. NOTE: The safe temperature range for discharging the battery is -4°F (-20°C) to 113°F (45°C). Do not charge the battery outside in freezing weather; charge it at room temperature.
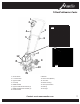
Assembly Tiller/Cultivator Parts 11 22 13 4 3 3 45 56 67 14 14 78 13 12 10 9 89 10 11 15 15 12 11 1. On/off switch On/off switch 2.1.Lock-off button Lock-off button 3.2.Upper handle Upper 4.3.Cord cliphandle Powerhandle cord 5.4.Middle Cord clip 6.5.Upper handle knob and bolt (2) Middlehandle handleknob and bolt (2) 7.6.Middle Upper Guard handle knob and bolt (2) 8.7.Fender 9. Wheels 8. Middle handle knob and bolt (2) 10. Steel Tines (blades) 9. Gear Guard 11. box 10.Motor Wheels 12.
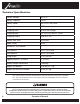
Technical Specifications Battery Voltage 58V D.C. Battery Capacity 2.5 Ah Battery Model 3501-01A, 3501-02A Charger Model 3505 Charging Time 90 min (full charge) Charging Input AC 100-120V, 60 Hz, 145W Charging Output 58.8 VDC, 2A Battery Run Time 20-30 min Motor Power 650W Tine Speed I 200+/-10% RPM Symbols On the product, the rating label and within these instructions you will find among Number Tine Speeds 2 others theoffollowing symbols and abbreviations.
NOTE: Take care of small parts that are removed durin assembly or when making adjustments. Keep them secure avoid loss. Assembly Handle bar BEFORE YOU START ke or • Remove packing materials and unpack all parts and 1.Attach the cable clips on the middle handle bar (Fig. 1). lay them on a flat, stable surface. The tiller/cultivator and the packaging are not •M ake sure the delivery contents are complete and free children’s toys! Children must not play with of any damage.
Assembly BATTERY INFORMATION (Continued) Your tiller/cultivator comes with maintenance free, sealed 58 volt battery. The tiller/cultivator should be used only with the •L ithium-ion batteries are subject to a natural aging process. lithium-ion batteries of the Mantis series! The battery pack must be replaced at the latest when its Make sure all handle knobs are properly tightened capacity falls to just 80% of its capacity when new. Weakened before using the product.
CHARGER INFORMATION Use only Mantis lithium-ion batteries with the Mantis tiller/cultivator. Charge the Mantis lithium-ion battery with supplied Mantis charger only. Other types of batteries may cause personal injury and damage. To reduce the risk of electric shock, do not allow charger or charger’s AC/DC plug to get wet. • Please check the data marked on the rating plate of the battery charger. Be sure to connect the battery charger to a power supply with the voltage marked on the rating plate.
CHARGER INFORMATION (CONTINUED) RED Light is ON Insert the plug of the charger into the wall receptacle. The RED light will illuminate and stay red. Place the battery pack into the charger by TO CHARGE TO CHARGE sliding the battery forward until it is fully seated. TO CHARGE TO CHARGETO CHARGE Mantis charger also works as a battery diagnostic center and the charger’s LED’s will illuminate in specific order to communicate the current battery status. See table below.
Cordless Tiller/Cultivator Operation INTENDED USE TWO SPEEDS SWITCH This tiller/cultivator is intended for loosening and working up the soil in a garden and for tilling coarse soil for mixing in fertilizer, peat and compost in planting areas. This tiller/cultivator should not be used to till extremely dry or wet soil. This product features a switch that allows operation at one of two, preset speeds. The switch is located on the back of the motor facing the operator.
Tilling 1. Make sure that the working area is objects that could damage the prod Cordless Tiller/Cultivator Operation (Continued) GENERAL OPERATION 2. Do not till very wet soil because it te the proper rotation, and it could also 3. Always maintain a firm grip on the p pressure to the handles (Fig. 10). 1. Check the tiller/cultivator, its battery as well as accessories for damage before each use. Do not use tiller/cultivator if it is damaged or shows wear. 2.
Cordless Tiller/Cultivator Care AFTER USE 1. Switch the tiller/cultivator off, wait for moving parts to stop, remove the battery and let it cool down. 2. Check, clean and store the tiller/cultivator as described below. RULES FOR CARE 1. Keep the tiller/cultivator clean. Remove debris from it after each use and before storage. 2. Regular and proper cleaning will help ensure safe use and prolong the life of the tiller/cultivator. 3.
Cordless Tiller/Cultivator Maintenance REPAIR SPARE PARTS/REPLACEMENT PARTS The motor transmission and electronics on this tiller/cultivator cannot be repaired by the consumer, only those repairs noted in this manual and/or on our website are recommended. For assistance contact the Mantis customer service center at 1-800-366-6268. The following parts of this product may be replaced by the consumer. Spare parts are available through Mantis customer service.
Cordless Tiller/Cultivator Maintenance & Storage VIBRATION AND NOISE REDUCTION RESIDUAL RISKS To reduce the impact of noise and vibration emission, limit the time of operation, as well as wear personal protective equipment. Take the following points into account to minimize the vibration and noise exposure risks: 1. Only use the tiller/cultivator as intended by its design and these instructions. 2. Ensure that the tiller/cultivator is in good condition and well maintained. 3.
Cordless Tiller/Cultivator Troubleshooting Troubleshooting Suspected malfunctions are often due to causes that users can fix themselves. Therefore check malfunctions using this section. In most cases the problem can be solved quickly.
LIMITED WARRANTY MANTIS extends this limited warranty against defects in material and workmanship for a period of two (2) years from the date of purchase by the original purchaser. MANTIS will repair or replace, at its option, any part or parts of the product found to be defective in material or workmanship during the warranty period. Warranty repairs and replacements will be made without charge for parts or labor.
Motobêche-bineuse à batterie Rév.
Bienvenue dans le monde du jardinage Mantis MESSAGE IMPORTANT Nous vous remercions d’avoir choisi cette motobêche-bineuse Mantis. Vous avez acheté un produit de classe mondiale, de conception et de fabrication quasiment sans égales. ENREGISTREMENT DU PRODUIT Ce manuel de l’utilisateur contient des instructions de sécurité. La durée utile et le bon emploi de cette machine dépendent en grande partie de la manière dont vous avez lu et compris ce manuel.
Règles de sécurité et avertissements Le présent manuel de l’utilisateur contient un certain nombre de règles de sécurité et d’avis importants. Pour la protection de tous, veiller à bien comprendre et respecter ces mises en garde et toutes les instructions. I.
Symbols Descriptions Keep supply flexible cord away from cutting device Descriptions Symbols Cutting device continues to rotate after the prod Cutting device continues to rotate after the prod ha ha READ THE OPERATOR'S MANUAL(S) – Read, understand, and follow all instructions in the user manual(s) before attempting to assemble and operate. off.protection, Wait breathing until all machine components Wear eye off.
IV. AVERTISSEMENTS (SUITE) l’interrupteur. S’assurer que l’interrupteur est en position d’arrêt avant de mettre la batterie en place ou de la retirer. 9. Retirer la batterie de la motobêche-bineuse lorsqu’elle n’est pas utilisée. 10. P ièces en mouvement – Garder les mains et les pieds à l’écart des pièces en mouvement. Maintenir les protections en place et en bon état de marche. e pas forcer sur la motobêche-bineuse – Elle 11.
V. CONSIGNES DE SÉCURITÉ CONCERNANT LA BATTERIE ET LE CHARGEUR (SUITE) • Charger dans un endroit bien aéré – Ne pas obstruer les évents du chargeur. Les maintenir dégagés pour permettre une ventilation suffisante. Ne pas fumer ni permettre de flamme nue près d’une batterie en cours de recharge car elle pourrait exploser. REMARQUE : La plage de température sans danger pour charger la batterie est de -20 °C (-4 °F) à 45 °C (113 °F).
Assembly Pièces de la motobêche-bineuse 11 22 13 4 3 3 45 56 67 14 14 78 13 12 910 89 10 11 15 15 12 11 1. Interrupteur marche/arrêt On/offde switch 2.1.Bouton verrouillage Lock-off button 3.2.Guidon supérieur Upper 4.3.Bride de handle fixation du cordon Powerintermédiaire cord 5.4.Guidon Cord clip 6.5.Molette et vis du guidon supérieur (2) Middleethandle 7.6.Molette vis du guidon intermédiaire (2) Upper handle knob and bolt (2) 8.7.Garde-boue 9. Roues 8.
Caractéristiques techniques Tension de la batterie 58 Vcc Capacité de la batterie 2,5 Ah Modèle de batterie 3501-01A, 3501-02A Modèle de chargeur 3505 Temps de charge 90 min (pleine charge) Entrée du chargeur 100-120 Vca, 60 Hz, 145 W Sortie du chargeur 58,8 Vcc, 2 A Autonomie de la batterie 20 à 30 min Puissance moteur 650 W Vitesse de fraises I 200 tr/min +/- 10 % Symbols On the product, the rating label and within these instructions you will find among Nombre vitesses de fraises 2 ot
NOTE: Take care of small parts that are removed durin assembly or when making adjustments. Keep them secure avoid loss. Assemblage Handle bar AVANT DE COMMENCER AVERTISSEMENT • Retirer les matériaux d’emballage puis déballer toutes les 1.Attach handle bar (Fig. 1). pièces et les poser sur une surface plane et stable.
Assembly (Continued) AVERTISSEMENT INFORMATIONS SUR LA BATTERIE La motobêche-bineuse est fournie avec une batterie 58 V étanche sans entretien. La motobêche-bineuse doit être utilisée uniquement avec les batteries lithium-ion de la • Les batteries lithium-ion sont sujettes à un processus naturel de série Mantis! vieillissement. La batterie doit être changée au plus tard lorsque Make sure all handle knobs are properly tightened sa capacité chute à seulement 80 % de sa capacité à l’état neuf.
INFORMATIONS SUR LE CHARGEUR AVERTISSEMENT Utiliser uniquement des batteries lithium-ion Mantis avec la motobêche-bineuse Mantis. Charger la batterie lithiumion Mantis avec le chargeur Mantis fourni seulement. Les autres types de batteries peuvent provoquer des blessures corporelles et des dégâts matériels. Pour réduire le risque de choc électrique, ne pas laisser le chargeur ou la prise secteur du chargeur se mouiller. • Vérifier les données figurant sur la plaque signalétique du chargeur de batterie.
INFORMATIONS SUR LE CHARGEUR (SUITE) Voyant ROUGE ALLUMÉ Brancher la fiche du chargeur dans la prise de courant. Le voyant ROUGE s’allume en continu. Placer la batterie dans le chargeur en la glissant à TO CHARGE TO CHARGE fond vers l’avant. TO CHARGE TO CHARGETO CHARGE Le chargeur Mantis fait aussi fonction d’outil de diagnostic. Ses voyants s’allument suivant des motifs spécifiques pour indiquer l’état actuel de la batterie. Voir la table ci-dessous.
Fonctionnement de la motobêche-bineuse à batterie EMPLOI PRÉVU COMMUTATEUR DEUX VITESSES La motobêche-bineuse est conçue pour ameublir et travailler la terre dans un jardin et pour Ce produit comporte un commutateur qui permet une biner les sols grossiers afin d’y incorporer de l’engrais, de la tourbe et du compost. Cette utilisation à deux vitesses préréglées différentes. Ce motobêche-bineuse ne doit pas être utilisée pour biner un sol extrêmement sec ou humide.
Tilling 1. Make sure that the working area is objects that could damage the prod 2. Do not till very wet soil because it te Fonctionnement de la motobêche-bineuse à batteriethe (suite) proper rotation, and it could also FONCTIONNEMENT GÉNÉRAL 1. Vérifier le bon état de la motobêche-bineuse, de sa batterie ainsi que des accessoires avant chaque utilisation. Ne pas utiliser la motobêche-bineuse si elle est endommagée ou présente des signes d’usure. 2.
Soins de la motobêche-bineuse à batterie APRÈS UTILISATION 1. Couper l’alimentation de la motobêche-bineuse, attendre l’arrêt complet des pièces en mouvement, retirer la batterie et la laisser refroidir. 2. Contrôler, nettoyer et ranger la motobêche-bineuse comme décrit ci-dessous. RÈGLES CONCERNANT LES SOINS 1. Maintenir la motobêche-bineuse propre. Éliminer les débris après chaque utilisation et avant de l’entreposer. 2.
Entretien de la motobêche-bineuse à batterie RÉPARATIONS PIÈCES DÉTACHÉES / PIÈCES DE RECHANGE Le motoréducteur et l’électronique de cette motobêchebineuse ne peuvent pas être réparés par l’utilisateur; seules les réparations indiquées dans ce manuel ou sur notre site Web sont recommandées. Pour toute assistance, appeler le service aprèsvente Mantis au 1-800-366-6268. Les pièces suivantes du produit peuvent être changées par l’utilisateur.
Entretien et entreposage de la motobêche-bineuse à batterie RÉDUCTION DES VIBRATIONS ET DU BRUIT RISQUES RÉSIDUELS Pour réduire l’effet du bruit et des vibrations produits, limiter le temps d’utilisation et porter un équipement de protection individuelle. Tenir compte des points suivants pour minimiser les risques d’exposition aux vibrations et au bruit : 1. Utiliser la motobêche-bineuse uniquement aux fins prévues et conformément à ces instructions. 2.
Dépannage de la motobêche-bineuse à batterie Dépannage Les avaries présumées sont souvent liées à des causes pouvant être rectifiées par l’utilisateur. Par conséquent, dépanner le produit comme indiqué ci-dessous. Dans la majorité des cas, le problème peut être résolu rapidement.
GARANTIE LIMITÉE MANTIS accorde la présente garantie limitée contre les vices de matériau et de fabrication pendant une période de deux (2) ans à compter de la date d’achat par l’acheteur initial. MANTIS réparera ou remplacera, à sa discrétion, toute pièce du produit présentant un vice de matériau ou de fabrication durant la période de garantie. Les réparations et remplacements sous garantie seront effectués sans frais de pièces ou de main-d’œuvre.