
Use and Care Manual


2. Turn on the circuit breakers to provide power to the unit.
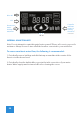
3. Press the center button to turn on the heater. NOTE it will not start heating until
water is provided to the unit.
If there is power to the unit, but no digital display, turn o the circuit breaker. Double
check to make sure that the cable to the LCD panel on the front cover is correctly
connected inside the unit, then turn the breaker back on.
4. After the unit is supplied with power, a beep sound can be heard and the display
ashes the set temperature, then goes solid showing the actual output temperature for
30 seconds until the screen goes blank. the unit is now in standby mode.
5. Press the power button to activate/deactivate the unit. When the unit is ON, the LED
display shows the actual water temperature of the outlet water.
6. The outlet water temperature can be adjusted by changing the temperature settings
on the heater. Press and to adjust the temperature. The range of options for the
temperature setting is 30°C-52°C/86° F-125° F.
WARNING: If the unit has been used recently, you may initially get a short burst of very
hot water from the unit. Allow a few seconds for the water to cool down to the set
point. Test the water before you take a shower. If the unit will not be used during
winter, drain out any water completely so that the heater will not freeze.
Periodically clean the inlet lter screen and the shower head to maintain strong water
ow.
7. Press then press to convert the temperature display between Fahrenheit and
Celsius.
8. The unit features an automatic memory function to avoid repetitive operation. When
you turn on the water heater, the default set point will be the same as the last setting
used.
18