
Owner's Manual


-7-
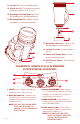
Adding Drink Ingredients to
the Blending Jars
7. Lift and remove the three Blending Jars
NOTE: AT THE CENTER BLENDING STATION,
THE ICE CHUTE IS SPRING-LOADED
AND WILL RETRACT WHEN REMOVING THE
BLENDING JAR.
8. Remove the lid of each Blending Jar.
9. Pull out the Recipe Drawer to refer to
drink recipes.
10. Add ingredients to each Blending Jar
based on the type of drinks you will be making at
each Blending Station to be
used for this cycle.
NOTE: DO NOT OVERFILL INGREDIENTS AS IT CAN
CAUSE OVERFLOW
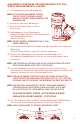
11.
Turn the main On/Off Switch (located at the right back side of the unit) to the
ON position.
The main Power Indicator Light will illuminate and fl ashes.
12. Replace each Blending Jar Lid, and return each Blending Jar to
the respective Blending Station.
Each jar can only be positioned in three
orientations.
NOTE: FOR THE MIDDLE STATION, PUSH UP ON THE RETRACTING ICE CHUTE
WITH THE BLENDING JAR TO SET IT INTO PLACE.
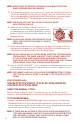
13. For each Blending Station you are using for this cycle, rotate the Drink
Selection switch to match the type of drink you have prepared. The White LED
Light will illuminate for each active Blending Station.
NOTE: FOR ANY BLENDING STATIONS YOU ARE NOT USING IN THIS CYCLE,
LEAVE THE ROTARY DRINK SELECTION SWITCH AT THE “OFF” SETTING
(OR LEAVE JAR OFF THE BASE). THE BLENDING JAR DOES NOT NEED TO
NOTE: THE UNIT WILL AUTOMATICALLY DETECT HOW MANY BLENDING
STATIONS ARE IN USE FOR EACH SHAVE-N-BLEND
™
CYCLE AND
WILL ROTATE ONLY TO THE BLENDING JARS THAT ARE ACTIVE.
Starting the Automated
Shave-n-Blend
™
Cycle
14. Start the automatic Shave-n-Blend
™
cycle by depressing the START button
in front of the center Blending Station for at least half a second.
NOTE: A DELAY WAS ADDED TO RESTRICT ACCIDENTAL START.