
Specifications


AUTO icon and time. If the screen is in the activated state,
and no buttons are touched for 30
seconds the display backlight will turn OFF (standby mode).
NOTE: If heating unit is in the stand by mode (where display
backlight is OFF), touching any button will illuminate the back-
light and display operating buttons. Touching the POWER button
when the heater is in stand by mode will illuminate the backlight,
touching the POWER button again will turn the heater OFF.
Please note power is live to heating unit when the unit is OFF.
3. Set Day and Time:
NOTE: For the following setup procedures, the display will auto-
matically save the setting after a 30 second pause and return to
the previous operating setting. If this occurs, start back at
Step a of the Set Day and Time procedure.
a. Simultaneously touch and hold the UP button and DOWN
button for 1.5 seconds. A beep will sound and the Day indi-
cator at the top of the display will flash (the buttons on the
display respond to touch, not pressure).
NOTE: If user touches the POWER button at any point during
setup procedure, the display will automatically save settings and
return to the previous operating setting.
b. Using the UP or DOWN buttons, adjust to appropriate DAY
of week.
c. Touch the MODE button. AM / PM indicator will flash. Use
the UP and DOWN buttons to set appropriate time.
AM / PM will change automatically once you pass 12:00.
d. Touch the MODE button, MINUTES will flash. Use the UP
and DOWN buttons to set MINUTES to the appropriate
time.
e. After the last parameter is set, touch the MODE button to
lock in your settings.
4. Once the installer has performed the initial setup, power
down the unit by touching the POWER button if no other pro-
gramming will be done at this time.
NOTE: The unit is programmed with default time and tempera-
ture settings for the Automatic Mode (see below). If these set-
tings are satisfactory, then no other programming needs to be
done. Refer to the OPERATIONS MANUAL for instructions on
other useful options and features.
Default settings for Automatic Mode:
Period Time Setpoint
1. Wake Up 6:00 AM 70°F (21°C)
2. Daytime 8: 00 AM 62°F (17°C)
3. Evening 6:00 PM 70°F (21°C)
4. Sleep Time 10:00 PM 62°F (17°C)
Operational Notice
This heater is equipped with a manual reset thermal limit control
that will automatically turn OFF the heater if it overheats to prevent
a fire. A red warning light will illuminate, error code and overheat
temperature will flash on the display, and an audible alarm (beep)
will sound to alert that this control has activated (see
Troubleshooting under Maintenance for a list of error codes). Once
activated the heater will turn OFF and the display will lock. Once
the unit has cooled to a normal operating temperature the display
will unlock and the user will be able to reset the thermal limit con-
trol.
TO RESET THERMAL LIMIT CONTROL
After the unit has cooled to a safe operating temperature, the red
warning light will begin to flash, and the display will become
active. The heater is now ready to be reset. In order to reset the
thermal limit control, press the POWER and UP buttons and hold
for 1.5 seconds, the unit will return to normal operation.
NOTE: The unit is provided with an End of Life “oneshot” protec-
tive device. This serves as a back up protector in extreme condi-
tions when the electronic overheat protector fails during an over-
heat condition. If the protector opens (no light or sound on the
display controller) and the power is connected and the unit does
not come ON, the the heater is no longer functional and has to
be replaced.
THE ACTIVATION OF THE THERMAL LIMIT CONTROL AND
RED WARNING LIGHT OCCURS WHEN THE HEATER OVER-
HEATS. CHECK HEATER TO MAKE SURE IT IS NOT
BLOCKED – IF SO, REMOVE THE BLOCKAGE. IF THERE IS
NO BLOCKAGE, IT IS RECOMMENDED THAT THE HEATER
BE INSPECTED BY A REPUTABLE ELECTRICIAN OR
REPAIR SERVICE TO ENSURE THE HEATER IS NOT
DAMAGED. DO NOT CONTINUE TO USE HEATER IF IT
REPEATEDLY CYCLES OFF ON THIS THERMAL LIMIT.
DO NOT TAMPER WITH OR BYPASS ANY THERMAL LIMITS
INSIDE HEATER.
CAUTION - DO NOT CONTINUE TO ATTEMPT TO USE THE
HEATER IF THE THERMAL LIMIT CONTROL REPEATEDLY
OPERATES AFTER BEING RESET. TO DO SO COULD PER-
MANENTLY DAMAGE THE HEATER OR CREATE A FIRE OR
SAFETY HAZARD.
5
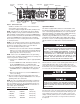
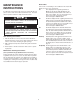
Figure 8 - Control Panel Layout
Temperature
Time
Periods
Down Button
Automatic Mode
Indicator
Hold Mode
Indicator
Time
Heat Control
Indicator
Night Light
Indicator
Lockout
Indicator
Fan Speed
Indicator
Day Indicator
Building Management
System indicator
Centigrade / Fahrenheit
Indicator
Power Button
Mode Button
Up Button