
Installation Guide


4.25"
MIN.
4.25" MIN.
INSTALLATION STEPS:
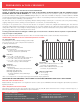
1 Assemble the concrete surface plate to the bottom of the post mount member as
shown using four of the supplied 2" coated hex bolts, 3/8" coated lock washers
and coated 3/8” hex nuts. (Fig. 1) Tighten nuts to 33 ft-lb using a torque wrench.
Ensure that the hex bolt heads are firmly seated inside the surface plate channels.
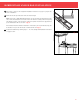
2 Determine the post mount location. Using the 5-1/2" x 5-1/2" concrete surface
plate as a guide, ensure that the distance from the edge of the concrete to the
edge of the surface plate is at least 4-1/4". (Fig. 2)
3 Mark the location of the four concrete surface plate corner holes for drilling. (Fig. 2)
IMPORTANT: Before continuing with installation the installer must review and
ensure compliance with all Hilti HIT-RE 500-SD instructions and guidelines.
Failure to do this could result in an unsafe railing system.
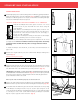
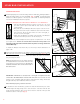
4 Drill four boreholes into the concrete to the required embedment depth using
a hammer drill and 7/16" masonry drill bit. When drilling, check periodically
to ensure boreholes remain plumb and aligned with all four of the concrete surface
plate corner holes.
REQUIRED EMBEDMENT DEPTH FOR THREADED RODS:
Marquee 38" Post Mount Kits: 3-1/2"
Marquee 44" Post Mount Kits: 4"
5 Properly clean all boreholes using a 7/16" round steel brush and compressed air (see
Hilti HIT-RE 500-SD Instructions, Steps 2-4). Boreholes must be free of dust, debris,
ice, oil, grease and other contaminants.
6 Prepare the HIT-RE 500-SD adhesive for use with a compatible Hilti dispenser and
discard initial adhesive (see Hilti HIT-RE 500-SD Instructions, Steps 5-8).
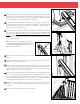
7 Inject adhesive into the boreholes without forming air voids, starting from the bottom
of each borehole and slowly withdrawing the dispenser. Fill holes approximately
2/3 full or as required to ensure that the annular gap between the threaded rod and
concrete is completely filled (see Hilti HIT-RE 500-SD Instructions, Steps 9-10).
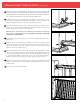
8 Insert the supplied threaded rods into the boreholes to the required depth,
slowly twisting the rods as they are inserted (see Hilti HIT-RE 500-SD Instructions,
Steps 11-13). Remove excess epoxy above the boreholes and ensure that the
mounting surface remains clear of debris.
IMPORTANT: Once installed correctly, do not disturb the threaded rods until
the appropriate setting time has elapsed. Do not install the post mount or
apply load to the concrete anchors until the adhesive is fully cured. Follow the
adhesive setting guidelines published in the Hilti HIT-RE 500-SD Instructions.
9 After the concrete anchors are fully cured, carefully position the post mount over
the threaded rods and install flush onto the concrete surface.
Install four of the supplied stainless steel washers and nuts over the threaded rods
and tighten nuts to 15 ft-lb using a torque wrench.
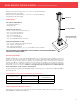
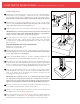
Check the post with a level. If the post needs to be adjusted for plumb, install four
of the supplied 1" leveling bolts. (Fig. 3) Adjust the leveling bolts until post is
plumb and all four leveling bolts are in contact with the concrete surface plate.
Fig. 1
Fig. 2
Fig. 3
10
11
1" LEVELING BOLT
BOTTOM OF
CONCRETE
SURFACE PLATE
TOP OF
CONCRETE
SURFACE PLATE
9
Post MoUnt installation CONCRETE APPLICATION (continued)