
Installation Guide


2
FIGURE 1
FIGURE 2
INSTALLATION STEPS:
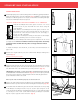
1 Install and prepare posts or other mounting surfaces for Marquee
™
Railing installation.
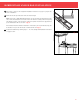
Ensure mounting surfaces are level and plumb. (Fig. 1) TAMKO
®
recommends using
Marquee Post Mount systems or wood posts covered with our matching Marquee
Post Sleeve and Marquee Wood Post Spacers.
TO INSTALL MARQUEE POST SLEEVE WITH A NOMINAL 4" X 4" WOOD POST:
IMPORTANT: Use of the Marquee Wood Post Spacer is required for 4" x 4" wood
post applications. Failure to follow these instructions may lead to an unsafely
installed product and will adversely affect coverage under the Limited
Warranty.
To install the Marquee Post Mount Kit, see the full post mount instructions on
pages 7-10.
2 Measure the length between posts and confirm which Marquee Railing Kit is
required (Fig. 2)
Marquee Railing Kit Lengths:
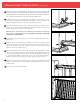
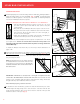
3 Lay the bottom rail beside the post sleeves with the pre-routed baluster holes facing
upward and evenly spaced. The rails should extend past the post sleeves on each
side. Mark both ends of the rail where they cross the post sleeve. (Fig. 3a)
IMPORTANT: A minimum of 1-5/8" rail length is required from the end of rail
to first baluster on both ends of the rail.
(Fig. 3a)
Check end spacing and shift
the position of the rail before cutting if required. Ensure that the gap between
posts and balusters will not exceed 4".
When positioned and marked properly cut the bottom rail.
4 Lay the top rail beside the bottom rail with the pre-routed baluster holes aligned.
Mark and cut the top rail to match the bottom rail length and end spacing.
(Fig. 3b)
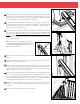
5 To install the bottom rail brackets, place the bottom of the bracket on the top edge
of the Marquee Post Ring and center on post. Secure in place using two of the
screws provided in the Marquee Straight Bracket Kit. Use 2" screws when mounting
to a wood post or the 1-1/4" screws when mounting to Marquee Post Mount.
Repeat on post at opposite end of rail section. (Fig. 4)
Nominal Rail Length 6' 8'
Actual Rail Length 67" 91"
Fig. 2
Fig. 3a
straiGht rail installation
Fig. 1
MINIMUM 1-5/8"
FIGURE 3
1-5/8" MINIMUM DISTANCE
FROM FIRST BALUSTER HOLE
TO END OF RAIL
FIGURE 4
Fig. 3b
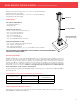
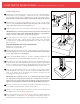
1 Slide the first Marquee Wood Post Spacer over the 4" x 4" wood
post and secure in place flush with the deck surface using the
screw provided.
2 Next, slide the second Marquee Wood Post Spacer over the 4" x 4"
wood post and secure in place with the bottom of the Wood Post
Spacer 29-1/2" above the deck surface for a 36" rail height, or
35-1/2" for a 42" rail height.
3 Finally, place the Marquee Post Ring on the bottom of the Marquee
Post Sleeve and slide post sleeve over the wood post.