Installation Operation and Maintenance Instructions Refrigerator / Beverage Center Luxury Series Pro+ 6GARM 6GARMP
CONTENTS Unpacking your refrigerator.................................................. Removing the packaging.................................................... Warranty Registration ........................................................ Installing your refrigerator.................................................... Selecting the location........................................................ Cabinet Clearances ............................................................ Leveling legs .................
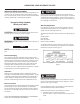
UNPACKING YOUR BEVERAGE COOLER Important Safety Instructions Warnings and safety instructions appearing in this guide are not meant to cover all possible conditions and situations that may occur. Common sense, caution, and care must be exercised when installing, maintaining, or operating this appliance. If the unit was shipped or has been laying on its back for any period of time allow the refrigerator to sit upright for a period of at least 24 hours before plugging in.
INSTALLING YOUR BEVERAGE COOLER Select Location Leveling Legs The proper location will ensure peak performance of your appliance. We recommend a location where the unit will be out of direct sunlight and away from heat sources. To assure your product performs to specifications the recommended installation location temperature range is from 65 to 80°F (18 to 27°C) for indoor built in units, 65 to 90°F (18 to 32°C) for indoor freestanding units.
ELECTRICAL CONNECTION • • Do not splash or spray water from a hose on the refrigerator. Doing so may cause an electrical shock, which may result in severe injury or death. This unit should not, under any circumstances, be installed to an un-grounded electrical supply. Electrical Connection A grounded 115 volt, 15 amp dedicated circuit is required. This product is factory equipped with a power supply cord that has a three-pronged, grounded plug.
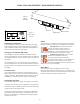
USING YOUR MICROSENTRY™ REFRIGERATOR CONTROL Figure 6 Control Assembly Control Alarm Set F Colder Warmer Press and Hold ON/OFF Light Switch Figure 7 close-up of control Door Switch Press and Hold Alarms Starting your refrigerator Your MicroSentry™ refrigerator control will monitor refrigerator function and alert you with a series of audible and visual alarms. • Door Ajar Alarm: If the door has been left open for over five (5) minutes, the alarm will sound in one (1) second intervals.
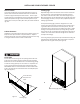
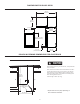
DIMENSIONS FOR GLASS DOOR 46-1/2” (118.1cm) 25-3/4” (65.4cm) 25-1/2” (64.77cm) 23-5/8” (60.0cm) 23-7/8” (60.66cm) 33-7/8” to 34-3/4” (86.06 to 88.3cm) 3” to 4” (7.62 to 10.2cm) 21-1/2” (54.61cm) ROUGH IN OPENING DIMENSIONS FOR GLASS DOOR Electrical Requirements: A grounded 115 volt, 15 amp dedicated circuit is required. Power outlet can be located in the back wall behind unit. Add 1” to depth for thickness of plug, or recess outlet 1” into the wall.
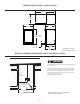
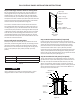
DIMENSIONS FOR GLASS OVERLAY DOOR 46-1/2 (118.1cm) 23-7/8”** (60.66cm) 23-13/16”** (60.48cm) 23-7/8” (60.66cm) 33-7/8” to 34-3/4” (86.06 to 88.3cm) 21-1/2” (54.61cm) 23-1/8” (58.72cm) 3” to 4” (7.62 to 10.2cm) **Dimension includes 3/4” thick overlay panel ROUGH IN OPENING DIMENSIONS FOR GLASS OVERLAY DOOR Electrical Requirements: A grounded 115 volt, 15 amp dedicated circuit is required. Power outlet can be located in the back wall behind unit.
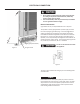
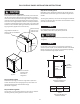
FULL OVERLAY PANEL INSTALLATION INSTRUCTIONS Step 4: Cut overlay panel Depending on the refrigerator model cut the overlay panel to the dimensions shown. Use Figure 9 and Table A for glass door models. Step 1: Verify door alignment Verify that the door is aligned with the cabinet prior to fabricating the custom panel. Failure to do so could result in mis-alignment of the custom panel with the hinge bracket.
FULL OVERLAY PANEL INSTALLATION INSTRUCTIONS Step 5: Drill hinge clearance holes in overlay panel Top hinge adapter bracket Set the overlay panel on the door front, align the edges, and clamp together. Clamp the panel firmly but be careful not to damage the door or the panel. Mark center of hinge adapter hole on wood panel, top and bottom. (See Figure 10.) Remove wood panel from door and drill 5/16” (8mm) diameter clearance holes into the overlay panels 3/4” (20mm) deep.
FULL OVERLAY PANEL INSTALLATION INSTRUCTIONS 1.234” (31.3mm) .991” (25.2mm) Figure 12 Step 9: Secure overlay panel to the door. With the #10 wood screws provided fasten the overlay panel to the door. (See Figure 13). Top hinge Top hinge pin Step 10: Install lock cam (Models with locks only). Attach the lock cam to the back of the lock assembly with the phillips head machine screw provided. Orient the lock cam vertically when installing on the lock.
STORAGE COMPARTMENT SHELVING Loading Tips and Suggestions To Add or Remove a Shelf Your product is equipped with a cantilever shelf system to provide you with maximum adjustability and customization options through the purchase of aftermarket shelving. Remove stored product from the shelf. Do not try to remove a loaded shelf from the unit. Grasp the shelf front with both hands, rotate the front upward and lift out. (See Figure 16).
ENERGY SAVING TIPS Wine Bottle Shelf The following suggestions will minimize the cost of operating your refrigeration appliance. Underneath the glass on both full width shelves are the wine bottle shelves. Simply remove the glass to store your bottled wine. (See Figures 17 and 18). 1. Do not install your appliance next to a hot appliance, (cooker, dishwasher, etc.). heating air duct, or other heat sources. 2. Install product out of direct sunlight. 3.
CARE AND CLEANING OF YOUR BEVERAGE AND WINE REFRIGERATOR Condenser Cleaning Light Bulb Replacement Disconnect the power cord before cleaning the condenser. DISCONNECT THE POWER CORD BEFORE ATTEMPTING LIGHT BULB REPLACEMENT. Failure to do so may result in an electrical shock that could severely injure you. The tube and wire condenser underneath the cabinet does not require frequent cleaning; however, satisfactory cooling depends on adequate ventilation over this heat exchanger.
TROUBLESHOOTING YOUR BEVERAGE AND WINE REFRIGERATOR Before you call for service If the unit appears to be malfunctioning, read through this manual first. If the problem persists, check the troubleshooting guide below. Locate the problem in the guide and refer to the cause and its remedy before calling for service. The problem may be something very simple that can be solved without a service call. However, it may be required to contact your dealer or a qualified service technician.
OBTAINING SERVICE If Service is Required: • • • • • For Your Records If the product is within the first year warranty period please contact your dealer or call AGA MARVEL Customer Service at 800.223.3900 for directions on how to obtain warranty coverage in your area. If the product is outside the first year warranty period, AGA MARVEL Customer Service can provide recommendations of service centers in your area. A listing of authorized service centers is also available at www.agamarvel.
HOUSEHOLD PRODUCT WARRANTY Parts or Service Not Supplied or Designated by AGA MARVEL Entire Product Limited One Year Parts and Labor Warranty The above warranties also do not apply if: AGA MARVEL warrants that it will supply all necessary parts and labor to repair or replace in the end user’s home or office, any component which proves to be defective in material or workmanship, subject to the condition and exclusions stated below, for a period of one year from the date of purchase by the end user.
NOTES 18
NOTES 19
www.agamarvel.com 1260 E. VanDeinse St. Greenville MI 48838 800.223.3900 41012375-EN Rev A 4/1//2011 All specifications and product designs subject to change without notice. Such revisions do not entitle the buyer to corresponding changes, improvements, additions, replacements or compensation for previously purchased products.
Instructions d’installation, d’utilisation et d’entretien Réfrigérateur pour boissons Série Luxury Pro+ 6GARM 6GARMP
CONTENU Déballage de votre réfrigérateur pour boissons...................... Enlèvement de l’emballage.................................................. Enregistrement de la garantie............................................... Installation de votre réfrigérateur pour boissons.................... Choix de l’emplacement ...................................................... Écartement par rapport à l’armoire ..................................... Pieds de mise à niveau.......................................
DÉBALLAGE DE VOTRE RÉFRIGÉRATEUR POUR BOISSONS Importantes instructions de sécurité ATTENTION Les avertissements et les instructions de sécurité qui apparaissent dans ce guide n’ont pas la prétention de couvrir toutes les conditions et situations possibles pouvant arriver. Il faut faire preuve de bon sens, de précautions et de soins, pour installer, utiliser ou entretenir cet appareil.
INSTALLATION DE VOTRE RÉFRIGÉRATEUR POUR BOISSONS Choix de l’emplacement Pieds de mise à niveau Un bon emplacement assurera une performance de pointe pour votre appareil. Nous recommandons un endroit où l’appareil ne sera pas exposé directement au rayonnement solaire et restera écartée de sources de chauffage.
CONNEXION ÉLECTRIQUE ATTENTION • • N’envoyez pas d’eau par éclaboussure ou par jet d’un tuyau sur le réfrigérateur pour boissons. Cela pourrait causer une commotion électrique, entraînant potentiellement des blessures graves voire mortelles. Cette unité ne doit sous aucun prétexte être installée sur une alimentation électrique sans liaison de terre. Raccordement électrique Un circuit secteur dédié en 115 V supportant 15 A est nécessaire.
UTILISATION DE VOTRE COMMANDE MICROSENTRY™ DE RÉFRIGÉRATEUR POUR BOISSONS Figure 6 Ensemble de commande Alarm Set F Colder Warmer Press and Hold ON/OFF Contrôle Press and Hold Interrupteur d’éclairage Figure 7 Vue rapprochée du contrôle Interrupteur de porte Alertes Démarrage de votre réfrigérateur pour boissons Votre contrôle MicroSentry™ du réfrigérateur pour boissons va surveiller son fonctionnement et vous prévenir par une série d’alertes sonores et visuelles.
DIMENSIONS DE PORTE VITRÉE 46-1/2” (118.1cm) 25-3/4” (65.4cm) 25-1/2” (64.77cm) 23-5/8” (60.0cm) 23-7/8” (60.66cm) 33-7/8” à 34-3/4” (86.06 à 88.3cm) 3” à 4” (7.62 à 10.2cm) 21-1/2” (54.61cm) DIMENSIONS BRUTES D’OUVERTURE POUR PORTE VITRÉE ATTENTION Besoins électriques : Un circuit secteur dédié en 115 V/15 A avec terre. La prise secteur peut être située sur la cloison arrière derrière l’appareil.
DIMENSIONS DE PORTE À REVÊTEMENT VITRÉ 46-1/2 (118.1cm) 23-7/8”** (60.66cm) 23-13/16”** (60.48cm) 23-7/8” (60.66cm) 33-7/8” à 34-3/4” (86.06 à 88.3cm) 21-1/2” (54.61cm) 23-1/8” (58.72cm) 3” à 4” (7.62 à 10.2cm) **La dimension inclut un panneau de revêtement de 3/4” d’épaisseur DIMENSIONS BRUTES D’OUVERTURE POUR PORTE À REVÊTEMENT VITRÉ ATTENTION Besoins électriques : Un circuit secteur dédié en 115 V/15 A avec terre. La prise secteur peut être située sur la cloison arrière derrière l’appareil.
INSTRUCTIONS D’INSTALLATION DE PANNEAU DE REVÊTEMENT COMPLET Étape 4 : Découpez le panneau de revêtement ATTENTION Selon le modèle de réfrigérateur pour boissons, découpez le panneau de revêtement aux dimensions montrées. Utilisez la Figure 9 et le Tableau A pour les modèles de porte vitrée. Étape 1 : Vérifiez l’alignement de la porte Vérifiez que la porte est alignée avec l’armoire avant la fabrication du panneau sur mesures.
INSTRUCTIONS D’INSTALLATION DE PANNEAU DE REVÊTEMENT COMPLET Étape 5 : Percez des trous de passage dans le panneau de revêtement Support d’adaptateur de charnière supérieure Posez le panneau de revêtement sur la face avant de la porte, alignez les bords et maintenez les deux ensemble. Maintenez fermement le panneau faites attention de ne pas abîmer la porte ou le panneau. Marquez le centre du trou d’adaptateur de charnière sur le panneau en bois, en haut et en bas (Voyez la Figure 10).
INSTRUCTIONS D’INSTALLATION DE PANNEAU DE REVÊTEMENT COMPLET CLÉ QTÉ 2 RONDELLE D’ARRÊT DE CAME QTÉ 1 ÉCROU DE MAINTIEN QYÉ 1 VERROU QTÉ 1 RONDELLE ÉLASTIQUE QTÉ 1 VIS INOX QTÉ 1 CAME 875 QTÉ 1 1.234” EXTENSION .991” EXTENSION QTÉ 1 (VOIR REMARQUE) VIS DE FIXATION QTÉ 1 Figure 12 Étape 9 : Fixez le panneau de revêtement sur la porte Avec les vis à bois #10 fournies, fixez le panneau de revêtement sur la porte (Voir la Figure 13).
AMÉNAGEMENT DU COMPARTIMENT DE RANGEMENT Conseils et suggestions de chargement Ajout ou enlèvement d’étagère Votre produit est équipé d’un système d’étagères en porte-à-faux, pour vous fournir une ajustabilité maximale et des options de personnalisation via l’achat d’étagères en après-vente. Sortez les produits conservés hors de l’étagère. N’essayez pas de sortir une étagère encore chargée de l’armoire.
CONSEILS D’ÉCONOMIE D’ÉNERGIE Étagère pour bouteilles de vin Sous le verre des deux étagères de largeur complète sont les étagères de bouteilles de vin. Enlevez seulement le verre pour ranger votre vin en bouteille (Voir les Figures 17 et 18). L’étagère à bouteilles peut en recevoir six. Conservez les vis que vous prévoyez de consommer quotidiennement ou pour une occasion sur la moitié frontale de l’étagère.
ENTRETIEN ET NETTOYAGE DE VOTRE RÉFRIGÉRATEUR POUR BOISSONS Nettoyage du condenseur AVERTISSEMENT Remplacement de l’ampoule d’éclairage AVERTISSEMENT Débranchez le cordon secteur avant de nettoyer le condenseur. DÉBRANCHEZ L’ALIMENTATION ÉLECTRIQUE AVANT D’ESSAYER DE REMPLACER L’AMPOULE D’ÉCLAIRAGE. Sinon vous risquez une commotion électrique qui peut vous blesser gravement.
DÉBALLAGE DE VOTRE RÉFRIGÉRATEUR À BOISSONS Avant d’appeler le service après-vente Si l’appareil semble présenter un dysfonctionnement, commencez par bien relire son manuel. Si le problème persiste, consultez le guide de dépannage qui suit. Identifiez le problème dans ce guide et consultez les colonnes de causes et de remèdes avant d’appeler pour du service. Le problème peut être quelque chose de très simple qui peut se résoudre sans demander une intervention de service.
OBTENTION DE SERVICE Si du service est nécessaire : • • • • • Pour vos archives Si le produit est encore dans sa première année de garantie, veuillez contacter votre revendeur ou appelez le service à la clientèle d’AGA MARVEL au 800.223.3900 pour des instructions sur la façon de faire jouer la couverture sous garantie dans votre secteur.
GARANTIE DE PRODUIT À USAGE DOMESTIQUE Pièces ou service non fournis ou conçus par AGA MARVEL Ensemble du produit Garantie limitée d’un an sur pièces et main-d’œuvre Les garanties précédentes ne couvrent pas non plus : La société AGA MARVEL garantit qu’elle fournira toutes les pièces nécessaires et la main-d’œuvre pour réparer ou remplacer au domicile ou au bureau de l’utilisateur final tout composant qui sera constaté être défectueux pour le matériel ou la main-d’œuvre, compte tenu des conditions et exc
REMARQUES 18
REMARQUES 19
www.agamarvel.com 1260 E. VanDeinse St. Greenville MI 48838 800.223.3900 41012375-CFR Rév. A 4/5/2011 Toutes les spécifications et particularités du produit sont susceptibles de changer sans préavis. De telles révisions ne donnent pas de droit pour l acheteur de bénéficier des changements, améliorations, ajouts, remplacements qui en découlent, ni de recevoir de compensation pour les produits précédemment achetés.