
User manual


4
INHOUD
Veiligheid 2
Wegwerpen van verpakkingsmateriaal 4
Het gebruik 5
Reiniging van de binnenkant 5
Ingebruikname 5
Temperatuurinstelling 5
Koelen van levensmiddelen 5
Verplaatsbare platen 5
Het verplaatsen van deurvakken 5
Tips 6
Koelen tips 6
Onderhoud 6
Gepronlogeerde stilstand 6
Schoonmaken 6
Vervangen van de lamp 6
Het ontdooien 7
Als er iets niet in orde is 7
Technische gegevens 7
Installatie 8
Plaats van opstelling 8
Muur-afstandhoudersr 8
Elektrische aansluiting 8
Het wijzigen van de deurdraairichting 9
Garantiebepalingen en Service 10
WEGWERPEN VAN VERPAKKINGSMATERIAAL
Het verpakkingsmateriaal van onze grote elek-
trische huishoudelijke apparaten kan met uitzonde-
ring van houten onderdelen, gerecycled worden en
dus bij het kringloopafval worden gezet.
Wij raden u aan om:
• Papier, karton en golfkarton in de speciale
papierbakken te werpen.
• Plastic verpakkingsmateriaal in de speciaal daar-
voor bestemde plastic-containers te gooien.
Indien dit soort bakken in uw buurt nog niet
voorkomen mag u het materiaal aan de vuilnis-
man meegeven.
Als verpakkingsmateriaal gebruiken wij slechts recy-
cleerbare kunststoffen, zoals bijv.:
In de voorbeelden staat:
PE voor Polyethyleen** 02 = ^ PE-HD;
04 = ^ PE-LD
PP voor Polypropyleen
PS voor Polystyrol
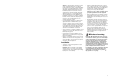
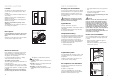
PLASTIC BESTANDDELEN
Om er gemakkelijker achter te komen hoe u het
materiaal van dit apparaat moet wegwerpen en /of
recycleren zijn er op verschillende punten herken-
bare symbolen op aangebracht.
PS
SAN
ABS
02**
PE
05
PP
06
PS
17
Door reversibility
Before carrying out any operations, remove the plug
from the power socket.
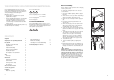
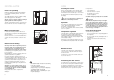
To change the opening direction of the door, pro-
ceed as follows:
1. pull off the ventilation grille (D) which is clipped
into place;
2. remove the hole cover (G) and the bottom hinge
(E) by unscrewing its three fixing screws;
3. remove the door, releasing it from the upper pin
(G);
4. unscrew the upper pin (G) and refit it on the
opposite side;
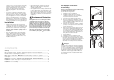
5. remove the two plugs of the door (where avail-
able), discovering the holes for the hinge pins,
assemble them on the opposite side;
6. using a 10 mm spanner, unscrew the hinge pin
(E) and reassemble it on the opposite side of the
hinge;
7. reassemble the lower hinge (E) on the opposite
side, using the screws previously removed;
insert the hole cover (G) on the lower hinge.
Slide the hole cover (F) out of the ventilation
grille (D) by pushing it in the direction of the
arrow and reassemble it on the opposite side;
8. reassemble the door;
9. refit the ventilation grille (D), clipping it into
place.
10.Dismantle the handles and reassemble them on
the opposite side. Cover the holes left open with
the plugs contained in the documentation pack.
Warning:
After having reversed the opening direction of
the doors check that all the screws are properly
tightened and that the magnetic seal adheres to
the cabinet. If the ambient temperature is cold (i.e.
in Winter), the gasket may not fit perfectly to the
cabinet. In that case, wait for the natural fitting of
the gasket or accelerate this process by heating up
the part involved with a normal hairdrier.
PR220
G
F
D
PR18
F
F
F
E
E
G