
Instructions


5
2. Einbau und Anschluss
2.1 Einbauhinweise
• Durch die vollständig vergossene
Bauform ist der Schaltdecoder für
den Freilandeinsatz gut geeignet.
• Verkabeln Sie den Decoder sorg-
fältig nach den Anschlussplänen.
• Der Decoder ist im Auslieferungs-
zustand auf Weichenadresse „1“
eingestellt. Möchten Sie den Deco-
der mit einer Lokadresse oder ei-
ner hohen Lokadresse verwenden,
müssen Sie CV 29 entsprechend
ändern (siehe CV Liste).
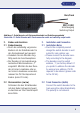
2.2 Gleisanschluss (sw/sw)
Schliessen Sie den Schaltdecoder
mit dem Kabel (schwarz/schwarz)
an das Gleis an. Die Polarität spielt
keine Rolle.
2. Installation and Connection
2.1 Installation Notes
• Due to the completely sealed
design the switch decoder is well
suited for real outdoor use.
• Please connect the decoder care-
fully according to the diagram.
• The decoder is set to switch
address „1“ per factory default. If
you prefer to address the decoder
by using a loco address, CV 29
requires to be altered. (please refer
to the CV list).
2.2 Track Connection (bk/bk)
Connect the switch decoder to the
track using the cable (black/black).
The polarity is not relevant.
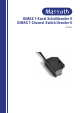
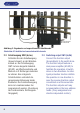
Abbildung 1: Schaltdecoder mit Gleisanschlusskabel und Schaltausgangskabel
Illustration #1: Switch Decoder with Track connection cable and switching output cable
Gleis/Track
SW1 (A1/A2)
Schaltausgang
Switching Output