Masterclock www.masterclock.
Table of Contents Thank you for your purchase of a CLDNTD12 digital clock from MASTERCLOCK. Here you’ll find instructions for unpacking and installing your clock(s), including suggestions for proper care and configuration. We are here to help. You can reach us using various contact methods (phone, email, etc.) found at our website: www.masterclock.com Introduction .........................................................................
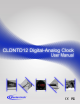
Introduction CLDNTD12 NETWORK TIME DISPLAY (NTD) DIGITAL CLOCKS Masterclock NTD digital clocks are designed to display accurate time referenced from an NTP time server, or one located on the Internet. The wide variety of sizes (illustrated to scale at left), are designed for a wide variety of applications and mounts. The built-in NTP client can set time from one or two NTP servers.
Features Your new CLDNTD12 digital-analog clock features: RTC (Real Time Clock) back-up maintains time during loss of power and/or loss of NTP reference Time Zone offsets (to one second resolution) supports any biasing requirements Operates on WAN or LAN at 10/100 Mbps Automatically adjust for Daylight Savings Time change Masterclock Fully configurable network settings, including DHCP/BOOTP support Primary and secondary NTP reference with fault-tolerant switching Supports NTP Br
Power, Accessories and Software Cat5 patch cable CD-ROM Above: DC power – Insert the DC power cord into the 2.1mm connector located on the back panel. Below: Ethernet PoE – Insert the CAT5 Ethernet patch cable (included) into the RJ45 socket. The list of accessories below is for illustrative purposes. Refer to your sales order for actual items shipped.
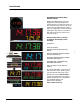
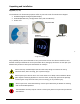
Unpacking and Installation Supplied (Ship Kit) The list below is for illustration purposes. Refer to your sales order for actual items shipped. CLDNTD12 digital-analog clock/date display CD-ROM (WinDiscovery Configuration Utility and User Manual) Power cord Cat5 patch cable CLDNTD12 Powder coated steel case Power cord WinDiscovery Configuration Utility 6 4 Digit LED Display Only qualified persons are authorized to carry out maintenance on this device.
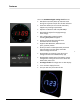
Mounting The CLDNTD12 digital time display is designed for wall mount. Power and low voltage signal wiring should be installed according to local electrical codes, so to access the back of the clock. Do not route power or signal cables between the case and the wall (along the exterior of the wall), which may pinch the power or signal cable and create a hazardous condition.
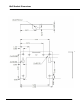
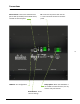
Wall Bracket Dimensions 8 Masterclock www.masterclock.
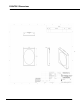
CLDNTD12 Dimensions 9 Masterclock www.masterclock.
Connections Ethernet PoE: Connect the CAT5 Ethernet patch cable (included) into the RJ45 socket, located on the back panel. DC: Insert the DC power cord into the 2.1 mm connector located on the back panel. 10 USB Port: For configuration. Relay Option: When the CLDNTD12 is not locked to a NTP reference, the dry contact relay will actuate. Reset Button - Clears current settings Masterclock www.masterclock.
Configuration Checklist The CLDNTD12 digital-analog clocks get their time signals from the Ethernet. Therefore, before installing this device, one should be prepared with the following basic configuration information that the device will require. It may be necessary to obtain some or all of this information from a network administrator in your organization.
LED STATE STATUS INDICATION Flashing No Reference: The CLDNTD12 is not able to reference Time Code On Solid Referenced Time: The CLDNTD12 is receiving time referenced from a Time Code If the Time Code input is different from UTC, do not adjust the Time Zone and/or DST offset. These will adjust automatically.
Configuration Masterclock CLDNTD12 clocks maintain their configuration data in non-volatile flash memory, even when the power is off. The CLDNTD12 clocks are configured on screen using WinDiscovery software.
Device Name/Default Password A network device will not function properly if configured to use DHCP services when no DHCP server is available on the network. The factory default displaying local time is disabled. You must enable and configure that setting to display local time. We suggest you use an NTP time server with a UTC reference to configure the offset for your Time Zone and DST.
IGMP Use of the multicast addressing method requires the use of routers and switches and other network devices which support the Internet Group Management Protocol (IGMP). In addition, the IGMP mode must be enabled and configured for multicast addressing to be implemented properly. Please ensure that your network system components are capable of, and configured properly for, IGMP before utilizing the multicast addressing feature.
USB Device Driver A USB type B port has been included on the rear cover of the clock to provide a means of configuring the clock via software and to allow for firmware upgrades for either firmware corrections or future product enhancements. To utilize the USB port, connect a USB type A to USB type B cable from the computer to the clock. USB A cable end (to computer) USB B cable end (to clock) USB port on back (back panel view) Installing the Device Driver First, power-on the CLDNTD12.
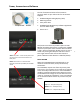
WinDiscovery The WinDiscovery software application is a clock setup and configuration program that operates in the Microsoft Windows operating system and is supplied FREE with your CLDNTD12 device. INSTALLING WINDISCOVERY To install the WinDiscovery complete the following steps: Insert the CD that shipped with your CLDNTD12 device. 1. Run the “WinDiscovery.exe” application from the CD. 2. By default, the setup utility will suggest installing files to C:\Program Files\MASTERCLOCK\WinDiscovery. Click OKAY.
To open the “Device Settings” window, double click the CLDNTD12 clock name. The top left item is labeled “Configurable Options.” WITHIN THE DROP-DOWN WINDOW: Click on a menu choice to open the window for that function. [PROPERTIES] BUTTON The “Properties” window lists the name, model, firmware and network configuration of your CLDNTD12 clock. These configurations may be changed in other windows, but not in this one. Click [OK] to exit.
[SET TIME/DATE] BUTTON Here you may break the link to UTC time to create a custom time. Click this button to reveal a preliminary warning. Read the warning and continue if you wish to create a custom time for your CLDNTD12 clock by unclicking the [UTC] button. By clicking the [UTC] button you will return to UTC time. Practical use of this feature requires the clock to be removed from the time code source.
GLOBAL PASSWORD The Global Password feature allows the user to enter a single password for all devices using the same password. During this session and subsequent sessions of WinDiscovery, you will not have to enter the password. The Global Password being used must match the password on all the devices being administered. On any new system being installed, the factory default password on all devices is “public”. 1. Check [Enable Global Password]. 2. Type your password. 3.
ADMINISTRATIVE FUNCTIONS From the “Device Settings” window, click [Administrative Functions]. SET TIME AND DATE This feature may be most useful for demonstration, in lab situations, environments where an external reference time signal is not available, when the built-in Time Code client is disabled or when a network connection to an Time Code server is not available. SET PASSWORD See page 18. RESET DEVICE See page 19 under Properties Button. INSTALL NEW OPTION Paste the Option Key you receive here.
NTP Addressing Modes Setting up to receive NTP is relatively easy to do once you known what you want. UNICAST (QUERY) NTPS clocks and devices support the Unicast Method of NTP (Network Time Protocol) packets transfer. The unicast method involves direct transfer of requested information from the NTP server to the NTP client (clock or other device) based on an automatically generated electronic query or NTP time request.
BROADCAST NTPS clocks and devices also support the broadcasting of NTP packets. The broadcast mode is a widespread or open-ended broadcast, not intended for any specific IP address. Broadcast packets are useful in situations where network administrators may wish to avoid heavy network traffic created by periodic NTP requests. Often such periodic requests end up synchronized, which can exceed the time server’s ability to reply promptly.
Time Zone Offset Modify the time zone by clicking the [Time Zone] button. This opens a new window that gives you a list of time zones, including descriptions to help with the selection. Select the desired time zone and click [OK] to close the window. Changes are applied when you click [OK]. Daylight Saving Time Configure and/or enable the daylight saving function by clicking the [Daylight Saving Time] button.
Communications I/O and Power Specifications COMMUNICATIONS – PROTOCOL DHCP (enabled by default) configuration, or via Static IP mode entry.
Troubleshooting WinDiscovery uses bi-directional UDP messaging on port 6163 for both the discovery process and to communicate configuration and status packets to and from the NTP network device(s). Delivery of UDP messages/packets is not guaranteed. If you experience intermittent problems with WinDiscovery, close the current session and restart the application. If this does not resolve the issue try the following troubleshooting tips, or switch to an alternate method of configuration.
Clock does not respond to configuration changes and/or status display is intermittent Device was found using WinDiscovery, but the status display is intermittent or not updating and/or the clock does not appear to be responding to configuration changes under the current WinDiscovery session. Clock(s) previously found during a recent session of WinDiscovery do not show up during the current session. The clock status or settings displayed under WinDiscovery show garbled characters.
If the configuration of the network device is changed while a “169.254.xxx.xxx” is being used (for example: changing the Time Zone offset), then the current “169.254.xxx.xxx” address will become the permanent static address and the original conflicting static address will be lost. At this point, it is necessary to manually change the static IP address to one that does not conflict, or you may do a [Reset Configuration] to restore the system to factory default settings. 3.
Clock is not displaying the correct local time or date Possible reasons and solutions: 1. Clock did not properly negotiate the DST to standard time (or vice-versa) transition 2. Time Zone offset has been configured incorrectly. Provide the correct Time Zone configuration. 3. DST has been configured incorrectly. This is configured separately from the Time Zone configuration.
Care and Cleaning Adherence to regular and proper cleaning procedures is recommended to preserve appearance. Scratched or otherwise damaged lens caused by misuse, mishandling and improper storage or improper cleaning is not covered under the limited warranty. Job Site Precautions It is recommended the clock be removed from the wall and stored face up in its protective shipment bag during painting and construction.
Minimize Hairline Scratches Always store the clock face-up in the protective plastic shipping bag until ready for installation and during transporting to the installation site. Do not place the clock face (lens surface) down on any surface as this may scratch or mar the lens. Scratches and minor abrasions can be minimized by using a mild automobile polish. Three such products that tend to polish and fill scratches are: 1. Johnson Paste Wax (Johnson and Johnson Co.) 2.
Limited Warranty This MASTERCLOCK product warranty extends to the original purchaser. MASTERCLOCK warrants this product against defects in materials and workmanship for a period of five years from date of sale. If MASTERCLOCK receives notice of such defects during the warranty period, MASTERCLOCK will, at its option, either repair or replace products that prove to be defective.
Health and Safety These devices generate, use and can radiate radio frequency energy and, if not installed and used in accordance with the instructions, may cause harmful interference to radio communications. There is no guarantee that interference will not occur in a particular installation.
Compliance Electromagnetic Compatibility 2004/108/EC Tested and Conforms to EMC standards Low voltage directive 2006/95/EC Tested and Conforms to Safety standards FCC Statement This device complies with Part 15 of the FCC Rules and found to comply with the limits for a Class B digital device. These limits are designed to provide reasonable protection against harmful interference in a commercial/residential installation.
Service Information We sincerely hope that you never experience a problem with any Masterclock product. If you do need service, contact Masterclock. Many problems are easily resolved with a single phone call or email. Visit our website for FAQs and contact information. http://www.MASTERCLOCK.com/faq.php Please supply us with as many details about the problem as you can. The information you provide will be supplied to the repair department before your unit arrives.
Masterclock www.masterclock.