
Use And Care Manual


Page 10
OPERATION
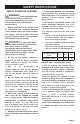
BATTERY FULL
When the battery is fully charged, the green
LED Light on the charger will be on and the red
LED light will be off.
NOTICE: The battery pack will fully
charge, but will not overcharge, if left on
the charger.
NOTICE: Charger may warm with several
continuous charge cycles. This is part
of the normal operation of the charge.
Charge in a well ventilated area.
FIG. 3
MAINTENANCE
WARNING:
When servicing, use
only identical replacement parts. Use of
any other parts may create a hazard or
cause product damage.
WARNING:
Always wear safety
goggles or safety glasses with side
shields when using compressed air to
clean tool. If the operation is dusty, also
wear a dust mask.
WARNING:
To avoid serious
personal injury, always remove the
battery pack from the tool when cleaning
or performing any maintenance.
GENERAL MAINTENANCE
Avoid using solvents when cleaning plastic
parts. Most plastics are susceptible to
damage from various types of commercial
solvents and may be damaged by their use.
Use clean cloths to remove dirt, dust, oil,
grease, etc.
WARNING:
Do not at any time let
brake uid, gasoline, petroleum-based
products, penetrating oils, etc. come in
contact with plastic parts. Chemicals can
damage, weaken or destroy plastic which
may result in serious personal injury.
WARNING:
When servicing, use
only identical replacement parts. Use of
any other parts may create a hazard or
cause product damage. To ensure safety
and reliability, all repairs should be
performed by a qualied service
technician.
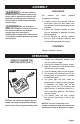
WALL-MOUNT HOLES (FIG. 3)
The charger has hanging holes for
convenient storage. Install screws in the
wall 2-1/8 inches apart.
Use screws sufficiently strong to hold
the combined weight of the charger and
battery pack (approximately 1 lb. 3 oz.).