
Installation Manual


16
ChargeMaster Plus 12/75-3, 12/100-3, 24/40-3, 24/60-3 – User and Installation Manual
4 SETTINGS
Adjustment of the settings of the ChargeMaster
Plus can be made in two different ways:
• By means of DIP switches.
• From a laptop or notebook connected to the
ChargeMaster Plus via a USB Interface. Some
settings can only be changed in this way.
CAUTION!
Invalid settings of the
ChargeMaster Plus can cause
serious damage to your batteries
and/or the connected load! Only
authorized personnel may adjust
settings.
When required, the ChargeMaster Plus can be
restored to factory settings (see section 0).
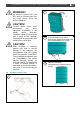
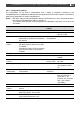
4.1 DIP switch settings
Use a small screwdriver to carefully set the
required settings.
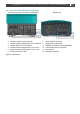
Figure 4: DIP switches (factory settings)
DIP switch 1 = CZone (0) or MasterBus (1)
network.
DIP switch 2 = MasterBus powering off (0) or
on (1)
DIP switches 3 to 10 are either used as CZone
address or for MasterBus battery and 3
rd
output
settings.
In a CZone network:
DIP switch 1 must always be set to the OFF
position (0).
DIP switch 2 must always be set to the OFF
position (0).
DIP switches 3 to 10 must match the unique
address used in the CZone network; the
dipswitch. See the CZone Configuration Tool
Instructions manual for more information.
In a MasterBus network:
DIP switch 1 must always be set to the ON
position (1).
DIP switch 2 is MasterBus Powering ON (1) or OFF
(0).
DIP switches 3 to 5 are used for battery type
selection:
DIP switch
3
4
5
MasterBus settings (Flooded)
1
0
0
0
Flooded (fixed)
0
0
1
AGM (fixed)
0
1
0
Gel (fixed)
0
1
1
Lithium-ion (fixed)
1
0
0
Constant voltage (13,25/26,50V)
2
1
1
1
1
If all DIP switches are in the OFF position (0 ), the
settings suit a Flooded battery but can be changed
in MasterAdjust.
2
Constant voltage has no temperature compensation
DIP switches 6 and 7 are used for DC 3 IN/OUT:
DIP switch
6
7
12V battery
1
Current limit 10A
1
These two options cover the most used
applications. Other options can be selected via
the configuration tool.
See section 5.4 for more information on charge
voltage settings and section 0 for DC 3 IN/OUT.
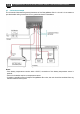
4.2 MasterBus configuration
MasterBus is a CAN based data network for
communication between Mastervolt devices.
When the ChargeMaster Plus is connected, open
MasterAdjust on a Windows laptop or notebook
connected to the MasterBus network via a
MasterBus USB interface. MasterAdjust software
is available as free to download software on the
Mastervolt website: www.mastervolt.com. This
tool runs on a Windows laptop or notebook.