Farmhouse Sink INSTALLATION INSTRUCTIONS 1/8
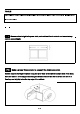
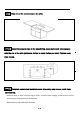
TOOLS Safety glasses / maker / silicone adhesive sealant / tape measure / Jigsaw / rags / wood braces / level / screws / bladed screwdriver Step 1 : Measure the height of apron sink, cut cabinet front cutout and countertop cutout accordingly. Step 2 : Make a proper frame under to support the farmhouse sink. Cut two support framings to extend along the inner walls of the cabinet on each side of the base.
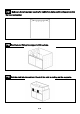
Step 3 : Make sure there is a proper spacing for sink before gluing and inserting screws into the wood and cabinet. Step 4 : Position and fixing the supports with screws . Step 5 : Put the sink into the cabinet. Check if the sink is resting on the supports.
Step 6 : Remove the sink. Step 7 : Apply the silicone sealant to the top of each support. Step 8 : Place the sink onto the support and adjust it to be in proper position. Sink should be positioned at least 4’’ between the back of the cabinet to allow faucet installation.
Step 9 : Then cover the countertop on the sink. Step 10 : Install the secure clips to the countertop, make sure each clip engages with the rim of the sink (minimum 4 clips in back, 2 clips per side). Tighten each clips evenly. Step 11 : Complete countertop installation and wipe away any excess caulk from the sink rim. • Connect drain to sink. Connect trap to drain. Connect water supply connections to faucet according to manufacturer’s instructions. • Run water into sink and check for leaks.
MAINTENANCE INSTRUCTIONS FAQs 1. Why is there rust in my new kitchen sink? Reasons: 1.1 The rust may be caused by the welding cement, or oil residue on the sink which when not cleaned on time can lead the sink to rust. 1.2 Chemical cleaning agent, paint, sauces or cooking oil left in the kitchen sink after a certain period, these will create molds and the molds would stick on the surface. Prevention and Treatments: 1.