ENGLISH Graphics Solutions for Professionals Matrox EpicA Series User Guide 10963-301-0111 2008.01.28 www.matrox.
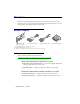
Overview Thank you for purchasing a Matrox EpicA graphics card. Your Matrox EpicA product is a high performance, low-powered graphics card designed for thin client systems. Matrox EpicA server-side software manages your Windows desktop in remote sessions. Hardware supplied Matrox EpicA card DVI dual-monitor cable* DVI quad-monitor cable† DVI-to-HD15 adapters ‡ (EpicA TC2 card shown) * Included with Matrox EpicA TC2 or TC2-Lite products. † Included with Matrox EpicA TC4 products.
Installation overview Note: If your Matrox product is already partially or fully installed on your computer, some or all the installation information in this guide may not apply to you. However, this information may be useful if you need to reinstall your Matrox product. To install your Matrox product: 1 Install the Matrox card – see “Hardware installation”, page 4. 2 Connect your monitors – see “Connection setup”, page 7. 3 Install the software – see “Software setup”, page 11.
Hardware installation This section describes how to install your Matrox card. If your Matrox graphics card is already installed in your computer, skip to “Connection setup”, page 7. For information specific to your computer, like how to remove its cover, see your system manual.
2 b Turn off your computer and all peripherals such as your monitor or printer. c Open the computer and remove your existing graphics card. (If graphics hardware is built into the motherboard of your computer, you may need to disable it manually. For more information, see your system manual.) Choose a PCI slot Most computers have different types of expansion slots. Choose a PCI (not PCI Express) slot for your graphics card. Your card supports both 64-bit and 32-bit PCI slots.
3 Insert your Matrox card a Position your Matrox card over the expansion slot you’ve chosen. b Push the card in firmly and evenly until it’s fully seated in the slot. c Secure the bracket of your Matrox card to the computer frame. Your Matrox card is now installed. Before restarting your computer, connect your monitor or monitors (“Connection setup”, page 7). After connecting, restart your computer and install your Matrox software (see “Software setup”, page 11).
Connection setup This section describes how to connect your monitors to your Matrox product. Connector overview – EpicA TC2 and EpicA TC2-Lite Dual-monitor cable (LFH60-to-DVI) TV output adapter* Secondary DVI connector (2/4) DVI-to-HD15 adapter S-video connector Composite video connector Main DVI connector (1/3) DVI-to-HD15 adapter * Supported with EpicA TC2-Lite and EpicA TC2 only. TV output adapters are sold separately (see http://shopmatrox.com).
Step-by-step connection setup WARNING: Don’t change monitor connections while your computer is turned on. While your computer is turned on, it may be using monitor settings that are specific to the current monitor connections. Some devices may be permanently damaged if incorrect settings are used. Note: Whenever you change your connection setup, make sure you’re using the correct connectors and that all connectors are properly fastened.
EpicA TC4 – Attach your Matrox quadmonitor cable to the connector on the bracket of your Matrox card. Make sure the connectors are properly fastened. 2 Connect your monitors Connect your preferred monitor to the main DVI connector of your multi-monitor cable. If your monitor has a DVI connector, connect it directly to the main DVI connector of your multi-monitor cable.
Note: To connect a digital monitor (a monitor that uses digital input, usually a flat panel monitor) to your Matrox product, your monitor must have a DVI connector. Some monitors with DVI connectors support both digital and analog input. If you’re using one of these monitors with your Matrox product, make sure it’s configured to use the correct type of input. For more information, see your monitor documentation.
Software setup This section describes how to install Matrox software for Windows 2000/XP/XPe and Windows Server 2003. For the Linux operating system, see the documentation included with your Linux software package. You may need administrator rights to install certain software. For more information, see Windows documentation or contact your system administrator.
3 Install Matrox PowerSpace (optional) Run the Matrox PowerSpace software package you downloaded. While PowerSpace is running on the client side, it organizes your Windows desktop in your local session. Matrox PowerSpace Epica needs to be installed on the server to organise your Windows desktop in remote sessions.
Download Matrox PowerSpace EpicA if you want PowerSpace to organize your Windows desktop in the remote sessions of your clients. Note: Matrox PowerDesk and PowerSpace software can be run locally on the server only if Matrox hardware is installed in your server. 2 Install your software package Run the software package you downloaded and follow the on-screen instructions. For more information, see the README file included with your software package.
TV output (EpicA TC2-Lite and EpicA TC2 only) If your Matrox product supports TV output, you can use the TV output adapter to connect a video recorder or a TV to your Matrox graphics card. This adapter is only included with certain Matrox products. To purchase a Matrox TV output adapter for your product, see the Matrox online store (http://shopmatrox.com). VI DE O OU T S -V ID EO OU T TV output adapter This section describes how to use the TV output feature.
3 Connect video output TV or video recorder using S-video To connect to a TV or a video recorder, you’ll need a composite video (RCA) or S-video cable. If your video device (a TV or a video recorder) didn’t come with one of these cables, these types of cable are available at most electronics stores. The type of cable you use depends on what your video device supports. Many video devices support composite video connections, and some higher-quality video devices support S-video connections.
4 Connect audio output Typically, the sound output from a computer comes from speakers connected to your sound card. If you prefer, you can hear or record the sound output from your computer using the same TV or video recorder you connect to your graphics card. To do this, you need an audio cable with a stereo jack on one end and two RCA connectors on the other end. If you don’t have this type of cable, you can buy one at most consumer electronics stores.
Troubleshooting Basic procedures This section explains basic procedures that are referred to by some troubleshooting items in this guide. Restarting in VGA mode Windows 2000/XP – What follows is information on how to restart your computer in VGA mode. 1 Click Start # Shut Down # Restart # OK* to restart your computer. (* Depending on your version and configuration of Windows, this part of the step may not be necessary.
3Cause Your computer BIOS (Basic Input/Output System) settings may be incorrect. 1Solution Change your BIOS settings. For more information on your computer BIOS, see your system manual. 4Cause Your computer BIOS may not be up to date. For more information on your computer BIOS, see your system manual. 1Solution Reinstall your previous graphics card and, if possible, update your computer BIOS. This can usually be done with software from the manufacturer of your computer.
Problem 1Cause 3 Select the appropriate device. 4 Click Adjust visible area and refresh rate # Restore defaults. After the startup screen, or after display settings are changed, the screen image is garbled or unusable (blank screen, rolling or overlapping screen images) The Matrox display driver may be trying to use settings your monitor doesn’t support.
Windows 2000/XP – 1 If your primary display is unusable, restart your computer in VGA mode (see “Restarting in VGA mode”, page 17). 2 To remove Matrox software, click Start # Settings* # Control Panel # Add/Remove Programs (double-click*) # Matrox PowerDesk-HF and Driver # Change/Remove # Yes. (* Depending on your version and configuration of Windows, this part of the step may not be necessary.) 3 Restart your computer for the changes to take effect.
Note: Windows 2000/XP – To check if your monitor settings are properly selected: 1 Right-click your Windows desktop background, then click Properties # Settings # Advanced # Monitor. If you’re using multiple displays in independent mode, select a display before clicking Advanced. 2 If you see the name of your monitor or “Plug-and-Play”, your monitor settings are properly selected. If you see the wrong monitor name or Default monitor, your monitor settings aren’t properly selected.
2Solution Change the configuration of your computer BIOS so that the slot type of your main graphics card has priority for becoming the primary display. For information on how to change your computer BIOS settings, see your system manual. If your computer BIOS doesn’t let you select which slot type has priority for becoming the primary display, a BIOS update may be available to let you do this. (The BIOS of most computers can be updated with software.
6 Restart your computer for changes to take effect. Note: To restore display adapters, repeat steps 3–5, but click Enable in step 5. Problem Not all graphics cards in the computer are fully supported (Software doesn’t work with a certain graphics card, or another graphics card doesn’t work at all) 1Cause If you have different models of graphics cards in your computer, your Matrox display driver may not support all the graphics cards in your computer.
2 Select a display and move it according to the physical position of the monitor it’s associated with. Note: In multi-display mode, you may have limited control over the arrangement of your displays. For more information, see Matrox PowerDesk documentation. Problem 1Cause 1Solution Screen image defects appear, program doesn’t run properly, or Windows doesn’t work properly (example: mouse pointer not drawn properly) Some programs may not work properly with some Matrox acceleration.
4Solution Windows 2000/XP – Disable Matrox hardware acceleration: 1 Right-click your Windows desktop background, then click Properties # Settings # Advanced # Troubleshooting. 2 Move the Hardware acceleration slider to None. 3 Click OK # OK to accept the changes. Note: If you identify a program that doesn’t work well with Matrox acceleration, please contact Matrox technical support (see page 40) and describe the problem.
4Cause The program window or dialog box may be somewhere off-screen. 1Solution If the program window you want to see is named on the Windows taskbar, right-click on it and select Maximize. (If you click Restore the program window goes back to its previous position. To fix this problem, see the other solutions.) 2Solution Manually move the program window or dialog box: 3Solution 1 Press [Alt]+[Space]. 2 If you see a pop-up menu, click Move. If you don’t see a pop-up menu, press [M] (for Move).
Video The following troubleshooting items address problems related to video files. Problem Video file playback is jerky (skipping frames) Note: Jerky video file playback may be the result of slow playback or recording. Slow recording causes frames to be dropped (frames aren’t recorded).
2Cause 1Solution 3Cause Too many programs may be running (using up computer resources). Close other programs, including memory-resident programs like System Agent. Your Matrox graphics card may be sharing an IRQ (interrupt request) with another PCI card in your computer (for example, a network card). 1Solution Try moving the PCI card to another PCI slot in your computer. For more information, see the documentation for this card or see your system manual.
Problem Can’t record DVD video See “Can’t record video with a video recorder”, page 31. TV output The following troubleshooting items are related to TV output support (see “TV output (Epica TC2Lite and Epica TC2 only)”, page 14). Problem 1Cause 1Solution 2Cause TV image is garbled or unusable. (blank screen, rolling or overlapping screen images) Your TV or video recorder may not be properly connected. Make sure your TV or video recorder is properly connected.
Problem 1Cause 1Solution Computer text is hard to read with a TV The resolution of a TV is lower than a typical computer display. As a result, some text may be harder to read with a TV than with a computer monitor. Lower your computer display resolution: Windows 2000/XP – 2Solution 1 Right-click your Windows desktop background, then click Properties # Settings. 2 Move the Screen area (Windows 2000) or Screen resolution (Windows XP) slider to a lower setting.
Problem 1Cause Can’t record video with a video recorder The video source may be copy protected. Your Matrox product may not let you make copies of copy-protected video. (Some video sources let you make a copy of a video, but you may not be able to make a copy of that copy.) 1Solution To get copies of a copy-protected video, contact the vendor of the video.
3Cause 1Solution Your sound card’s Windows software settings may be incorrect. Specifically, input or output may be disabled, or volume levels may be too low or too high. Windows 2000/XP – Make sure your sound card’s Windows software settings are correct. 1 Double-click the speaker icon ( or ) on the Windows taskbar. If you don’t see the speaker icon: Windows 2000 – a Click Start # Settings # Control Panel. b Double-click the Multimedia or Sounds and Multimedia icon.
8 Close the dialog box. Note: Depending on your sound driver, certain labels may be different. For example, Line In may be labeled Line. 4Cause 1Solution The problem may be specific to the sound card you have. For more information, see your sound card manual. More Information We provide additional information in help and Readme files. Be sure to check for any last-minute release notes included with your product. Also, check the Matrox Web site (www.matrox.
Display information ! Your Matrox graphics card is 100% VGA compatible and supports all VESA standards: VBE 2.0 (Super VGA modes), DPMS (energy saving), and DDC-2B (Plug-and-Play monitor). ! To get the most of your Matrox product, we recommend using the highest color palette setting (a 32-bit color palette) for all your displays. ! If you’re using BNC connectors with a Plug-and-Play monitor, the Plug-and-Play feature of your monitor can’t be used.
! While using 2 displays at a time, your Matrox graphics card supports display resolutions up to 1920 × 1440. ! The highest display resolution supported for digital monitors is 1920 × 1200. ! While using 2 displays in independent mode, each monitor has its own monitor settings (refresh rates). EpicA TC4 ! While using Matrox advanced display control with multiple displays in independent mode, monitor settings are shared by pairs of monitors.
Hardware information Features Matrox EpicA TC2-Lite Matrox EpicA TC2 Matrox EpicA TC4 2 2 4 TV output $* $* — Display rotation — $ $ Main RAMDAC 360 MHz 400 MHz 400 MHz Secondary RAMDAC 230 MHz 400 MHz 400 MHz 32 MB 64 MB 128 MB DDR (Double Data Rate) SDRAM DDR (Double Data Rate) SDRAM DDR (Double Data Rate) SDRAM PCI PCI PCI Low-profile Low-profile Low-profile # of displays supported Memory Memory type Card type Form factor * TV output adapter sold separately (see http:/
Maximum card dimensions – Matrox EpicA TC2-Lite ≤ 0.75 in. / ≤ 1.91 cm 6.60 in. / 16.80 cm 2.536 in. / 6.44 cm 0.325 in. / 0.
Maximum card dimensions – Matrox EpicA TC2 ≤ 0.75 in. / ≤ 1.91 cm 5.20 in. / 13.21 cm 2.536 in. / 6.44 cm 0.325 in. / 0.
Maximum card dimensions – Matrox EpicA TC4 ≤ 0.75 in. / ≤ 1.91 cm 6.60 in. / 16.80cm 2.536 in. / 6.44 cm 0.325 in. / 0.
Customer support Matrox Web Matrox is on the Internet with a World Wide Web (WWW) site. Our Web site has product literature, press releases, technical material, a sales office list, trade show information, and other relevant material. ! Visit the Matrox Graphics Web site at www.matrox.com/graphics. ! E-mail questions or comments regarding the site to webmaster@matrox.com. If you have a problem Matrox values your business and offers professional support for your Matrox product.
Where to get information For system information: ! ! Windows 2000 – Right-click the My Computer icon on your Windows desktop background, then click Properties. Windows 2000/XP – Click Start # Programs # Accessories # System Tools # System Information. ! Windows XP/XPe – Click Start # Settings* # Control Panel # Performance and Maintenance* # System (double-click*). (* Depending on your configuration of Windows, this part of the step may not be necessary.
Warranty A. Limited Warranty Statement 1. Matrox Graphics Inc. (“Matrox”) warrants to the end-user customer, who provides adequate proof of purchase that Matrox hardware products purchased from Matrox authorized dealers will be free from defects in materials and workmanship for a period of 3 years from the date of purchase. This warranty applies only to the original end-user purchaser and is non-transferable. Conditions and limitations of Matrox’s warranty are stated below. 2.
C. Limitations of Liability 1. EXCEPT FOR THE OBLIGATIONS SPECIFICALLY SET FORTH IN THE LIMITED WARRANTY STATEMENT, IN NO EVENT SHALL MATROX BE LIABLE FOR: a. any direct, indirect, special, incidental, consequential, foreseeable or unforeseeable, or punitive damages, whether based on contract, tort, delict or any other legal theory and whether advised of the possibility of such damages, and/or b.
Software license agreement Single User Products This Matrox software (the “Software”) is copyrighted by Matrox Graphics Inc. All rights are reserved. The purchaser is granted a license to use the software only, subject to the following restrictions and limitations: 1. The license is for the original purchaser only, and is not transferable without written permission of Matrox. 2. The original purchaser may use the Software on a single computer owned or leased by the original purchaser.
Index B BIOS 21 C S Hardware Acceleration 24 Information 2, 36–39 Installation 4–6 Software Setup 11–13 7–10 Connection setup Connector KX-20 9 LFH-60 8 40–41 D Installation Hardware 4–6 Overview 3 L Display Information 34 Primary 21 Low-profile Bracket 6 28 M E Expansion slots Monitor Settings 17 Graphics Troubleshooting 18–20 Multi-display Mode 23 G Sound output Troubleshooting 17–33 DVD 28–29 Extra 20–26 Graphics 17–26 Sound 31–32 TV output 29–31 Video 27–28 TV output Connection se
Thank you for choosing Matrox Please register online (http://www.matrox.com/graphics/registration) to be eligible for customer support, new product announcements, and information on special offers and upcoming events.
USA FCC Compliance Statement Remark for the Matrox product support by this guide (Matrox EpicA TC2, Matrox EpicA TC2-Lite) This equipment has been tested and found to comply with the limits for a Class B digital device, pursuant to Part 15 of the FCC Rules. These limits are designed to provide reasonable protection against harmful interference in a residential installation.
CANADA (English) Industry Canada Compliance Statement Remark for the Matrox product support by this guide (Matrox EpicA TC4) These digital apparatus does not exceed the Class A limits for radio noise emission from digital devices set out in the Radio Interference Regulation of Industry Canada.
(Français) Informations aux utilisateurs Européens – Déclaration de conformité Remarque sur les produits matériels Matrox couverts par ce guide (Matrox EpicA TC2, Matrox EpicA TC2-Lite) Ces unités sont conformes à la directive communautaire 89/336/EEC pour les unités numériques de classe B. Les tests effectués ont prouvé qu’elles sont conformes aux normes EN55022/CISPR22 et EN55024/CISPR24.
typique compatible classe A. On suppose qu’ils présenteront la même compatibilité dans tout système compatible classe A. (Deutsch) Information für europäische Anwender – Konformitätserklärung Anmerkung für die Matrox Hardware-Produktunterstützung durch dieses Handbuch (Matrox EpicA TC4) Diese Geräte entsprechen EC Direktive 89/336/EEC für ein digitales Gerät Klasse A. Sie wurden getestet und entsprechen demnach EN55022/CISPR22 und EN55024/CISPR24.
for home and other limited viewing uses only unless otherwise authorized by Macrovision Corporation. Reverse engineering or disassembly is prohibited. (Français) A. Demande de numéros de brevet aux États-Unis 4,631,603, 4,577,216, 4,819,098 et 4,907,093 avec licence pour des utilisations limitées d’affichage uniquement. B.
Copyright © 2008 Matrox Graphics Inc. • (English) All rights reserved. • (Français) Tous droits réservés. • (Deutsch) Alle Rechte vorbehalten. • (Italiano) Tutti i diritti riservati. • (Español) Reservados todos los derechos. Trademarks • Marques déposées • Warenzeichen • Marchi registrati • Marcas registradas Matrox Electronic Systems Ltd. / Matrox Graphics Inc..................................................
(English) Disclaimer THE INFORMATION IN THIS GUIDE IS SUBJECT TO CHANGE AT ANY TIME AND WITHOUT NOTICE. Matrox Graphics Inc. reserves the right to make changes in specifications at any time and without notice. The information provided by this document is believed to be accurate and reliable. However, no responsibility is assumed by Matrox Graphics Inc. for its use; nor for any infringements of patents or other rights of third parties resulting from its use.
Matrox Graphics Inc. 1055 Saint Regis Boulevard Dorval, Quebec, Canada H9P 2T4 North America: 1-800-361-1408 International: (514) 822-6000 Email: graphics@matrox.com Web site: www.matrox.com/graphics Technical support: www.matrox.com/graphics/support To locate the sales office nearest you, visit www.matrox.