
User guide


10 Matrox Avio Series – User Guide
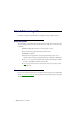
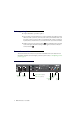
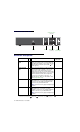
Avio F120 Receiver – Back
Connector descriptions
Connector
TX
RX
Description Required host
connection
12V DC power
input
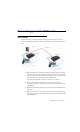
99 Connect the 12V DC power supply included
with your product to this connector. While the
12V DC power supply is connected to the unit
and electrical socket, the power LED ( ) is
active (green).
Dedicated USB
links
9 For host systems that don’t support keyboards
and mice through a USB hub, connect your
host system to the dedicated mouse and
keyboard connectors on your transmitter unit to
support a keyboard and mouse on your receiver
unit. A USB A to mini-B cable is required to
connect to each of these connectors. To
purchase these cables, see the Matrox online
store (shopmatrox.com
).
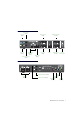
DVI-D SL/DL
*
9 Using the DVI-D cable provided with your
transmitter unit, connect the primary graphics
connector of your graphics hardware to this
connector on your transmitter unit.
Note: Your Avio unit only supports digital input
signals.
DVI-D SL
*
* While using a Dual-Link display resolution (such as 2560 x 1600) with the
DVI SL/DL and
VGA+DVI SL/DL
connectors of your units, the DVI SL and
VGA+DVI SL connectors are disabled.
9 Using the DVI-D cable provided with your
transmitter unit, connect the secondary
graphics connector of your graphics hardware
to this connector on your transmitter unit.
Note: Your Avio unit only supports digital input
signals.
Debug SFP+
VGA+DVI SL/DL
*
(remote)
VGA+DVI SL
(remote)
12V DC
power input