
Installation Guide

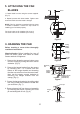

7. MAKE THE ELECTRIC
CONNECTIONS
Remember to disconnect the power. Follow the
steps below to connect the fan to your
household wiring. Use the wire connecting nuts
supplied with your fan. Secure the connectors
with electrical tape. Make sure there are no
loose strands or connections.
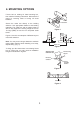
1. Connect the fan supply (black) wire to the
black household supply wire as shown in Figure
10.
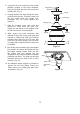
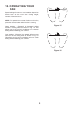
2. Connect the neutral fan (white) wire to the
white neutral household wire. (Fig. 11)
3. Connect the fan ground wire (green) to the
household ground wire.
4. After all splices are made, check to make
sure there are no loose strands. As an
additional precaution we suggest to secure the
plastic wire connectors to the wires with
electrical tape.
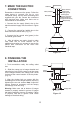
8. FINISHING THE
INSTALLATION
1. Tuck connections neatly into ceiling outlet
box.
2. Slide the canopy up to hanger bracket and
place the key hole on the canopy over the screw
on the hanger bracket, turn canopy until it locks
in place at the narrow section of the key holes.
(Fig. 12)
3. Align the circular hole on canopy with the
remaining hole on the hanger bracket, secure by
tightening the two set screws. Note: Adjust the
canopy screws as necessary until the canopy
and canopy cover are snug.
Warning: Make sure tab at bottom of hanger
bracket is properly seated in groove of hanger
ball before attaching canopy to bracket. Failure
to properly seat tab in groove could cause
damage to electrical wiring.
Figure 11
White (neutral)
Green or bare
copper (ground)
White ("AC IN N")
Ground (green)
(Connect to ground wire
on hanger bracket if no
house ground wire exists.)
Outlet box
Black ("AC IN L")
Black (motor)
Figure 12
Outlet box
Hanger
bracket
Canopy
Canopy cover
Screws
6