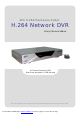
4Ch H.264 Hardware Codec H.264 Network DVR User¡s Manual VER 1.0 4 Channel Network DVR Real-time playback / USB backup The most stable and reliable real stand alone Digital Video Multiplex Recorder Created with novaPDF Printer (www.novaPDF.com). Please register to remove this message.
4Ch H.264 hardware codec - Network DVR Installation & Safeguards INSTALLATION & SAFEGUARDS All the safety and operating instructions should be read before the unit is operated. Environment Condition for Installation 1. To prevent electric shock or other hazard, do not expose units to rain, moisture, or dust. 2. Place this unit in a well-ventilated place and do not place heat-generating objects on this unit. 3.
4Ch H.264 hardware codec - Network DVR Contents Contents CHAP. 1 Features & Package Contents ---------------------------------------------------------------- 4 1-1. Features ---------------------------------------------------------------- 4 1-2. Package Contents ---------------------------------------------------------------- 5 Function of Each Button ---------------------------------------------------------------- 6 2-1.
Ch H.264 hardware codec CHAP. 5 - Network DVR Contents Set up ---------------------------------------------------------------- 18 5-1. General Operation ---------------------------------------------------------------- 18 5-2.
4Ch H.264 hardware codec - Network DVR CHAP 1. Features & Package Contents CHAP 1. Features & Package Contents 1-1.
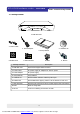
4Ch H.264 hardware codec - Network DVR CHAP 1. Features & Package Contents 1-2. Package Contents NETWORK DVR POWER HDD ACTIVE USB 1. DVR Main Unit 2. Power Cable 5. Software CD 3. Power Adapter 4. User¡s Manual 6. Rubber Pad 7. HDD absorber 8. Bolts Package Contents 9. Mouse Description 1. DVR Main Unit Stand-Alone Digital Video Recorder 2. Power Cable AC power supply to adapters for 12V DC power 3. Power Adapter DC power supply 4. User¡s Manual User¡s Manual 5.
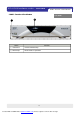
4Ch H.264 hardware codec - Network DVR CHAP 2. Function of Each Button CHAP 2. Function of Each Button 2-1. Front 2 1 Name Function ① USB HOST Used for Data Backup ② LED Lamps Shows status of operation 6 Created with novaPDF Printer (www.novaPDF.com). Please register to remove this message.
4Ch H.264 hardware codec - Network DVR CHAP 2. Function of Each Button 2-2.
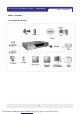
4Ch H.264 hardware codec - Network DVR CHAP. 3 CHAP.3 Installation 3-1. Installation Configuration 8 Created with novaPDF Printer (www.novaPDF.com). Please register to remove this message.
4Ch H.264 hardware codec - Network DVR CHAP. 3 Installation 3-2. Detailed Installation 1) HDD MAIN BOARD ( HDD ) 1. Connect Main Board and HDD using SATA data cable and HDD power cable. 2. Stick the HDD absorber (included in package) on the bottom of case and then install the HDD on top of them by using the bolts (included in package). 3. Screws must be inserted from outside of the case bottom. 2) Camera Connect camera to the camera input on rear panel of DVR marked CAMERA IN.
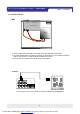
4Ch H.264 hardware codec - Network DVR CHAP. 3 3) Monitor Connect the video output marked MONITOR to Video-In of Main monitor. 4) Power DC over 12V adapter 10 Created with novaPDF Printer (www.novaPDF.com). Please register to remove this message.
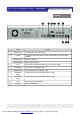
4Ch H.264 hardware codec - Network DVR CHAP. 3 Installation 5) Other External Device RS-485 : Control external device like PTZ camera. (Pin No.8 & No.9 at D-SUB). RELAY Output : Relay Output (Pin No.6 & No.7). SENSOR Input : Sensor Input ? Alarm Input (Pin No.1 ~ No.4).
4Ch H.264 hardware codec - Network DVR CHAP. 4 Operation 4-1. System Log-In 1) After power on, right-click of a mouse shows icon bar on the screen. Then you click the [Menu] icon to log in. 2) Then, you will see ¡DVR Log-In¡ message shown as right. 3) You may log in as a ADMIN, MANAGER, or USER1 ~ USER8. 4) Input your password (Max. 8 digits are available for password) 5) To exit, click ¡EXIT¡ button.
4Ch H.264 hardware codec - Network DVR CHAP. 4 Operation 4-3. Display Configuration ETHERNET connection status icon disconnected HDD space display (Recorded space in HDD) connected OVERWRITE status icon Current Date/ Time display * shown when overwrite is ENABLE * not shown when overwrite is DISABLE * blinking during OVERWRITE PLAYBACK SEARCH FREEZE Ch No.1 single display SEQUENCE Ch No.2 single display ZOOM PIP Ch No.3 single display PTZ Ch No.
4Ch H.264 hardware codec - Network DVR CHAP. 4 Operation 4-4. Live View Setup 1) Full / Multiple View CHAP. 4 사용방법 Move a cursor onto [4 - split icon] in the icon bar and click it to view 4 channel division. To enlarge each channel, click 1,2,3,4 Icon. Then, you will see a channel in full screen mode. Full Screen Full Screen 2) SEQ Click ¡SEQ¡ icon. It automatically displays full screen images in sequence. You can setup SEQ time interval on setup menu.
4Ch H.264 hardware codec - Network DVR CHAP. 4 Operation 4-5. Record It records as a setting made by a user in Schedule Mode. - Emergency Record Once you click this icon , it keeps recording continuously regardless of schedule setting. - Schedule Record Go to MAIN MENU-SCHEDULE SETUP and setup schedule as you want. It records as a setting. - Record Icon in Red indicates Schedule Record, Motion record, and alarm record.
4Ch H.264 hardware codec - Network DVR CHAP. 4 Operation 4-7. SEARCH There are three search methods controlled by a mouse wheel button, left and right button of a mouse. When you click [SEARCH] icon , then you see a window shown as below. Select a target data by using a mouse. In PERCENT SEARCH Mode, you can select a certain data by clicking on the bar. To move to the previous mode, click ¡ESC¡. 1. PERCENT SEARCH Search by percentage of total recorded data.
4Ch H.264 hardware codec - Network DVR CHAP. 4 Operation 4-8. PAN/TILT/ZOOM Camera Operation Click [PTZ] icon in the icon bar, then you can see ¡arrow¡ key & ¡+/-¡ key shown below. Click these arrow keys to move a PTZ camera to each direction. By using ¡+/-¡ key, you can control ZOON IN/OUT function. (¡+¡ : ZOOM IN / ¡-¡ : ZOOM OUT) 4-9. Data Backup Right-click to see icon bar and click [MENU] icon and go to ¡Backup¡. 1.
4Ch H.264 hardware codec - Network DVR CHAP. 5 Set up CHAP. 5 Set up 5-1. General Operation Click [MENU] icon and input user password to log in.
4Ch H.264 hardware codec - Network DVR CHAP. 5 Set up 5-2. DISPLAY SETUP This is setup menu for display on the screen. If you click ¡DISPLAY SET UP¡, then you change setting values for display as shown below. DISPLAY SETUP VGA SETUP SCREEN DISPLAY OSD SETUP ESC 1) VGA SETUP VGA SETUP RESOLUTION 800 X 600 / 75Hz DEFAULT ESC VGA SETUP : Connection to a VGA monitor (CRT/TFT LCD), if optional VGA board is fixed on the main board. You can set ¡RESOLUTION¡ for VGA as shown below. (VGA Default is 800X600.
4Ch H.264 hardware codec - Network DVR CHAP. 5 set up VERTICAL POSITION : -5 ~ 5 HORIZONTAL POSITION : -31 ~ 31 BORDER ENABLE : ON/OFF BORDER COLOR : COLOR SELECT 3) OSD SETUP OSD SETUP TOP OSD OFFSET 0 DEFAULT ESC TOP OSD OFFSET : -1 ~ 1 20 Created with novaPDF Printer (www.novaPDF.com). Please register to remove this message.
4Ch H.264 hardware codec - Network DVR CHAP. 5 Set up 5-3. RECORD This is the most important configuration of the DVR. When you select ¡RECORD SETUP¡ in the main menu, you can see the window as shown on the left. RECORD RECORD SETUP SCHEDULE SETUP 1) RECORD SETUP ESC You can change setup value by using a mouse. RECORD SETUP BIT RATE 2.5 Mbps DEFAULT (1) BIT RATE setup: You can select the size of recording images per 1 second. Recording image quality depends on BIT RATE that you select.
4Ch H.264 hardware codec - Network DVR CHAP. 5 Set up 2) SCHEDULE SETUP DVR system records in Schedule Recording mode. In Schedule Recording mode, you can choose four different types of recording modes and make schedule by 2 hour time frame from Sunday to Saturday. Default recording mode is continuous recording. Set Recording time interval for a day of the week (Time interval : by 2 hour ) and recording type.
4Ch H.264 hardware codec - Network DVR CHAP. 5 Set up 5-4. CONFIGURATION When you click ¡CONFIGURATION¡ on the main menu, you can go to ¡CONFIGURATION¡ menu as shown on the right. CONFIGURATION HDD MANAGEMENT CAMERA SETUP MOTION SETUP ALARM SETUP INTERVAL SETUP TIME/DATE SETUP PASSWORD SETUP ESC 1) HDD MANAGEMENT You can see HDD Model name, serial number, number of blocks and size of HDD. You can also clear HDD. (While you are in this HDD MANAGEMENT Mode, DVR does NOT record.
4Ch H.264 hardware codec - Network DVR CHAP. 5 Set up 2) TIME/DATE SETUP In this setup, you can select date/time of DVR system and display format. You can adjust values by using a mouse wheel or left/right button of a mouse. ※ For the first time installation, date/time setup must be completed first.
4Ch H.264 hardware codec - Network DVR CHAP. 5 Set up 4) MOTION SETUP MOTION SETUP CHANNEL SENSITIYITY DURATION CH1 5 05 ALL-DEFAULT ESC MOTION SETUP : You can change values by mouse wheel and left/right button of a mouse. - SENSITIYITY : Adjusting sensitivity of a movement. You can adjust level 1 ~ level 5. [DEFAULT : 1] - DURATION : Whenever motion is detected and it is set at Motion Recording mode, DVR records for a certain time being from the point of time when motion is detected. (1 sec.
4Ch H.264 hardware codec - Network DVR CHAP. 5 Set up 5) INTERVAL SETUP See the switching time interval for SEQ or PIP function. (1 sec. ~99 sec. ) SEQUENCE SCREEN :Set the sequencing switch time interval in live full screen. INTERVAL SETUP SEQUENCE SCREEN 01 SEC PIP SCREEN 01 SEC EVENT UPDATE 600 SEC PIP SCREEN : Set the sequencing switch time interval of PIP window. DEFAULT ESC EVENT UPDATE : Set the minimum time interval of event to be listed on EVENT LIST.
4Ch H.264 hardware codec - Network DVR CHAP. 5 Set up 5-5. EXTERNAL DEVICE EXTERNAL DEVICE Set parameters of external devices connected to DVR like Ethernet, PTZ camera, Spot monitor etc. If you click ETERNAL DEVICE on the main menu, then you will see the window shown on the right. TCP/IP SETUP PAN/TILT SETUP MOUSE SETUP AUDIO SETUP SPOT SETUP ESC 1) TCP/IP SETUP TCP/IP SETUP TCP/IP function enables you to see live pictures and recorded pictures via internet.
4Ch H.264 hardware codec 1) 2) 3) 4) 5) - Network DVR CHAP. 5 Set up CHANNEL : Select channel MODEL : Select camera model (protocol type) per each channel PTZ ID : Select PTZ ID (per each channel) BAUDRATE : Select data transmission speed CMD DELAY : Select command delay time 3) MOUSE SETUP MOUSE SETUP SENSITIVITY If you increase sensitivity, mouse cursor moves fast. 3 DEFAULT 4) AUDIO SETUP ESC AUDIO SETUP If you select a channel, the audio of the selected channel is recorded.
4Ch H.264 hardware codec - Network DVR CHAP. 5 Set up 5-6. BACK-UP 1) USB SETUP User can back up the recorded data to USB Media using USB (HOST) port on front panel of DVR. Refer to [START] and [END] of data on HDD and set start and end time of data to USB Media ( Memory Stick or USB HDD ). Select backup file size, and move to BACKUP and press [ENTER] Button to start copy. USB HDD control only : Partition can be selectable by Ch button 1~4.
4Ch H.264 hardware codec - Network DVR CHAP. 5 Set up 5-7. FIRMWARE UPGRADE When it comes to firmware upgrade, you may ask your local dealer. 5-8. FACTORY DEFAULT Factory default setting initializes DVR system. Select categories below that you want to initialize and choose ON. Then, click ¡Default¡ button. In order to initialize all of the categories below, choose ON for ¡ALL¡. Then, click ¡Default¡ button.
4Ch H.264 hardware codec - Network DVR CHAP. 6 Network Setup CHAP. 6 Network Setup 6-1. DVR Network Configuration Please call your provider to identify what type of service they are providing you. You will need to know following : Upload speed ? For your own knowledge for expected frame rates. Download speed ? For your own knowledge for expected frame rates. Addressing ? For determining what scenario you should follow. Router ON Site or Just a Modem ? For determining what scenario you should follow.
4Ch H.264 hardware codec - Network DVR CHAP. 6 Network setup TCP/IP function enables you to see live pictures, and allows you to control a PTZ camera via internet. How to set Network depending on ISP 1. Static IP User input IP address in IP CONFIG SETUP which is assigned from ISP company. 1) Verify if IP address is OK or not with PC before connecting DVR. 2) Connect LAN cable to DVR after confirmation. 3) DVR : MENU→EXTERNAL DEVICE→TCP/IP. 4) Set DHCP to MANUAL and go into TCP/IP SETUP.
4Ch H.264 hardware codec - Network DVR CHAP. 6 Network Setup 2. Dynamic IP If you set ¡AUTOMATIC¡ for DHCP Type on TCP /IP setup menu, IP information is automatically assigned from ISP¡s DHCP. 1) Verify if IP address is OK or not with PC before connecting DVR. 2) Connect LAN cable to DVR after confirmation. 3) Turn off and on Modem ( Router ) which is provided by ISP company. -> This is to reset client of MAC from ISP company. User have to wait for 30 seconds after turning on. 4) Turn off and on DVR.
4Ch H.264 hardware codec - Network DVR CHAP. 6 Network Setup 3. Dynamic IP of PPPoE (DSL) DVR doesn¡t support DSL(PPPoE), user have to set NETWORK with IP SHARE if user need to access DVR remotely. At this time, user have to port forward on DVR. Please contact IP SHARE Manufacturer if You need to know how to forward port.
4Ch H.264 hardware codec - Network DVR CHAP. 7 Web Viewer Setup CHAP. 7 Web-Viewer Setup 7-1. Registering DVR for DDNS (DDNS Web-server) 1) Please access www.j2kip.com and click Register Member ID. 2) Please click DVR Add to register DVR. 35 Created with novaPDF Printer (www.novaPDF.com). Please register to remove this message.
4Ch H.264 hardware codec - Network DVR CHAP. 7 Web Viewer Setup 3) Please click confirm after inputting DVR information (DVR Name and MAC Address only). Then, Click ¡confirm¡ button. 4) Now, DVR is listed on DDNS web server without IP and Port number. 36 Created with novaPDF Printer (www.novaPDF.com). Please register to remove this message.
4Ch H.264 hardware codec - Network DVR CHAP. 7 Web Viewer Setup 7-2. DDNS set up in DVR * The following setting is a sample for a cable modem connected to DVR directly. 1) Go to Menu 2) Go to IP SETUP menu, if you set DHCP AUTOMATIC then, it detects IP address automatically. IP SETUP MAC ADDRESS DHCP MODE 00-00-00-00-00-00 AUTOMATIC IP PORT IP ADDRESS GATEWAY SUBNET 50000 192 168 001 160 192 168 001 001 255 255 255 000 DEFAULT ESC 3) Go to the previous menu and click DDNS SETUP.
4Ch H.264 hardware codec - Network DVR CHAP. 7 Web Viewer Setup 4) Set DDNS ON/OFF ¡ON¡. IP address which is assigned from DHCP server is automatically input on DNS SERVER. DDNS SETUP DDNS ENABLE DNS SERVER INTERVAL ON 192.168.063.001 D-00 H-00 N-20 REGISTER DDNS STATUS IP ADDRESS IP PORT REMAIN TIME LAST REGISTRATION DATE > WED. 12 JUL 2006 REGISTER OK 192.168.001.
4Ch H.264 hardware codec - Network DVR CHAP. 7 Web Viewer Setup 6) Go to your computer again after you see ¡SUCCESS TO REGISTER DVR INFO¡ and then Click ¡refresh¡ button. Then, DDNS server automatically catches your DVR¡s IP address and Port number. Note. Before using Web-Viewer, please add www.j2kip.com on Trusted Sites at first installation as follows. (Tools -> Internet Options -> Security) ① ② 39 Created with novaPDF Printer (www.novaPDF.com). Please register to remove this message.
4Ch H.264 hardware codec - Network DVR CHAP. 7 Web Viewer Setup ③ ④ ⑤ Click ⑥ Leave this check box empty ⑦ 40 Created with novaPDF Printer (www.novaPDF.com). Please register to remove this message.
4Ch H.264 hardware codec - Network DVR CHAP. 7 Web Viewer Setup 7-3. Web Viewer You can see live view and control PTZ camera via Web Viewer. 1) Please click the following icon to execute Web-Viewer. *If ActiveX control installation is required for the first time access, please click ¡Yes¡. Click 2) The following Web-Viewer will pop up. Press ¡connect¡ button to see the Live image. 41 Created with novaPDF Printer (www.novaPDF.com). Please register to remove this message.
4Ch H.264 hardware codec 3) - Network DVR CHAP 7. Web Viewer Setup Web Viewer Interface 1 2 3 4 6 5 2 DVR connection setup : Input network information to connect. (IP / PORT / ID / PW) Network connection a) CONNECT : Click this button to connect to DVR & see live view over a network. b) DISCONNECT : Click this button to disconnect. 3 System information : Displays connection status and operating information. 4 PTZ control : Controls PTZ cameras connected to DVR remotely.
4Ch H.264 hardware codec - Network DVR CHAP. 7 Web Viewer Setup 7-4. Web Backup Player You can see backup images via Web Backup Player. 1) To execute Web Backup Player, click web viewer icon on the right. * *If ActiveX control installation is required for the first time access, please click ¡Yes¡. 2) The following Web-Viewer will pop up. Press ¡open¡ button to open the backup image file. 3) Choose one backup data file and click ¡open¡ button on window.
4Ch H.264 hardware codec - Network DVR CHAP 7. Web Viewer Setup 4) Web Backup Player Interface 1 2 3 4 5 a 9 1 2 3 4 5 6 7 8 9 8 b c d e f g 6 7 Time display : Displays current time. Recorded data display : Displays start time & end time of recorded data. Also, displays operating status during playback.
4Ch H.264 hardware codec - Network DVR CHAP 7. Web Viewer Setup Image EDIT 1 2 3 1 RECORDED DATA DISPLAY : Displays start time & end time of recorded data. Also, displays operating status during playback. 2 EDIT TOOL : User can adjust color tone of copied images using this buttons. - Contrast : make bright part of image brighter and dart part of image darker : To reduce light and shade, lower contrast a little.
4Ch H.264 hardware codec - Network DVR CHAP 7. Web Viewer Setup AVI SAVE 1 2 3 1 RECORDED DATA DISPLAY : Displays start time & end time of recorded data. Also, displays operating status during playback. 2 OPTION : Used to save data in AVI file format. CHANNEL : Selects channel FRAMERATE : Decides frames per second of data to be saved. SIZE : Decides the size of data to be saved automatically. START : Starts saving STOP : Stops saving.
4Ch H.264 hardware codec - Network DVR CHAP. 7 Web Viewer Setup 7-5. Web Backup 1) Log on to www.j2kip.com first and then, click ¡DVR Web Backup¡ icon on the left. 2) To execute BACKUP, input IP Address & Port and click ¡Connect Test¡ button. 47 Created with novaPDF Printer (www.novaPDF.com). Please register to remove this message.
4Ch H.264 hardware codec - Network DVR CHAP. 7 Web Viewer Setup 3) After Connect Test is done, you can see ¡Success Connect Test!¡ message. Then, click ¡lock¡ button and click ¡Set Backup Time¡ button. 4) Now you set ¡Start Time¡, ¡End Time¡, ¡Save File Path¡, ¡File Size¡ and click ¡Apply¡. 48 Created with novaPDF Printer (www.novaPDF.com). Please register to remove this message.
4Ch H.264 hardware codec - Network DVR CHAP. 7 Web Viewer Setup 5) After finishing time setting, click ¡Start Backup¡ to start backup. Then, you can see the backup file on the path that you chose. 49 Created with novaPDF Printer (www.novaPDF.com). Please register to remove this message.
4Ch H.264 hardware codec - Network DVR CHAP 8. Specifications CHAP. 8 Specifications ? H.264 Hardware Codec ? Real time live display in all channels ? Triplex (Playback/Recording/Ethernet) ? Web monitoring ? Easy control by Mouse ? USB host for data backup.
4Ch H.264 hardware codec - Network DVR MEMO : 51 Created with novaPDF Printer (www.novaPDF.com). Please register to remove this message.
4Ch H.264 hardware codec - Network DVR MEMO : 52 Created with novaPDF Printer (www.novaPDF.com). Please register to remove this message.
4Ch H.264 hardware codec - Network DVR MEMO : 53 Created with novaPDF Printer (www.novaPDF.com). Please register to remove this message.
4Ch H.264 hardware codec - Network DVR MEMO : 54 Created with novaPDF Printer (www.novaPDF.com). Please register to remove this message.
4Ch H.264 hardware codec - Network DVR 4Ch Real time/Triplex/Mux 55 Created with novaPDF Printer (www.novaPDF.com). Please register to remove this message.