
Specifications


DVR16M 15 GB
5) Alarm Polarity Set-Up
1. Press#or$ to select the alarm polarity setting.
2. Press"or!to set the alarm polarity LOW / OFF / HIGH.
3. Press MENU to confirm the current set-up and return to the previous menu.
4. Press MENU again to exit and close the alarm menu.
6) Alarm Recording Mode Set-Up
1. Press
#
or
$
to select the RECORD setting.
2. Press
"
or
!
to choose the recording mode: EVENT / NORMAL / OFF.
EVENT: when the alarm on this channel is triggered, it will be recorded more frequently than other channels.
NORMAL: alarm triggering will not affect the recording frequency of this channel.
OFF: this channel will not be recorded under any circumstances.
3. Press MENU to confirm the current set-up and return to the previous menu.
4. Press MENU again to exit and close the alarm menu.
g) Motion Detection Set-Up
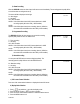
1) Enter Motion Detection Menu
Press the MENU button on the front of the device, enter the password
and confirm it by pressing ENTER (cf. "4a: Open Main Menu" on p. 7).
Press"or!until 'CAMERA' is selected (cf. figure on the right).
Press ENTER TWICE to enter the motion detection menu. The current camera picture is shown, overlaid with the
motion targets (see below). Push the up, down, left & right buttons to move around in the grid.
REMARK: a motion detection will not automatically trigger the live or recording mode. It will only affect the sequence
of channels shown in live/recording mode, with the
icon appearing when a motion detected channel is shown.
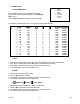
1 2 3 4 5 6 7 8 9 10 11 12 13 14 15
032
--
--
--
--
--
--
-- -- -- -- -- -- --
--
--
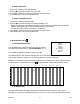
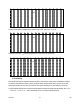
2) Set Detection Area
Pressing the ENTER button will activate / deactivate the selected position (see figure below: row 6, column 7).
Alternately, you can push the channel select button of the cell on the row you're on that you would like to turn on/off.
(MENU)
SEARCH
TIMER
RECORD
► CAMERA
SYSTEM
EVENT