
Product Manual


Limited Warranty – Abrasive Blasters
1. DURATION: From the date of purchase by the original purchaser as follows: for five (5) years, with exceptions noted below.
2. WHO GIVES THIS WARRANTY (WARRANTOR): Maxus, 100 Production Drive, Harrison, Ohio, 45030
Telephone: (888) Maxus4U – www.maxustools.com
3. WHO RECEIVES THIS WARRANTY (PURCHASER): The original purchaser (other than for purposes of resale) of the Maxus product.
4. WHAT PRODUCTS ARE COVERED BY THIS WARRANTY: Any Maxus abrasive blaster supplied or manufactured by Warrantor.
5. WHAT IS COVERED UNDER THIS WARRANTY: Defects due to material and workmanship with the exceptions noted below.
6. WHAT IS NOT COVERED UNDER THIS WARRANTY:
A.Implied warranties, including those of merchantability and FITNESS FOR A PARTICULAR PURPOSE ARE LIMITED FROM THE DATE
OF ORIGINAL PURCHASE AS STATED IN THE DURATION. If this product is used for rental purposes, the warranty will apply for
ninety (90) days from the date of purchase. Some States do not allow limitations on how long an implied warranty lasts, so the
above limitations may not apply to you.
B. ANY INCIDENTAL, INDIRECT, OR CONSEQUENTIAL LOSS, DAMAGE, OR EXPENSE THAT MAY RESULT FROM ANY DEFECT,
FAILURE, OR MALFUNCTION OF THE PRODUCT. Some States do not allow the exclusion or limitations of incidental or
consequential damages, so the above limitation or exclusion may not apply to you.
C. Any failure that results from an accident, purchaser’s abuse, neglect or failure to operate products in accordance with
instructions provided in the owner’s manual(s) supplied with product.
D.Pre-delivery service, i.e. assembly, filtration, and adjustment.
E. Normal adjustments or expendable items which are explained in the owner’s manual(s) provided with the product including but
not limited to parts subject to normal wear such as nozzles, air jets, seal blocks, valves, o-rings, hose connections, hoses and blast
gun.
F. Items or service that require periodic replacement to maintain the product, i.e. filters, gaskets, valves, etc.
G.Additional items not covered under this warranty:
a. Any component damaged in shipment or any failure caused by installing or operating unit under conditions not in
accordance with installation and operation guidelines.
b. Failure caused by rain, excessive humidity or corrosive environments.
c. Cosmetic defects that do not interfere with blaster functionality.
d. Rusted tanks, including but not limited to rust due to improper cleaning/storage.
e. Other items not listed but considered general wear parts.
7. RESPONSIBILITIES OF WARRANTOR UNDER THIS WARRANTY: Repair or replace, at Warrantor’s option, products or components
which are defective, have malfunctioned and/or failed to conform within duration of the warranty period.
8. RESPONSIBILITIES OF PURCHASER UNDER THIS WARRANTY:
A.Provide dated proof of purchase and maintenance records.
B.Call Maxus (888-629-8748) to obtain your warranty service options. Freight costs must be borne by the purchaser.
C. Use reasonable care in the operation and maintenance of the products as described in the owner’s manual(s).
9. WHEN WARRANTOR WILL PERFORM REPAIR OR REPLACEMENT UNDER THIS WARRANTY: Repair or replacement will be scheduled
and serviced according to the normal work flow at the servicing location, and depending on the availability of replacement parts.
Limited Warranty applies in the U.S., Canada and Mexico only and gives you specific legal rights. You may also have other rights
which vary from State to State or country to country.
6
15 Sp
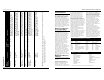
HUMEDAD EN EL AIRE COMPRIMIDO
Al comprimir el aire, la humedad en ella contenida produce agua en el tanque del compresor. Cuando el nivel de humedad es muy alto o cuando
el compresor ha estado en uso continuo por mucho tiempo, ésta se acumula en el tanque. Durante el trabajo de abrasión, esta agua viene
transportada desde el tanque por la manguera y se combina con los medios de abrasión.
IMPORTANTE: ESTA MEZCLA DE AGUA Y MATERIAL ABRASIVO OBSTRUYE EL SISTEMA. LA CHORREADORA DEJARÁ DE FUNCIONAR.
Un secador de aire comprimido y/o un separador de agua ayudará a resolver este problema.
Presión baja o no hay presión en la
herramienta
El material abrasivo no sale de la pistola
La pistola no cesa de rociar - gatillo
atascado
Chisporreo - sistema de vacío
insuficiente
Chisporreo - fuga de aire/abrasivo en la
boquilla/propulsor
Chisporreo - fuga de vacío
Chisporreo - obstrucción por partículas
1. El regulador está ajustado
incorrectamente
2. La manguera tiene un quiebre
3. El filtro del compresor está sucio
1. La manguera del material está
obstruida
2. Hay acumulación en el propulsor
3. Material húmedo o muy pesado
4. Hay agua en el suministro de aire
Los anillos en O de la válvula de aire
están dañados
1. El propulsor y/o la boquilla están
desgastados
2. Hay acumulación de abrasivo en el
propulsor/boquilla
1. La boquilla o el propulsor están
sueltos
2. El anillo en O está dañado
1. La manguera del material está floja
2. El anillo en O está dañado
El orificio del conector de la manguera
está cubierto
1. Reajuste el regulador
2. Enderece la manguera
3. Limpie o reemplace el filtro
1. Reduzca la presión a menos de
40 PSI. Sostenga firmemente la
punta de la pistola contra el piso
y hale el gatillo para forzar el
material fuera de la manguera
2. Quite la boquilla y limpie alrededor
del propulsor
3. Reemplace el abrasivo con abrasivo
seco. (El material húmedo puede
secarse y volver a usar)
4. Drene el tanque del compresor e
instale un separador de agua -
Vea la sección “Humedad en el Aire
Comprimido”
Reemplace los anillos en O
1. Reemplace el propulsor y/o la
boquilla
2. Quite la boquilla y el propulsor
y límpielos. Asegúrese de que las
roscas estén limpias antes de volver
a montar
1. Apriete la boquilla o el propulsor
2. Reemplace el anillo en O
1. Apriete la manguera del material
2. Reemplace el anillo en O
Destape el orificio del conector de la
manguera
Tabla de diagnóstico de averías
Síntoma Causa(s) posible(s) Acciones a tomar
LA HOJA DE DATOS DE SEGURIDAD DEL MATERIAL (MSDS) PUEDE OBTENERSE DE SU ABASTECEDOR DE MATERIAL ABRASIVO.
www.maxustools.com
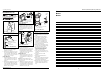
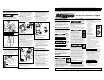
Operating Instructions MXS11001, MXS11002, MXS11003 y MXS11004
Funcionamiento
(Continuación)
6. Cuando llene la tolva, filtre siempre el
material abrasivo (en el cedazo) para
eliminar todo material aglutinado y
residuos, y así evitar obstrucciones.
7. Use la presión efectiva más baja en
materiales suaves, aluminio, bronce,
vidrio y madera.
8. Use la presión más elevada para
materiales duros.
9. Llene la tolva con material abrasivo
hasta 3/4 de la capacidad.
10. Cuando haya terminado el montaje y
tenga puesto el equipo de seguridad
apropiado, apunte la pistola
chorreadora a la superficie y hale el
gatillo.
11. Cada vez que quita la boquilla para
limpiarla o reemplazarla, limpie la
rosca con un cepillo y reemplace el
anillo en O.