
Installation Guide

9
MAINTENANCE
Doors/Hinges
Over time and with heavy use doors the hinges may become loose. If the door is be-
ginning to sag, it may become necessary to tighten the screws that mount the hinge
brackets to the frame of the unit. If the doors are loose or sagging this can cause the
hinge to pull out of the frame which may damage both the doors and the door hinges.
In some cases this can require qualified service agents or maintenance personnel.
Drain Maintenance
Each unit has a drain located inside the unit which removes the condensation from the
evaporator coil and evaporates it at an external condensate evaporator pan. Each
drain can become loose or disconnected from moving or bumping the drain. If you
notice excessive water accumulation on the inside of the unit be sure the drain tube is
connected from the evaporator housing to the condensate evaporator drain pan. If
water is collected underneath the unit you may want to check the condensate evap-
orator drain tube to be sure it is still located inside the drain pan. The leveling of the unit
is important as the units are designed to drain properly when on a level surface, if your
floor is not level this can also cause drain problems. Be sure all drain
lines are free of
obstructions. Typically food product may block drain lines, causing water to back up
and overflow the drain pans.
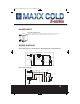
Door Replacement and Adjustment
1. Open the door to about 100-110° until the door remains open.
2. Loosen and remove the bottom screw of self-closing cartridge and the three hinge
screws, then slide the door down and out.
3. Prepare the new door. Use a wrench to rotate the square head of the cartridge
shaft approximately 120° in the closing direction of the door. The hinge is now pre-
loaded and ready to be secured to the bottom hinge
4. Hold the door at about 100° from the closed position, insert the bottom hinge over
the square shaft of the cartridge so that the hinge is facing the cabinet. Insert the
mounting screw and fasten securely.
5. Still holding the the entire door/hinge assembly at about 100°, slide it up to the top
hinge pin, ensuring proper alignment then fasten the bottom hinge securely.
6. Allow the door to freely swing, making sure it swings closed by itself without
restriction.
maxxx cold manual:Layout 1 5/16/11 11:12 AM Page 11