
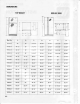
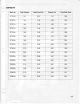
Specifications
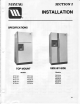
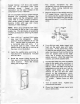

UNCRATING
1. Lay
appliance on back.
2. Remove
bottom cap
by cutting
band
and
pulling
cap
away.
3.
Remove crate base by
removing
four
(4)
bolts.
4. Discard crate base.
5. Return appliance
to an upright
position
6.
Lift carton up and off.
NOTE:
lf
using a
hand
truck to move
refrigerator.
NEVER PLACE STRAP
OVER THE
HANDLES. Avoid
overtightening strap
to
prevent
misaligning doors.
7.
Remove
all exterior and
interior tape,
carefully
retain
old
tape. Make a small
pad
of this tape
to
pick
off any
remaining tape residues. This will
eliminate
the need to use dangerous
solvents
of
any
kind.
8. Remove and discard cantilever shelf
packing
clips located
just
above each
shelf where
it hooks
onto
the frame.
To remove
a clip,
wiggle
sideways and
pull
straight out.
NOTE: Should it be necessary to remove
the doors
for installation
purposes,
see
page
2-9.
ln
addition,
hinges may
be
removed if necessary. Care MUST be
taken since the water and electrical lines
will
need
to be disconnected
on those
models with ice and water fountains. Both
can
be disconnected
just
behind the
hinge.
LOCATION
1. Select a
location
for
your
new
ref rigerator
away
f rom
any
heat
sources.
Allow
a
free
flow of air
through the front base
grille.
2. Your model
should
NOT
be installed
where the temperature will
go
below
55"F because
if
will not
run
frequently
enough to maintain
proper
temperature in the freezer.
3.
For
ease of
installation,
you
should
leave
a space of about one-half inch
between
your
ref rigerator and
adjacent walls or cabinets.
WATER
CONNECTION
For those models without an lce Maker.
Most models are designed so an
automatic lce Maker
can
be easily
installed. The lce Maker kits
come
with
installation instructions. water connection
instructions and
other
information
concerning the ice maker operation.
For
those models
with lce
Maker.
To
locate water valve:
For
the 22 and 24 cubic foot models,
remove
the center screw from the right
end of the
black
fiber
panel
that covers
the
machine
compartment with a socket
driver, and fold back the etch marked flap.
Save the screw for later reinstallation
as
this flap
is required for
proper
and safe
operation of the refrigerator.
For
the 20 cubic foot model. follow above
sequence for the left
side of
the fiber
panel.
To connect
water:
All installations
must be in accordance
with local
plumbing
code requirements.
2-6