Precision Touch Control 500 Electric Smoothtop ® Use & Care Guide Table of Contents Safety .......................................... 1-4 Surface Cooking ...................... 5-8 Controls Smoothtop Surface Oven Cooking ......................... 9-18 Baking Cook & Hold Delay Keep Warm Broiling Oven Racks Form No. A/06/03 Part No. 8113P395-60 Care & Cleaning ................... 19-22 Self-Clean Oven Cleaning Procedures Maintenance ...............................
Model Number __________________________________ To ensure proper and safe operation: Appliance must be properly installed and grounded by a qualified technician. Do not attempt to adjust, repair, service, or replace any part of your appliance unless it is specifically recommended in this guide. All other servicing should be referred to a qualified servicer. Serial Number __________________________________ Always disconnect power to appliance before servicing.
Safety Child Safety CAUTION NEVER store items of interest to children in cabinets above an appliance. Children climbing on the appliance or on the appliance door to reach items could be seriously injured. • NEVER leave children alone or unsupervised near the appliance when it is in use or is still hot. Children should never be allowed to sit or stand on any part of the appliance as they could be injured or burned. • Children must be taught that the appliance and utensils in it can be hot.
Safety hazards, result in performance problems, and reduce the life of the components of the appliance. cleaning. Clean with caution. Use care to avoid steam burns if a wet sponge or cloth is used to wipe spills on a hot surface. Some cleaners can produce noxious fumes if applied to a hot surface. • If pan is smaller than element, a portion of the element will be exposed to direct contact and could ignite clothing or potholder. • Clean only parts listed in this guide.
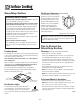
Surface Cooking Surface Controls Suggested Heat Settings The size, type of cookware and cooking operation will affect the heat setting. For information on cookware and other factors affecting heat settings, refer to Cookware Recommendations on page 7 and “Cooking Made Simple” booklet. Use to turn on the surface elements. An infinite choice of heat settings is available from Low to High. The knobs can be set on or between any of the settings.
Surface Cooking Smoothtop Surface FlexChoice Element (select models) The FlexChoice element is a fully functioning element that provides an ultra low (Warm) heat setting for holding delicate sauces and keeping cooked foods warm. It is located in the right rear position. Smoothtop Surface Notes: • Cooktop may emit light smoke and odor the first few times the cooktop is used. This is normal. • Smoothtop cooktops retain heat for a period of time after the element is turned off.
Surface Cooking • Make sure the surface and the pan bottom are clean before turning on to prevent scratches. Flat Pan Tests • To prevent scratching or damage to the glass-ceramic top, do not leave sugar, salt or fats on the cooking area. Wipe the cooktop surface with a clean cloth or paper towel before using. The Ruler Test: • Never slide heavy metal pans across the surface since these may scratch. 3. Little or no light should be visible under the ruler. See if your pans are flat. 1.
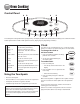
Oven Cooking Control Panel A B E F G H C D I J The control panel is designed for ease in programming. The display window on the control shows time of day, timer and oven functions. Control panel shown includes model specific features. (Styling may vary depending on model.) A Broil Use for broiling and top browning. Clock B Bake Use for baking and roasting. C D More+ or LessTimer Enters or changes time, oven temperature. Sets HI or LO broil. Sets Timer.
Oven Cooking Locking the Control and Oven Door To cancel the Clock display: If you do not want the time of day to display: Press and hold the CANCEL and Clock pads for three seconds. The time of day will disappear from the display The touch pad controls and oven door can be locked for safety, cleaning, or to prevent unwanted use. They will not function when locked. When the clock display is canceled, press the Clock pad to briefly display the time of day.
Oven Cooking Baking Baking Differences Between Your Old and New Oven Operating the Controls for Routine Baking: It is normal to notice some baking time differences between a new oven and an old one. See “Adjusting the Oven Temperature” on page 12. 1. Press the Bake pad. • “BAKE” will flash. • 000 will light in the display. 2. Select the oven temperature. The oven temperature can be set from 170° to 550°. Press or press and hold the More+ or Less- pads.
Oven Cooking When the Delay time has expired: Delay Bake • “DELAY” will turn off. CAUTION • Baking time is displayed. • “BAKE” and “HOLD” are displayed. Do not use delayed baking for highly perishable foods such as dairy products, pork, poultry, or seafood. To set a Delay when Cook & Hold has already been programmed: When using Delay, the oven begins to cook later in the day. Set the amount of time that you want to delay before the oven turns on and how long you want to cook.
Oven Cooking Keep Warm Keep Warm Notes: For safely keeping foods warm or for warming breads and plates. • For optimal food quality, oven cooked foods should be kept warm for no longer than 1 to 2 hours. To set Keep Warm: • For optimal food quality and color, foods cooked on the range top should be kept warm for an hour or less. 1. Press the Keep Warm pad. • “WARM” flashes. • To keep foods from drying, cover loosely with foil or a lid. • 000 appears in the display. • To warm dinner rolls: 2.
Oven Cooking Automatic Shut-Off/Sabbath Mode The oven will automatically turn off after 12 hours if you accidentally leave it on. This safety feature can be turned off. To cancel the 12-hour shut-off and run the oven continuously for 72 hours: 1. Set the oven to bake (see page 9). 2. Press and hold the Clock pad for three seconds. • SAb will be displayed and flash for five seconds. Adjusting the Oven Temperature Oven temperatures are carefully tested for accuracy at the factory.
Oven Cooking Broiling 5. Place food in the oven. Leave oven door open about four inches (the first stop). To set Broil: 6. Turn meat once about halfway through cooking. 1. Press the Broil pad. 7. When food is cooked, press the CANCEL pad. Remove food and broiler pan from the oven. • “BROIL” flashes. • SEt is displayed. 2. Press the More+ pad to set HI broil or press the Less- pad to set LO broil. • The time of day will reappear in the display. • HI or LO will be displayed.
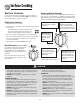
Oven Cooking Oven Racks Oven Vent When the oven is in use the area near the vent may become hot enough to cause burns. Never block the vent opening. CAUTION The oven vent is located below the backguard vent shield on your range. OVEN VENT LOCATION • Do not attempt to change the rack position when the oven is hot. Do not place plastics near the vent opening as heat from the vent could distort or melt the plastic. • Do not use the oven for storing food or cookware. The oven has two racks.
Oven Cooking RACK 2: Used for roasting small cuts of meat, frozen pies, dessert souffles or angel food cake. Also use for two rack baking. Baking Layer Cakes on Two Racks RACK 1: Used for roasting large cuts of meat and poultry. Place the cakes on the rack as shown. For best results when baking cakes on two racks, use racks 2 and 4. Oven Bottom: Place oven rack on raised sides of oven bottom. Use for additional space when cooking large oven meals.
Care & Cleaning Self-Clean Oven To set Self-Clean: Note: Oven temperature must be below 400° F to program a clean cycle. CAUTION • It is normal for parts of the range to become hot during a self-clean cycle. 1. Close the oven door. 2. Press the Clean pad. • To prevent damage to oven door, do not attempt to open the door when LOCK is displayed. • “CLEAN” flashes in the display. • Avoid touching cooktop, door, window or oven vent area during a clean cycle.
Care & Cleaning During the Self-Clean Cycle 5. Press the More+ or Less- pad to scroll through the selfcleaning settings. When LOCK shows in the display, the door cannot be opened. To prevent damage to the door, do not force the door open when LOCK is displayed. CL-H (Clean – Heavy Soil, 4 hours) CL-M (Clean – Medium Soil, 3 hours) Smoke and Smells CL-L (Clean – Light Soil, 2 hours) You may see some smoke and smell an odor the first few times the oven is cleaned. This is normal and will lessen in time.
Care & Cleaning Cleaning Procedures CAUTION • Be sure appliance is off and all parts are cool before handling or cleaning. This is to avoid damage and possible burns. • To prevent staining or discoloration, clean appliance after each use. • If a part is removed, be sure it is correctly replaced. PART * Brand names are registered trademarks of the respective manufacturers. ** To order call 1-877-232-6771. PROCEDURE Backguard and Porcelain enamel is glass fused on metal and may crack or chip with misuse.
Care & Cleaning PART PROCEDURE Oven Window and Door – Glass • Avoid using excessive amounts of water which may seep under or behind glass causing staining. • Wash with soap and water. Rinse with clear water and dry. Glass cleaner can be used if sprayed on a cloth first. • Do not use abrasive materials such as scouring pads, steel wool or powdered cleaners as they will scratch glass. Oven Interior • Follow instructions on pages 16-17 to set a self-clean cycle. Oven Racks • Clean with soapy water.
Maintenance Oven Door To replace: 1. Fit the ends of the drawer glides into the rails in the range. CAUTION 2. Lift up the front of the drawer and gently push in to the first stop position. Do not place excessive weight on or stand on an open oven door. This could cause the range to tip over, break the door, or injure the user. 3. Lift drawer up again and push until drawer is closed. Leveling Legs Note: The oven door on a new range may feel “spongy” when it is closed.
Troubleshooting PROBLEM SOLUTION For most concerns, try these first. • • • • Check if oven controls have been properly set. Check to be sure plug is securely inserted into receptacle. Check or re-set circuit breaker. Check or replace fuse. Check power supply. Part or all of appliance does not work. • • • • • Check if surface and/or oven controls have been properly set. See pages 4 & 9. Check if oven door is unlocked after self-clean cycle. See pages 16-17.
Troubleshooting PROBLEM SOLUTION Smoothtop surface shows wear. 1. Tiny scratches or abrasions. • Make sure cooktop and pan bottom are clean. Do not slide glass or metal pans across top. Make sure pan bottom is not rough. Use the recommended cleaning agents. See page 18. 2. Metal marks. • Do not slide metal pans across top. When cool, clean with Cooktop Cleaning Creme. See page 18. 3. Brown streaks and specks. • Remove spills promptly. Never wipe with a soiled cloth or sponge.
Warranty & Service Full One Year Warranty Parts and Labor For one (1) year from the original retail purchase date, any part which fails in normal home use will be repaired or replaced free of charge.