
Operating instructions
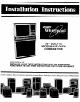


Begin the
installation -
Remove racks and all other contents from oven
before removing appliance.
A. Remove shipping skid
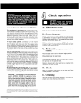
NOTE:
Before installing the oven in the cut-out, it may be
helpful to remove the lower oven door. See details
below.
Insert appliance into cut-out. Screws are provided for
fastening the front frame of the appliance to the cabinet.
The mounting holes in the front frame of appliance may
be used as a template to locate the appliance moun-
ting screw holes.
CAUTION:
For your personal safety, and to minimize poten-
tial personal injury, this oven must be securely
fastened to the cabinet, using the four screws
that are provided.
TO REMOVE OVEN DOOR-SELF-CLEANING
MODELS (Door to be removed for installation only.
VIEW A
2. Put a nail (932” or smaller) or equivalent in the hole
in each of the hinges. Close the oven door until the
pins touch the oven front. See View 13.
3. The oven door can now be lifted off.
4. Reinstall oven door the same as on non-self clean-
ing models. (See page 5)
5. Reinstall the
door mounting screws.
1. Remove the two screws, one on each side of the in-
ner door panel. See View A.
4