
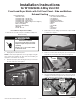
Installation Instruction

— 2 —
(continued)
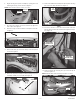
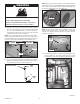
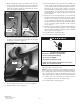
7. Disconnect door switch connector located on top right front
side of dryer. See Figure 4.
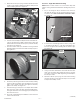
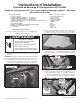
8. Remove four (4) screws from bottom of front panel as shown
in Figure 6.
W10337809C
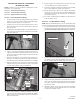
6. Begin removing front panel assembly by opening door and
removing the two (2) screws shown in Figure 5.
NOTE: After removal of these screws, close door.
9. Remove the three (3) screws from the top of the front panel
as shown in Figure 7.
figure 5
figure 6
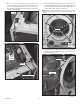
figure 8
figure 7
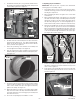
10. Remove front panel assembly from dryer by lifting front panel
assembly off tabs (one each side).See Figure 8.
11. Remove the bulkhead assembly from dryer by first removing
lint screen from dryer lint duct. See Figure 9.
figure 9
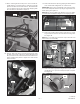
12. Disconnect moisture sensor disconnect block from main
harness disconnect block located at lower right side of dryer.
See Figure 10.
figure 10
13. Remove lint duct by removing four (4) screws and clip as
shown in Figure 11.
NOTE: Slide lint duct down and away from dryer to remove.
figure 11