
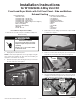
Installation Instruction
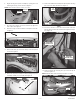
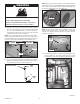
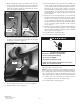

17. Before removing drum from dryer the CCU & bracket as-
sembly must be secured in position to side panel using the
plastic hook attached to the main harness. This will allow the
CCU assembly to hang in place rather than dropping down
when the drum is removed. See Figure 15.
— 4 —
(continued)
18. Remove drum from dryer by reaching into dryer just under
the drum to back side of drive motor. Grasp idler pulley and
lift up to relieve tension from belt and remove belt from motor
pulley and idler pulley. Refer to Figure 16 for belt removal
and reassembly.
figure 15
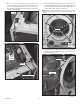
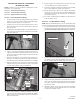
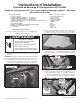
19. Remove drum from the dryer by grasping the drum belt and
front of drum while sliding drum out of cabinet front.
IMPORTANT: Note position of drum belt, front and rear orienta-
tion for reassembly. The drum front opening is larger than the rear
drum opening. See Figure 17.
NOTE: When removing drum from cabinet be sure not to hit the
CCU & bracket assembly knocking it from its hanging position.
W10337809C
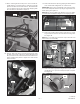
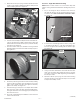
20. Remove the existing exhaust vent by removing one (1) 3/8”
long screw that secures the vent to the blower housing outlet.
See Figure 18.
NOTE: The screw (3/8” long) removed in step 20 must be used
in this location for reassembly.
figure 17
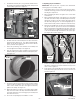
figure 19
21. Remove the vent ring by depressing the three (3) tabs on the
ring allowing you to push it out away from dryer rear panel.
See Figure 19.
figure 18 (gAs Dryer shown)
figure 16