
Installation Instruction

— 9 —
W10337809C
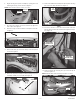
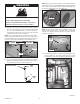
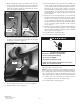
7. When reattaching the upper front bracket, make sure the
central control bracket front is above the upper front bracket,
see Figure 12B. Insert and push down two (2) ear tabs on
either side of bracket, Figure 37. Reattach five (5) screws
as shown in Figures 12A and 12B.
figure 37
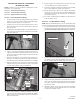
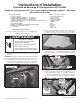
8. When reattaching the blower housing lint duct and its screws,
see Figure 11, verify the lower plastic lint duct clip is hooking
the lint duct correctly. See Figure 38.
figure 38
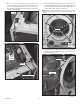
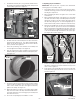
11. When re-hanging the front panel and door assembly onto
the two (2) tabs, Figure 8, verify the door switch connector
is also properly fed up and behind the upper front bracket.
Attach the three (3) upper screws, Figure 7. Connect the
door switch, Figure 4. Holding the front panel in position to
prevent bending it, open the dryer door and reattach two
(2) Phillip-head screws, Figure 5. Attach the four (4) lower
screws, Figure 6.
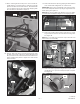
12. Take the front console and feed the two connectors through
the right hole in the upper front bracket. Set the two console
bottom corner posts into the front panel top slots and tip the
console toward back clicking its top lip over the top edge of
the upper front bracket. Reconnect the drum light and main
console connectors, Figure 4. Reattach the two (2) upper
screws, Figure 3.
13. Take the front edge of the top panel and set it into the plastic
tray of the upper front bracket, Figure 2. Set the remaining
top panel down and slide it forward into position. Reattach
the two (2) rear screws, Figure 1.
14. Reposition dryer to operating position.
15. Connect external exhaust vent to dryer.
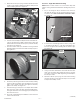
9. Reconnect the moisture sensor connector. See Figure 10.
10. Reinsert the lint screen. See Figure 9.
WARNING
16. Plug in dryer or reconnect power.
NOTE: For gas dryer application, connect flexible gas supply line
to rear of dryer. Turn on gas supply and check for leaks by brush-
ing or spraying approved non-corrosive leak detection solution
onto connection at rear of dryer. If any bubbles are present turn
off gas supply, tighten the leaking connection and retest for leaks.
17. Check to assure all components are attached securely in
place and lint screen has been installed to dryer.
18. Check that dryer is working properly.
© Whirlpool Corporation 2011
(All Rights Reserved)