
User Manual


5
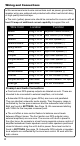
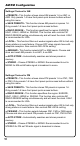
Installation Opening & Depths Mounting Bracket Details
3” / 76.2mm
Cut Out Diameter
3” / 76.2mm
4” / 100mm
Installation Depth incl. Wiring
Mounting Surface
U-Bracket
Mounting
Nuts
Break Off Marked
Joints for Exact Fit
Rear Mounting Instructions
● Check for appropriate mounting depth and mechanical or
electrical obstacles behind the mounting panel BEFORE any
cutting. Including the “U”-shaped aluminum mounting bracket, at
least 4” (100mm) depth is required.
● Using a 3” hole saw or air saw, cut a 3” (76.2mm) diameter
hole in the mounting panel. Use a le or sandpaper to smooth
out any rough edges after the cut is complete.
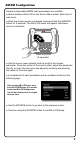
● Thread the two supplied bolts into the back of the multimedia
controller using a 9/32” nut driver or deep socket. The threaded
holes are located just above the wiring harness in the heatsink.
● Thread two of the supplied 9/32” mounting nuts upside down
on the bolts. The at surface of the nut will sit ush with the
inside of the mounting bracket to allow spacing (if needed).
● Insert the source unit through the mounting hole opening. Be
sure to allow enough depth for wiring to be securely tied up once
the installation is complete.
● Attach the aluminum mounting bracket to gauge the sizing and
that it will t over the supplied threaded bolts. If necessary, use
pliers to break away the marked sections until the bracket ts
snugly against the mounting panel. Be sure the bracket clears
the wiring on the back of the unit without rubbing or heavily
bending the wires.
● Attach the remaining supplied 9/32” mounting nuts on the
threaded bolts to secure the mounting bracket.