
User Manual


6
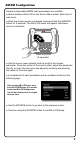
Front Mounting Instructions
● Check for appropriate mounting depth and mechanical or
electrical obstacles behind the mounting panel BEFORE any
cutting. At least 3.75” (95.25mm) depth is required.
● Using a 3” hole saw or air saw, cut a 3” (76.2mm) diameter
hole in the mounting panel. Use a le or sandpaper to smooth
out any rough edges after the cut is complete.
● Remove the snap-in covers on the front panel hiding the
mounting holes. Use a small at head screw driver in the two
small indents on each cover to gently pry open.
● Insert the source unit through the mounting hole opening. Be
sure to allow enough depth for wiring to be securely tied up once
the installation is complete. Ensure the source unit is level.
● Mark four (4) holes using an awl, straight pick tool or 1/16"
(1.5mm) drill bit to make the markings. DO NOT DRILL
THROUGH WITH THE SOURCE UNIT IN PLACE.
● Remove the source unit and gently drill the four (4) marked
locations for mounting holes using a drill with a 1/16" (1.5mm)
drill bit.
● Re-insert the source unit in the opening. Gently install the four
supplied screws in each of the mounting holes with a handheld
screwdriver. Do not use drills or battery-powered screw guns for
this step.
● Replace the snap-in covers on the source unit's front panel.
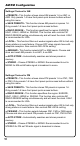
Installation Opening & Depths Front Mounting Details
3” / 76.2mm Cut Out Diameter
3” / 76.2mm
Mounting
Surface
3.75” / 95.25mm Installation Depth incl. Wiring
Mounting Surface
Mounting
Screws
Snap-In
Covers
Drill (4) 1/16” / 1.5mm Holes