Quick Start Installation Guide RA1-150.2 RA1-280.4 RA1-300.1 RA1-750.1 RA1-710.
Before you start CAUTION Many new and factory radios require a reset code when disconnected from battery power. This is an anti-theft feature. Before unplugging power, you must determine if your radio/source unit requires a reset code. Check the operation manual for your vehicle or contact the dealer. Congratulations on your choice of a MBQuart amplifier. This “Quick Start Installation” guide is meant to help you “hook up” and play music.
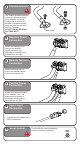
4 Chassis Ground The chassis ground connection is critical to the performance of the amplifier. Choose a location that is close to the amplifier. Completely scrape away the paint and use a nut and bolt if possible. DO NOT USE AN EXISTING FACTORY BOLT! 5 Negative Power Connection Attach the chassis ground cable to the amplifier negative terminal. It is important to make sure this connection is very tight.
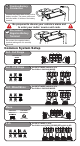
BRIDGED 10 Positive Battery BRIDGED Connection CH 4 OUTPUT ER SPEAKER RIGHT BRIDGED CH 2 R SPEAKER OUTPUT OUTPUT SPEAKER SPEAKER SPEAKER OUTPUT SPEAKER OUTPUT SPEAKER SPEAKER LEFT SPEAKER OUTPUT SPEAKER OUTPUT SPEAKER OUTPUT SPEAKER SPEAKER LEFT BRIDGED CH1/2 RIGHT FT R LEFT BRIDGED CH3/4 RIGHT OUTPUT 0Hz ER RIGHT BRIDGED CH1 OUTPUT SPEAKERBRIDGED OUTPUT LEFT CH3/4 RIGHT STEREO SPEAKER SPEAKER CH 5 CH 4 R CH 4 OUTPUT OUTPUT CH 2 R OUTPUT LEFT CH 5 LP 50Hz
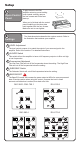
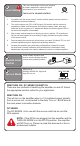
Setup To gain access to the RA1 amplifier series top mount setting control panel carefully remove the four screws and lift the face plate up. A Open Control Panel When you’re finished with the control panel mindfully put the face plate back together with the four screws. Make sure not to over tighten. B The illustrations below describe the various controls. Refer to the illustration that matches your amplifier.
C Level Setting This is a critical step to insure your amplifier is properly adjusted to match the signal output level of your source unit. THIS IS NOT A VOLUME CONTROL! R R R GAIN MIN LPF MAX 50Hz 1. INPUT If possible, with the source unit off, confirm that the primary volume control is FRONT REAR turned down (counter clockwise). 2. Turn L on the source unit (CD, or L MP3 player). Re-confirm that L the volume is turned down.
WARRANTY Maxxsonics USA Inc. warrants this product, to the original consumer purchaser, to be free from defects in material and workmanship for a period of one (1) year from the date of purchase. Maxxsonics USA Inc. will, at it’s discretion, repair or replace defective products during the warranty period. Components that prove to be defective in materials and workmanship under proper installation and use must be returned to the original authorized Maxxsonics USA Inc. retailer from where it was purchased.