
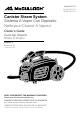
Use and Care Manual


8
|
ENGLISH
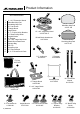
STEAM MOPPING ACCESSORIES
WARNING: Do not try to connect accessories while unit is emitting steam.
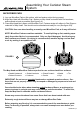
EXTENSION WANDS
1. Select one of the Extension Wands. Insert end (A) of Wand onto Steam Nozzle (B) with yellow
lock/release button slightly off center with hole. Fully insert and rotate wand slightly to allow
button to snap into hole.
2. Using the same instruction, attach remaining Extension Wand to the rst Wand. Both Exten-
sion Wands should now be connected to the Steam Nozzle.
MOP HEAD
1. Align Mop Head with open end of Extension Wand, so that hole in Mop Head aligns with yel-
low lock/release button on Wand.
2. Press down on yellow lock/release button. While continuing to hold button down, slide Mop
Head onto Extension Wand (See gure 1-A). Fully insert and rotate wand slightly until button
snaps through hole (See gure 1-B).
NOTE: Do not use excessive force when mopping or using Extension Wands as this
may cause the Wands to break.
BRISTLE BRUSH ATTACHMENT
1. Align Mop Head with Bristle Brush Attachment, so that the re-
lease tabs (A) on the Bristle Brush align with the sides of the Mop
Head (B).
2. Firmly press the Bristle Brush Attachment onto Mop Head until it
securely snaps into place.
Note: Do not use Bristle Brush Attachment with Microber or
Scrubbing Mop Pad.
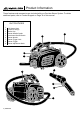
Assembling Your Canister Steam
System
B
C A
FIGURE 1
A
B