TM MODEL/MODELO: 1639630 ASSEMBLY INSTRUCTIONS INSTRUCCIONES DE ARMADO ATTENTION DO NOT RETURN TO THE STORE Contact MD Sports Customer Service * For additional resources and Frequently Ask Questions, please visit us at themdsports.com ATENCIÓN NO DEVOLVERLO A LA TIENDA Contacto MD Sports Servicio al Cliente * Por mayor información y Preguntas Frecuentes, favor visitarnos en themdsports.
Give Us Your Opinion and Receive A FREE FULL YEAR EXTENDED WARRANTY! Write a review for a recently purchased item on TheMDSports.com and receive an extended full year limited warranty, valued at $150.00. See TheMDSports.com for additional details.
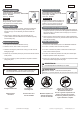
English Español LIMITED 90 DAYS WARRANTY GARANTÍA LIMITA DE 90 DIAS This product is covered by a limited warranty that is effective for 90 days from the date of purchase. If, during the limited warranty period, a part is found to be defective or broken, we will offer replacement parts at no cost to you, the customer. The only exceptions to the warranty include mainframes, table tops, playing surfaces, batteries or tools.
English Español Herramientas Necesarias TOOLS REQUIRED Phillips Screwdriver - Not Included Standard (Flat Head Screwdriver) - Not Included Wrench - Included Allen Key - Included CAUTION ! Destornillador Phillips - No incluido Destornillador de Cabeza Plana - No incluido Llave Inglesa - Incluida Llave Allen - Incluida Power Tools - Set Low Torque High Torque over tightened demasiado apretadas ¡PRECAUCI N! Los destornilladores eléctricos pueden ser de gran ayuda durante el ensamblado; sin embargo, po
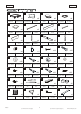
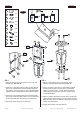
English Español 1639630 PARTS LIST / LISTA DE PARTES 1 2 3 x8 x1 Mainframe Unidad Principal 5 Leg Side Board Tablero Lateral de Pierna Shims Base de Pierna Side Top Board Delantal Final Inferior 13 Pegamento 5/16” Washer Arandela 5/16” Cerrojo 1/4”x1-1/2” T4x1/2” Screw Tornillo T4x1/2” 1/4”x1” Bolt T4x5/8” Screw Bola de Billar (Continued on the next page.
English Español 1639630 PRE-INSTALLED PARTS / PIEZAS PREINSTALADAS P1 P3 P2 x32 x2 Adjustable "L" Bracket Corchete “L” Regulable 1/4" Barrel Nut P4 x1 x32 Tuerca de Barril 1/4" 5/16" Barrel Nut Tuerca de Barril 5/16" Logo Plate Placa de logotipo ASSEMBLY INSTRUCTIONS: INSTRUCCIONES DE ENSAMBLAJE 1. Find a clean, level place to begin the assembly of your Billiard Table. The table will be assembled upside down and then turned over on its legs once the assembly is completed.
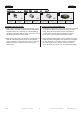
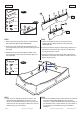
Español English 2 X8 4 X4 5 X4 12 X8 14 X1 20 X 32 23 X 32 24 X 32 31 X1 P2 X 32 FIG. 1 14 2 24 23 20 4 P2 12 2 P2 2 12 2 12 2 5 20 23 24 FIG.1 FIG.1 4. Attach one Leg Support (#12) to each Leg Side Boards (#2) using two Bolts (#23) and two Washers (#20) per Leg Support, and then attach two Leg Side Boards (#2) together using four Bolts (#23) and four Washers (#20). 4.
Español English 6 X2 7 X2 8 X2 9 X2 15 X 18 P3 X16 FIG. 2 15 6 P3 7 FIG. 2A 15 14 6 & 8 8 P3 9 FIG.2 FIG.2 7. Apply the Glue (#14) into the grooves of the Side and End Top Boards (#6 and #8). See FIG. 2A. 7. Aplicar el Pegamento (#14) en las ranuras de las Tablas Lateral y Tablero Superior Lateral (#6 y #8). Vea la FIG. 2A. 8. Reverse the Side Top Boards (#6) and attach to the Lower Side Aprons (#7) using six Screws (#15) per Side Top Board. 8.
Español English 16 X 16 17 X 16 P3 X16 FIG. 4A FIG. 4 17 16 P3 9 7 7 9 FIG.4 FIG.4 11. Adjunte las Piernas instalado (Vea la FIG. 1) a los Delantales Final y Lateral Inferior (#7 y #9) usando 4 Cerrojos (#16) y 4 Arandelas (#17) por Pierna. Vea la FIG. 4 y 4A. 11. Attach the assembled Legs (See FIG. 1) to the Lower Side and End Aprons (#7 and #9) using four Bolts (#16) and four Washers (#17) per Leg. See FIG. 4 and 4A. 11 X2 13 X4 18 X4 19 X4 20 X4 P1 X2 FIG.
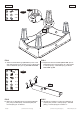
Español English 21 X 16 FIG. 6 13 7 11 P1 11 21 7 P1 11 FIG. 6A Notice: Adjust the playfield level. / Noticia:Ajuste el nivel del campo de juego. FIG.6 FIG.6 13. Lift the Lower Aprons/Legs assembly (See FIG. 4) from the floor with four strong adults, turn it over, and set the table on its legs in the location where you will play. 13. Levante los Delantales Inferior/Pierna montado (Vea la FIG. 4) desde el piso con cuatro adultos fuertes, Darle vuelta y colocar la mesa en sus patas donde Ud.
Español English 1 X1 20 X 20 22 X 20 25 X4 FIG. 7 1 8 1 8 6 9 20 22 FIG. 7A 1 P1 FIG. 7B 25 1 6 7 11 FIG.7 FIG.7 16. Attach the Adjustable "L" Brackets (P1) to the underside of the Mainframe (#1) using two Screws (#25) per Bracket. See FIG. 7B. 15. Pegar los Corchetes Regulable “L” (P1) a la parte inferior del Unidad Principal (#1) usando 2 Tornillos (#25) por Corchete. Vea la FIG. 7B. 15.
Español English 3 X9 P4 X1 FIG. 8 P4 P1 32 3 FIG. 8B FIG. 8A Note: Utilize shims (#3) if needed (as shown) to level the table. / Nota: Utlice shims (#3) si fuera necesario (como mostrado) para nivelar la mesa. 32 P1 FIG.8 FIG.8 16. Under the Mainframe (#1), adjust the "L" Brackets (P1) in order to level the playfield of the Mainframe. (#1). See FIG. 8A and 8B. 16.