
Use and Care Manual
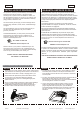
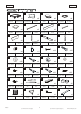
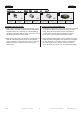
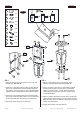
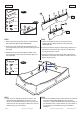


FIG.7
15. Place the Mainframe (#1) on the top of the
pre-assembled Lower Table (See FIG. 6 ). Attach the
underside of the Mainframe (#1) to the Side and End
Top Boards (#6 and #8) using twenty Bolts (#22) and
twenty Washers (#20). See FIG. 7 and 7A.
16. Attach the Adjustable "L" Brackets (P1) to the
underside of the Mainframe (#1) using two Screws
(#25) per Bracket. See FIG. 7B.
FIG.7
15. Coloque el Unidad Principal (#1) sobre la parte superior
de la Mesa Inferior pre-montada (Vea la FIG. 6).
Pegar el Armazón Principal (#1) patas arriba as Las
Tableras Lateral y Final Superior (#6 y #8) usando 20
Cerrojos (#22) y 20 Arandelas (#20). Vea la FIG. 7 y 7A.
15. Pegar los Corchetes Regulable “L” (P1) a la parte
inferior del Unidad Principal (#1) usando 2 Tornillos
(#25) por Corchete. Vea la FIG. 7B.
www.themdsports.com
1639630
9
(Continúe en la siguiente página.)
(Continued on the next page.)
Español
English
1
X 1
20
X 20
22
X 20
25
X 4
1
11
7
6
8
9
25
P1
1
FIG. 7A
FIG. 7B
1
1
8
6
22
20
Go back and make sure that all connections are tight. Vuelva y asegúrese que todas las conexiones están apretadas.
FIG. 7