
Use and Care Manual


www.themdsports.com
1639630
6
(Continúe en la siguiente página.)
(Continued on the next page.)
Español
English
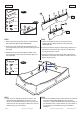
FIG.2
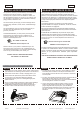
7. Apply the Glue (#14) into the grooves of the Side and
End Top Boards (#6 and #8). See FIG. 2A.
8. Reverse the Side Top Boards (#6) and attach to the
Lower Side Aprons (#7) using six Screws (#15) per Side
Top Board.
9. Reverse the End Top Boards (#8) and attach to the
Lower End Aprons (#9) using three Screws (#15) per
End Top Board.
FIG.2
7. Aplicar el Pegamento (#14) en las ranuras de las
Tablas Lateral y Tablero Superior Lateral (#6 y #8).
Vea la FIG. 2A.
8. Invierta los Tableros Superior Lateral (#6) y adjunte a los
Delantales Lateral Inferior (#7) usando 6 Tornillos (#15)
por Tablero Superior Lateral.
9. Invierta los Tableros Superior Final (#8) y adjunte a los
Delantales Final Inferior (#9) usando 3 Tornillos (#15) por
Tablero Superior Final.
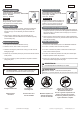
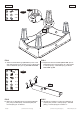
FIG.3
10. Align the Lower Side and End Aprons with the Top
Boards assembly
(See FIG. 2)
as shown in FIG. 3.
Attach the Corner Braces (#10) to the Lower Side and
End Aprons (#7 and #9) using four Bolts (#16) and four
Washers (#17) per Corner Brace.
FIG.3
10. Alinee los Delantales Final y Lateral Inferior con Tableros
Superior instalado (Vea la FIG. 2) como mostrado
en la FIG. 3. Adjunte las Abrazaderas de Rincón (#10) a
los Delantales Final y Lateral Inferior (#7 y #9) usando 4
Cerrojos (#16) y 4 Arandelas (#17) por Abrazadera
de Rincón.
FIG. 3
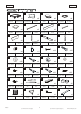
10
16
17
X 4
X 16
X 16
32
X 1
FIG. 2
6
7
8
9
X 2
X 2
X 2
X 2
15
X 18
P3
X16
14
6 8
15
8
9
&
15
6
7
FIG. 2A
P3
P3
16
17
9
9
7
7
10