
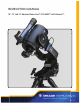
User's Manual

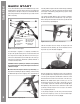


the dust cap from the rear cell port (A) of the telescope (Note:
Telescope not shown for clarity). Thread the microfocuser adapter
(B) into the rear cell port thread. Slide the microfocuser (C) over
the microfocuser adapter and tighten the three hex screws on the
microfocuser (K) using the provided hex keys.
1.25" Diagonal Prism Users: If using the 1.25"
diagonal prism (G), slide the 1.25" adapter (D)
into the microfocuser. Line up the thumbscrew
into the groove in the microfocuser. Slide the
1.25" diagonal prism into the adapter (D). Tighten
the adapter thumbscrew (H) to a fi rm feel only.
Tighten the microfocuser thumbscrews (I) to a
fi r m f e e l o n l y .
2.0" Diagonal Mirror Users: If using the optional
2.0" diagonal mirror, slide the mirror directly into
the microfocuser (C). Tighten the microfocuser
thumbscrews (I) to a fi rm feel only.
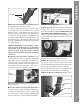
H Attach the StarLock assembly. Loosen the two retaining
bolts on the StarLock dovetail bracket with the provided hex key.
Slide the StarLock unit fully into the saddle plate. Tighten the
retaining bolts to a fi rm feel only.
AutoStar #497 HANDBOX
Quick Start
8
I Attach the StarLock cable. The StarLock cable has a
small connector on one end and a larger connector on the other
end. Plug the smaller connector into the“StarLock Telescope
Connection” port on the StarLock unit and the larger connector
into the “StarLock” port located on the fork arm.
J Connect the two (2) jumper cables that bridge the OTA
and the telescope base. These jumpers are non-directional
and identical on each fork arm. Secure the connectors to the
receptacle by tightening the knobs on both sides of the plug.
Finger tight, do not over tighten.
1) Remove the dust covers from the ends of the telescope tube
and the narrow and wide angle tubes of the StarLock.
1! Mount and align the viewfi nder. To assemble and align the
viewfi nder perform the following during the daytime:
1. Assemble the viewfi nder by attaching all included
thumbscrews onto the viewfi nder bracket and
insert the 8X50 viewfi nder into the bracket.
Tighten the thumbscrews to a fi rm feel only so
the 8x50 optical tube is roughly centered in the
middle of the bracket.
2 . Slide the viewfi nder bracket into its mounting
assembly on the OTA. To secure the viewfi nder
to the mounting assembly, tighten the two
thumbscrews to a fi rm feel only. Remove the
viewfi nder dust cover.
3. Loosen the RA and DEC clutches. Point the
telescope at some well-defi ned and stationary
land object at least 200 yards distant, such as
Figure I. Attaching the optional microfocuser.
훽훾훿
OR
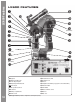
Retaining bolts
R
Re
Dovetail bracket
Fork arm jumper
Fork arm jumper
cable — other
end is obscured