Instruction Manual LX65 Series Telescopes with AudioStar
WARNING! Never use an unfiltered telescope to look at the Sun! Looking at or near the Sun will cause instant and irreversible damage to your eye. Eye damage is often painless, so there is no warning to the observer that damage has occurred until it is too late. Do not point the telescope at or near the Sun. Do not look through the telescope or Red Dot Finder as it is moving. Children should always have adult supervision while observing.
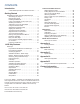
CONTENTS Introduction A solid telescope built for a lifetime of service . . . . 4 Getting Started Assembling the and Using the LX65 Telescope Assembling the Tripod . . . . . . . . . . . . . . . . . . . . . . . 5 Mounting the Tripod . . . . . . . . . . . . . . . . . . . . . . . . . 6 Installing the Batteries . . . . . . . . . . . . . . . . . . . . . . . 6 Using an AC Adapter or DC Power Cord . . . . . . . . . 6 Attaching Accessories . . . . . . . . . . . . . . . . . . . . . . .
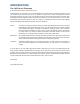
INTRODUCTION The LX65 Series Telescope A solid telescope built for a lifetime of service Congratulations on receiving your new LX65 telescope. You’ll find that this telescope system has all you need to explore the Universe we live in. Meade’s concept was to create a telescope that would be simple enough for anyone to use, yet capable enough for the experienced amateur to stretch their knowledge and skills.
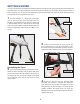
GETTING STARTED You may want to perform the telescope assembly indoors in the light so that you become familiar with the parts and operation before moving the telescope outside into the dark for observing. This Getting Started Guide provides a brief overview so you can use your new telescope as quickly as possible. Just follow the simple steps below and you will be up and running before you know it. 1 Set the telescope in a large open area where you can see lots of sky.
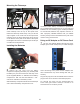
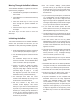
Mounting the Telescope Center Hub Follow the battery polarity (orientation) as indicated by icons CAUTION: Follow battery manufacturer’s precautions. Do not install batteries backwards or mix new and used batteries. Do not mix battery types. If these precautions are not followed, batteries may explode, catch fire, or leak. Improperly installed batteries void your Meade warranty. Always remove the batteries if they will not be used for a long period of time.
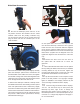
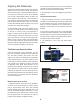
Attaching Accessories Rear Cell Thread Dust Cap Eyepiece Holder Diagonal Prism 8 Be sure the telescope power switch is in the off position. Remove the handbox and the coiled interface cable from the packing materials. Plug one end into the HBX port of the control panel and plug the other end into the Handbox port on the LX65 handbox. Altitude Clutch Knob Dovetail Locking Knob On the optical tube, remove the dust cap from the rear cell of the telescope. Thread the 1.
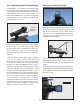
Adjusting the Red Dot Finder Your Telescope is Now Fully Assembled Congratulations, your LX65 is now assembled and you are nearly ready to begin observing! Please follow the next steps to align your telescope so you can start locating objects in the night sky with the push of a button using AudioStar. One you become familiar with the following alignment procedures, your overall setup time will be just a few minutes.
Aligning the Telescope As the Earth rotates beneath the night sky, the stars appear to move from East to West. The speed at which the stars move is called the sidereal rate. You can setup your telescope to move at the sidereal rate so that it automatically tracks the stars and other objects in the night sky. If the telescope is not tracking an astronomical object, the object will drift out of the eyepiece field of view.
Moving Through AudioStar’s Menus Note: The location settings (country/state/ province and city, or zip code) are only asked for the first time you turn on the control panel. If you wish to change this setting later on, use the Site menu. The AudioStar database is organized in levels for quick and easy navigation. • Press ENTER to go deeper into AudioStar’s menu levels. a. If you chose the zip code option, the left most “0” is highlighted. Use the Number keys to enter the digits.
The alignment star should be easily recognized and be the brightest star in the area of the sky where the telescope is pointing. While looking through the red dot finder, use the Arrow Keys to move the telescope to place the red dot on the top of the star. Now look through the eyepiece and use the Arrow Keys to move the star to the center of the eyepiece field. Press ENTER.
Go To Saturn Using the Guided Tour After performing the Easy Alignment procedure, the motor drive begins operating and the telescope is aligned for a night of viewing. Objects in the eyepiece should maintain their position even though the Earth is rotating beneath the stars. This example demonstrates using “Tonight’s Best” Guided Tour. 1. After observing Saturn, press mode twice so that “Select Item: Object” displays again. 2. Press the Scroll Down key twice. “Select Item: Guided Tour” displays.
LX65 KEY FEATURES 1 Diagonal Holder 9 2 Diagonal Mirror 3 Visual Back Thumbscrew 10 Dovetail Saddle for Optional Second Optical Tube 4 Visual Back 11 AudioStar Handbox 5 Eyepiece 12 Optical Tube Assembly 6 Focus Knob 13 Battery Compartment 7 Red Dot Finder 14 Dust Cover (not visible) 8 Computer Control Panel 15 Handbox Storage Cradle 13 Single Fork Arm Mount
LX65 Dovetail Saddle for Optional Second Optical Tube *NOTE ON USING THE VERTICAL ADJUSTMENT KNOBS: Always rotate adjustment knobs in the same direction, at the same time, and with the same magnitude. Computer Control Panel A. Always take caution when making the vertical adjustment and to support the OTA as needed. Only small adjustment should be needed. B. C. D. E. A. Handbox (HBX) Port B. ON/OFF Switch with LED C. Auxiliary (AUX) Port D. 12V DC Power Input Port E.
1 2 Diagonal Holder: Holds the eyepiece in place. 3 Visual Back Thumbscrew: Tighten screw to securely hold diagonal mirror, eyepiece, or accessories in place. 4 Visual Back: Insert the diagonal mirror here and tighten with adjacent thumbscrew to securely hold in place. 11 AudioStar Handbox: Plugs into the HBX port. Provides computerized control for the LX65 including a comprehensive celestial object database, audio tours, and several other telescope functions.
Choosing Eyepieces A telescope’s eyepiece magnifies the image formed by the telescope’s main optics. Each eyepiece has a focal length, expressed in millimeters, or “mm.” The smaller the focal length, the higher the magnification. For example, an eyepiece with a focal length of 9mm has a higher magnification than an eyepiece with a focal length of 26mm. Experienced users know that higher powers are, in general, not as useful as lower powers.
The AudioStar Handbox 1 12 13 2 14 3 4 1. 2-Line LCD Display 5 2. ENTER Key 6 3. MODE Key 11 7 10 8 9 4. “GO TO” Key 5. Arrow Keys 6. Number Keys 7. Scroll Keys Tour the Cosmos with Just the Push of a Button Automatically move the telescope to any of over 30,000 objects stored in the database or manually enter the astronomical coordinates of any celestial object. • Take a guided tour of the best celestial objects to view on any given night of the year.
•The AudioStar Computer Controller provides control of virtually every telescope function within a compact handbox. AudioStar has soft-touch keys designed to have a positive feel. The LCD (Liquid Crystal Display) is backlit with a red LED (Light Emitting Diode) for easy viewing in the dark. The backlit display, key arrangement, and sequential database make AudioStar extremely user friendly. 1 2-Line LCD Display: Provides an interface between AudioStar and the telescope.
Nine available speeds are: Number Key “1” = 1x (Guide) Number Key “2” = 2x Number Key “3” = 8x Number Key “4” = 16x Number Key “5” = 64x Number Key “6” = 0.50°/sec Number Key “7” = 1.0°/sec Number Key “8” = 1.5°/sec Number Key “9” = 4.0°/sec (Max) Speeds “1”,“2”, or “3” Best used for fine centering of an object in the field of view of a higher power eyepiece, such as a 12mm or a 9mm eyepiece.
Observing Using AudioStar’s Arrow Keys You may observe land and astronomical objects using AudioStar’s Arrow keys to move the telescope (Refer to the AudioStar Hand Box overview on page 17 to become familiar with the key pads and their functions on the AudioStar). 1. Verify the telescope is fully assembled and that AudioStar is properly connected to your telescope. See Getting Started on pages 5-12. the audio is playing, the volume can be adjusted by pressing the 7 (volume down) or 9 (volume up) keys.
AudioStar Operation Important Note: No matter how many levels into AudioStar are traveled, each press of the MODE key moves up a level, until the top level, “Select Item”, is reached. Once in the Select Item level, press MODE to return to the topmost level, “Select Item: Object”. AudioStar Navigation Exercise To demonstrate how the AudioStar menu structure works, the following exercise calculates Sunset time so an evening observing session can be planned. To Calculate Sunset time: 1.
Entering Data into AudioStar • To enter numbers and text: a) Use the Number keys, or b) Use the Arrow keys to scroll through numbers 0 - 9 and the alphabet. The Down Arrow key begins with the letter “A”; the Up Arrow key begins with digit “9”. • To move the cursor across the display: Use the Right or Left Arrow key to move the cursor from one number to the next in the display • Press ENTER when the desired information has been entered.
AudioStar MENU TREE 23
Important Note: When an object is selected, pressing “ENTER” will synchronize the telescope’s coordinates with the object. This is most useful when syncing on bright stars to achieve better pointing in the vicinity of the star. User Objects allows the user to define and store in memory deep-sky objects of specific interest that are not currently in the LX65 database.
Min. (Minimum) of Algol is the minimum brightness of the dramatic eclipsing binary star system, Algol. It is relatively close at a distance of 100 light years. Every 2.8 days during a 10 hour period, Algol undergoes a major change in apparent magnitude as one of the two stars passes behind the other. The combined magnitude of the two stars thus dips from +2.1 to a minimum of +3.4 halfway through the eclipse as the second star is hidden. LX65 calculates minimum magnitude time at mid-eclipse.
AudioStar and the telescope without forgetting its alignment. With “Sleep Scope” selected, press ENTER to activate the Sleep function. AudioStar goes dark, but the internal clock keeps running. Press any key, except ENTER, to re-activate AudioStar and the telescope. Setting the correct time is critical for AudioStar to properly calculate locations and events. Always make sure the time is correct in AudioStar before beginning.
• Tracking Rate: Changes the speed at which the telescope tracks targets in the sky. a. Sidereal: The default setting for AudioStar; sidereal rate is the standard rate at which stars move from East to West across the sky due to the rotation of the Earth. b. Lunar: Choose this option to properly track the Moon over long observing sessions. c. Custom: Allows entry of user-defined tracking rates. • Reverse L/R reverses the functions of the Left and Right Arrow keys (i.e.
Left Arrow keys to move through the text. Press ENTER when the entry is complete. • Address: Use the Up and Down Arrow keys to enter your street address, city, state, and zip code. Press ENTER when the entry is complete. Download transfers information from another AudioStar during cloning (see below). During the operation, the warning “Downloading Do Not Turn Off” appears. Note: The Download function requires the optional #505 Astrofinder Software and Cable Connector Kit.
Advanced AudioStar Features Adding Observing Sites the list (as opposed to using the “Custom” feature) makes it easier to edit, as the “Time Zone” value may not need to be changed. If you plan to observe using AudioStar at different geographic locations, you can store up to six observation sites in AudioStar’s memory to help simplify your telescope setup. Perform these procedures using the Site options (Add, Select, Delete, Edit) of the Setup menu. 2. Scroll to “Site: Edit” and press ENTER.
Using AudioStar to Find Objects Not in the Database In this procedure, you will enter coordinates of celestial objects that do not appear in any of the AudioStar database lists. You will enter the object’s name and R.A. and Dec. coordinates (required information). You may also enter the object’s magnitude and size (optional information). Although AudioStar contains an extensive database of celestial objects (stars, nebulae, planets, etc.
4. “Calculating...” and then “Tracking...” displays. If the satellite is going to make a pass, “Located” displays. 5. Use the Scroll keys to display data about the pass: aos—acquisition of signal and los—loss of signal. If you subtract the aos from the los, you can calculate how long the satellite will be visible. Location information also displays. 6. “Alarm” displays after the location information.
Comment Line Information in the Tour program that is not displayed, such as authorship, revision history, copyrights, etc. All comments begin with a “/” character in column 1 of the line. For example: / Extreme Object / (c) 2018 Meade Instruments Corporation Command Line Description String: Description of an object. Must be surrounded by quotation marks. If the description is longer than one line, each line must end with a quotation mark and a hard return.
NGC xxxx example: SATELLITE: “Intl Space Stn” Enter NGC followed by the desired New General Catalog number and AudioStar provides the user with a description of the object from its database. For example: NGC 4256 ASTEROID “name” IC xxxx Enter IC followed by the desired Index Catalog number and AudioStar provides the user with a description of the object from its database.
STAR “name” AUTO SLEW ON / AUTO SLEW OFF Enter STAR followed by the name of the desired star in quotes. For example: STAR “Vega” With AUTO SLEW ON enabled in the tour, AudioStar automatically slews the telescope to objects first before displaying the text description. This feature is useful when designing tours in which observing certain objects is required. For example, an astronomy professor may require his students to observe six objects, four of which AudioStar automatically slews to in a tour.
To Add a landmark to the database: To Select a landmark from the database: In this procedure, you will store the location of terrestrial landmarks in AudioStar’s memory. 1. Make sure the telescope is located and aligned exactly as when the desired landmark was entered into memory. 1. Set the telescope in the home position, if necessary. Note for future reference where the telescope is located and if you have aligned the telescope, which alignment method is used. 2.
Identify Advanced Alt/Az Alignment This procedure allows you to use AudioStar to identify objects you have found in the night sky using the Arrow keys. If the object is not in AudioStar’s database, AudioStar displays information about an object in its database that is closest to the one you queried about. If you would rather choose your own alignment stars from the AudioStar database during the Alt/Az alignment procedure, AudioStar offers two methods described below.
when the correct location displays. d. The next screen asks for the city (listed alphabetically) closest to the observing site. Use the Scroll keys to scroll through the list of cities. Press ENTER when the correct city appears on screen. 5. Daylight Savings Time: The next screen requests the status of Daylight Savings Time. If Daylight Savings Time is active, press the 1 key. If Daylight Savings Time is not active, press the 2 key.
One-Star Alt/Az Alignment One-Star Alignment requires some knowledge of the night sky. AudioStar provides a database of bright stars. One-Star Alignment is identical to Two-Star Alt/Az: Alignment (see “Two-Star ALT/AZ Alignment,” above), except only one star from this database is chosen by the observer for alignment.
MAINTENANCE The LX65 is a precision optical instrument designed to yield a lifetime of rewarding viewing. Given the care and respect due any precision instrument, the LX65 will rarely, if ever, require factory servicing. Maintenance guidelines include: 1. Avoid cleaning the telescope’s optics: a little dust on the front surface of the telescope’s correcting lens causes virtually no degradation of image quality and should not be considered reason to clean the lens. 2.
the opposite direction and bring the image back to the center of the field. Collimating the ACF Optical System 1. The only adjustments possible, or necessary, on the ACF are from the three inner most screws located at the inner surface of the secondary mirror housing. 5. If the screw you are turning becomes very loose, tighten the other two screws by even amounts. If the screw you are turning gets too tight, un-thread the other two by even amounts.
most of the turbulent layers of sky seen closer to the horizon. Allow the telescope to adjust to the temperature of your observation site before proceeding; temperature differences between the optics and the outside air can cause distortion in the images. 2. Center the star with the 26mm eyepiece, then switch to the 9mm eyepiece. We recommend aligning the Go-To on the LX65 so that you can keep the star centered during this process and easily recenter the star as needed with the AudioStar handbox.
APPENDIX A: Verify that AUDIOSTAR INITIALIZATION is complete. 1 TRAINING THE DRIVE 2 Press MODE until Select Item is displayed. Select Item Object Perform this procedure if you are experiencing any pointing accuracy problems. The diagram to the right depicts the complete Drive Training procedure. 3 Press the scroll up key once. NOTE: Use a far away terrestrial object, such as a telephone pole or lamp post, to train the drive. Select Item Setup Complete this exercise once every 3 to 6 months.
APPENDIX B: BASIC ASTRONOMY In the early 17th century Italian Scientist Galileo, using a crude telescope considerably smaller than the LX65 Series, turned it to look towards the sky instead of distant trees and mountains. What he saw, and what he realized about what he saw, forever changed the way mankind thought of the universe.
moons can also be seen as a bright, star-like object near the planet. Planets change positions in the sky as they orbit around the Sun. To locate the planets on a given day or month, consult a monthly astronomy magazine, such as Sky and Telescope or Astronomy. You can also consult LX65 for information about planets. Scroll to the “Object: Solar System” menu and scroll through the lists of planets. When a planet you are interested in displays, press “ENTER”.
APPENDIX C: SPECIFICATIONS Model and Product Number LX65 with 5” Maksutov-Cassegrain #228001 Optical System Optical Design Maksutov-Cassegrain Primary Mirror Diameter 5” (127mm) Primary Mirror Material Borosilicate Glass Focal Length, Focal Ratio 1900mm, f/15 Optical Coatings Ultra-High Transmission Coatings (UHTC™) Resolving Power (arc seconds) 0.91 Limiting Visual Stellar Magnitude 12.5 Viewfinder Red Dot Mount Mount Type Aluminum Single-Arm Fork Altazimuth Drives 4.
APPENDIX C: SPECIFICATIONS Model and Product Number LX65 with 6” Maksutov-Cassegrain #228002 Optical System Optical Design Maksutov-Cassegrain Primary Mirror Diameter 6” (152mm) Primary Mirror Material Borosilicate Glass Focal Length, Focal Ratio 1800mm, f/12 Optical Coatings Ultra-High Transmission Coatings (UHTC™) Resolving Power (arc seconds) 0.76 Limiting Visual Stellar Magnitude 12.9 Viewfinder Red Dot Mount Mount Type Aluminum Single-Arm Fork Altazimuth Drives 4.
APPENDIX C: SPECIFICATIONS Model and Product Number LX65 with 6” ACF #228003 Optical System Optical Design Advanced Coma-Free Primary Mirror Diameter 6” (152mm) Primary Mirror Material Borosilicate Glass Focal Length, Focal Ratio 1524mm, f/10 Optical Coatings Ultra-High Transmission Coatings (UHTC™) Resolving Power (arc seconds) 0.76 Limiting Visual Stellar Magnitude 12.9 Viewfinder Red Dot Mount Mount Type Aluminum Single-Arm Fork Altazimuth Drives 4.
APPENDIX C: SPECIFICATIONS Model and Product Number LX65 with 8” ACF #228004 Optical System Optical Design Advanced Coma-Free Primary Mirror Diameter 8” (203mm) Primary Mirror Material Borosilicate Glass Focal Length, Focal Ratio 2032mm, f/10 Optical Coatings Ultra-High Transmission Coatings (UHTC™) Resolving Power (arc seconds) 0.57 Limiting Visual Stellar Magnitude 13.5 Viewfinder Red Dot Mount Mount Type Aluminum Single-Arm Fork Altazimuth Drives 4.
APPENDIX D: LX65 OPTICAL SYSTEMS (2) (1) (1) (2) Ray (2) Ray (1) (2) (1) Focal Plane Secondary Mirror Secondary Baffle Primary Baffle Tube Field Stops Correcting Plate Primary Mirror The Meade Advanced Coma-Free Optical System Unlike Schmidt-Cassegrain systems, Meade’s Advanced Coma-Free (ACF) optical system provides razor-sharp pin-point star images all the way to the very edge of the field of view.
APPENDIX E: Using the LX65 with Two Optical Tubes 3. Check that the Dovetail Locking Knob is still secure after the vertical alignment adjustment and retighten if necessary. 4. Slightly loosen the Horizontal Lock Knobs. 5. Turn the Horizontal Adjustment Knob as needed so that the target is centered in the eyepiece of both optical tubes. 6. Retighten the Horizontal Lock Knobs. Check that both optical tubes are secure with both Dovetail Locking Knobs securely tightened.
RECYCLING INFORMATION (EU Countries only) Correct Disposal of this Product (Waste Electrical & Electronic Equipment) This marking shown on the product or its literature indicates that it must not be disposed of in unsorted municipal waste at the end of its working life To prevent possible harm to the environment or human health from uncontrolled waste disposal, please separate this from other types of wastes and recycle it as required by law.
We appreciate your business. Keep in touch! Let’s get social: @meadeinstruments @meadeinstruments @meadeinstrument Share your photos with us: #MeadeMoments Social@meade.com For special offers and other products, visit our website www.meade.com August 2018 REV 1 14-2713-00 27 Hubble, Irvine, California 92618 (800) 626-3233 www.meade.